In the modern world, there are many various IP video surveillance cameras, which are very different: from those that operate in the DVR mode to those that can conduct online broadcasts in real or near real time. Such broadcasts can be posted on the website to attract customers, and this can be useful not only for bloggers and companies working in the field close to IT. Developers offer virtual tours in the houses under construction, beauty salons show the real-time working process, car dealerships can conduct virtual test drives and presentations, etc. Thus, they show the ‘face’ of the product and this can improve demand dramatically.
An IP camera is a mini computer with extremely limited resources of the processor, RAM and network card. Thus, you cannot broadcast live using only resources of the camera. The camera can simply freeze when there are a lot of users. Therefore, to organize real-time broadcasting on your website, you need a relay server. The re-streaming server, even with modest technical features, has better performance and will allow you to organize broadcasting from multiple cameras for a large number of end users.
Popular social platforms YouTube and Facebook are a good choice if you want to increase interaction with your customers using live broadcasts. They can receive video streams via RTMP (RTMPS), and YouTube videos can be easily integrated into your website. You need only to transmit the stream from the IP camera.

As you might know, many IP cameras transmit a video stream via RTSP. RTSP is a real-time streaming protocol. Browsers do not support working with RTSP directly, so you need an intermediate link that allows converting the video stream so it can be played by the browser. YouTube and Facebook also do not support an RTSP stream.
If you have only one IP camera for live broadcasting, you can use a desktop program to capture the RTSP video stream and re-stream it via RTMP.

The task is a little more complicated if you need to introduce an online streaming service from several IP cameras at the same time. Desktop applications often either cannot work with more than one camera, or require a significant increase in processor power, or have licensing restrictions on the number of cameras and viewers. In this case, the server solution will be very useful, which allows you not only to capture the video stream from the IP camera and transmit it to YouTube and Facebook, but also to monitor the status of the streams, centrally start and stop broadcasts and manage the camera stack. You can write your own scripts for the server to automate many of the tasks of live broadcasts.
Web Call Server 5.2 (hereinafter WCS) may be such a solution.
WCS receives an RTSP video stream from a surveillance camera and relays it in a format that the browser understands.
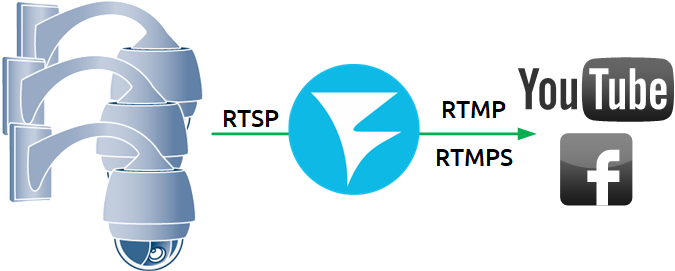
One of the advantages of a WCS-based solution, in addition to re-streaming RTSP to RTMP (RTMPS), is the ability to control using REST API.
For example, by using a query
/rtsp/startup
– you can capture a video stream from an IP camera.
A query
/rtsp/find_all
– allows you to get a list of streams captured by the RTSP server.
A query to end the RTSP session is as follows:
/rtsp/terminate
You can control capture and relay of video streams either by using a simple browser and any convenient REST client, or by using the minimum number of code lines to embed the server management functionality in your web project.
Let’s take a closer look at how this can be done.
A small manual on how to organize a live broadcast on YouTube and Facebook using a minimum code
For the server side, we use demo.flashphoner.com. To quickly deploy your WCS server, use this instruction or run one of the virtual instances on Amazon, DigitalOcean or in Docker.
It is assumed that you have a verified YouTube account and you have already created a broadcast in YouTube Studio, as well as a live video broadcast in your Facebook account.
For live broadcasts to work on YouTube and Facebook, you need to specify the following lines in the WCS settings file flashphoner.properties:
rtmp_transponder_stream_name_prefix=
– removes all prefixes for the relayed stream.
rtmp_transponder_full_url=true
– With “true”, ignores “streamName” and uses the RTMP address to relay the stream in the form in which the user specified it.
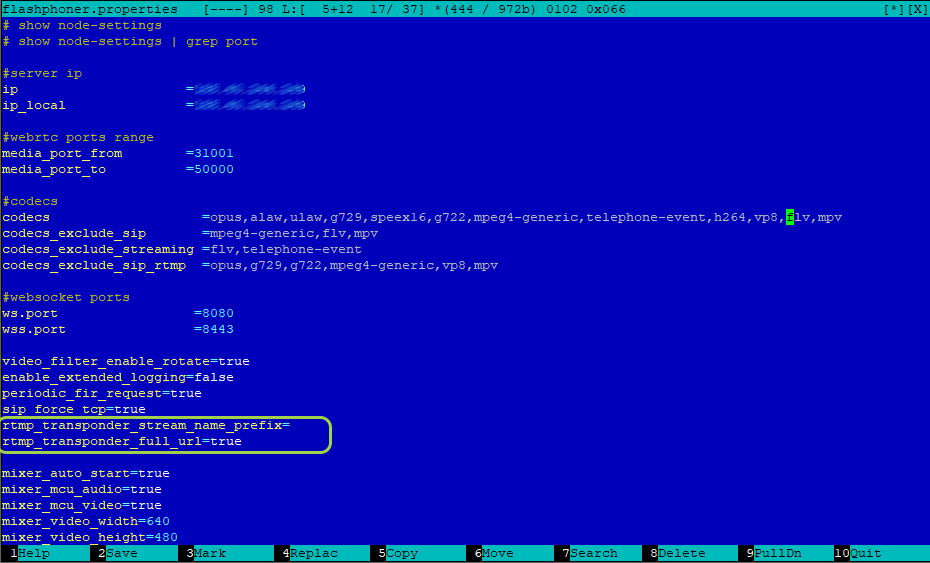
Now that all the preparatory steps have been completed, let’s move on to programming. Place the minimum necessary elements in the HTML file
1. Connect the scripts of the main API and JS for the live broadcast, which we will create a little later:
<script type="text/javascript" src="../../../../flashphoner.js"></script>
<script type="text/javascript" src="rtsp-to-rtmp-min.js"></script>
2. Initialize API to load the web page:
<body onload="init_page()">
3. Add the necessary elements and buttons – fields for entering unique stream codes for YouTube and Facebook, a button for publishing the RTSP stream, a div element for displaying the current status of the program, and a button for stopping the publication:
<input id="streamKeyYT" type="text" placeholder="YouTube Stream key"/>
<input id="streamKeyFB" type="text" placeholder="FaceBook Stream key"/>
<button id="repubBtn">Start republish</button>
<div id="republishStatus"></div>
<br>
<button id="stopBtn">Stop republish</button>
Then move on to creating JS for RTSP republication. The script is a mini REST client.
1. Create constants.
Constant “url” to write an address for queries REST API . Replace “demo.flashphoner.com” with your WCS address.
Constant “rtspStream” — specify the RTSP address of the stream from the IP camera. As an example, we use an RTSP stream from a virtual camera.
var url = "https://demo.flashphoner.com:8444/rest-api";
var rtspStream = "rtsp://wowzaec2demo.streamlock.net/vod/mp4:BigBuckBunny_115k.mov"
2. The function “init_page()” initializes the main API when a web page is loaded. Also in this function, we assign the buttons to the called functions and call the “getStream” function, which captures the RTSP video stream from the IP camera:
   function init_page() {
       Flashphoner.init({});
   	repubBtn.onclick = streamToYouTube;
   	stopBtn.onclick = stopStream;
   	getStream();
   }
3. The function “getStream()” sends to WCS REST a query “/rtsp/startup” to capture the RTSP video stream whose address was written to the constant “rtspStream”
   function getStream() {
       fetchUrl = url + "/rtsp/startup";
       const options = {
           method: "POST",
           headers: {
               "Content-Type": "application/json"
           },
           body: JSON.stringify({
               "uri": rtspStream
           }),
       }
       fetch(fetchUrl, options);
   	console.log("Stream Captured");
   }
4. The function “streamToYouTube()” republishes the captured video stream to the live broadcast on YouTube:
   function streamToYouTube() {
   	fetchUrl = url + "/push/startup";
   	const options = {
           method: "POST",
           headers: {
               "Content-Type": "application/json"
           },
           body: JSON.stringify({
               "streamName": rtspStream,
   			"rtmpUrl": "rtmp://a.rtmp.youtube.com/live2/"+document.getElementById("streamKeyYT").value
           }),
       }
       fetch(fetchUrl, options);
   	streamToFB()
   }
This function sends to WCS REST a call “/push/startup” with the following values in the parameters:
- “streamName” – name of the stream captured from the IP camera. The stream name corresponds to its RTSP address written to the constant “rtspStream”;
- “rtmpUrl” – server URL + unique stream code. This data is given when creating a live broadcast in YouTube Studio. In our example, we rigidly fixed the URL in the code, you can add another field for it to your web page. The unique stream code is indicated in the field “streamKeyYT” on our web page.
5. The function “streamToFB” republishes the captured video stream to the live broadcast on Facebook:
   function streamToFB() {
   	fetchUrl = url + "/push/startup";
   	const options = {
           method: "POST",
           headers: {
               "Content-Type": "application/json"
           },
           body: JSON.stringify({
               "streamName": rtspStream,
   			"rtmpUrl": "rtmps://live-api-s.facebook.com:443/rtmp/"+document.getElementById("streamKeyFB").value
           }),
       }
       fetch(fetchUrl, options);
   	document.getElementById("republishStatus").textContent = "Stream republished";
   }
This function also sends to WCS REST a call “/push/startup” with the following values in the parameters:
- “streamName” – name of the stream captured from the IP camera. The stream name corresponds to its RTSP address written to the constant “rtspStream”;
- “rtmpUrl” – server URL + unique stream code. This data can be found on the Facebook Live Stream page in the Live API section. The server URL in this function is specified in the code, as well as for the publishing function on YouTube. For this time, take a unique stream code from the field “streamKeyFB” on the web page.
6. The function “stopStream()” sends to RTSP a query “/rtsp/terminate” which stops capturing the stream from the IP camera to WCS and accordingly stops publishing on YouTube and Facebook:
   function stopStream() {
   	fetchUrl = url + "/rtsp/terminate";
       const options = {
           method: "POST",
           headers: {
               "Content-Type": "application/json"
           },
           body: JSON.stringify({
               "uri": document.getElementById("rtspLink").value
           }),
       }
       fetch(fetchUrl, options);
   	document.getElementById("captureStatus").textContent = null;
   	document.getElementById("republishStatus").textContent = null;
   	document.getElementById("stopStatus").textContent = "Stream stopped";
   }
Full HTML and JS file codes will be discussed below.
So. Save the files and try to run.
Procedure for testing
1. Create a live stream in YouTube Studio. Copy the unique video stream code:
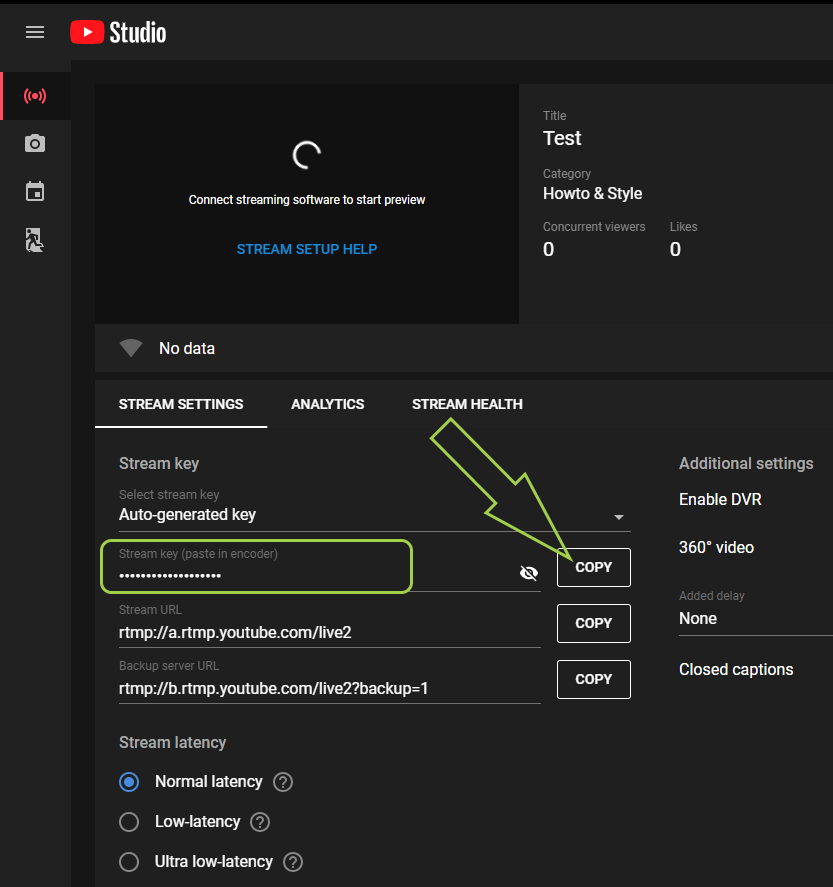
2. Open the previously created HTML page. In the first field, enter the unique video stream code copied to YouTube:

3. Create a live stream in your account on Facebook. Copy the unique video stream code.
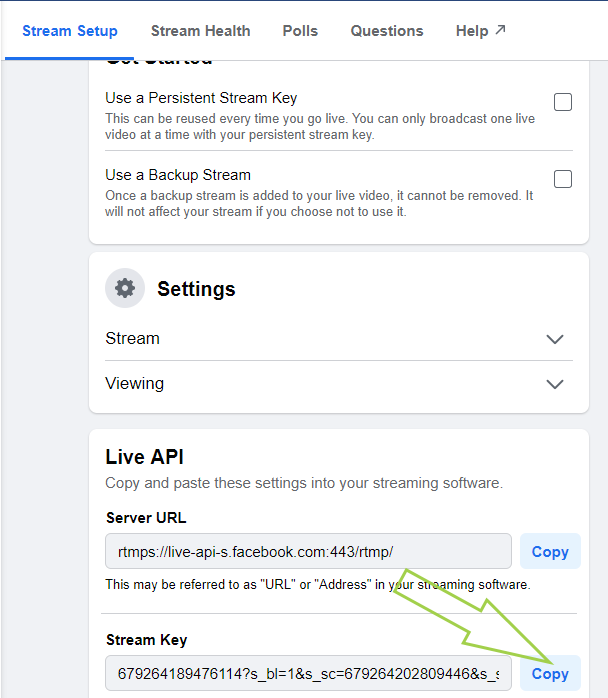
4. Go back to our web page, paste the copied code into the second field and click “Start republish

5. Now check our republication. Again, go to YouTube Studio and Facebook, wait a few seconds and get a stream preview.
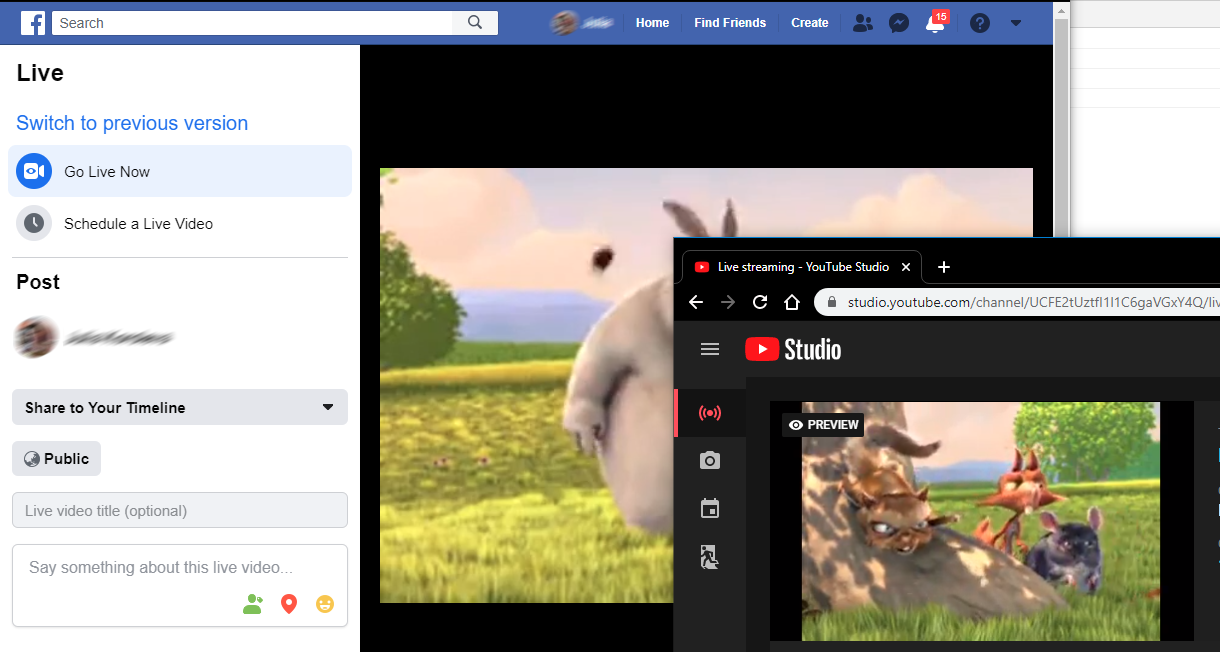
6. To stop republication, click “Stop”

Now, as we promised, full source codes of the example.
Listing of the HTML file “rtsp-to-rtmp-min.html”
<!DOCTYPE html>
<html lang="en">
<head>
    <script type="text/javascript" src="../../../../flashphoner.js"></script>
    <script type="text/javascript" src="rtsp-to-rtmp-min.js"></script>
</head>

<body onload="init_page()">
	<input id="streamKeyYT" type="text" placeholder="YouTube Stream key"/>
	<input id="streamKeyFB" type="text" placeholder="Facebook Stream key"/>
	<button id="repubBtn">Start republish</button>
	<div id="republishStatus"></div>
	<br>
	<button id="stopBtn">Stop republish</button>

</body>
</html>
Listing of the JS file “rtsp-to-rtmp-min.js”:
var url = "https://demo.flashphoner.com:8444/rest-api";
var rtspStream = "rtsp://wowzaec2demo.streamlock.net/vod/mp4:BigBuckBunny_115k.mov"

function init_page() {
    Flashphoner.init({});
	repubBtn.onclick = streamToYouTube;
	stopBtn.onclick = stopStream;
	getStream();
}

function getStream() {
    fetchUrl = url + "/rtsp/startup";
    const options = {
        method: "POST",
        headers: {
            "Content-Type": "application/json"
        },
        body: JSON.stringify({
            "uri": rtspStream
        }),
    }
    fetch(fetchUrl, options);
	console.log("Stream Captured");
}

function streamToYouTube() {
	fetchUrl = url + "/push/startup";
	const options = {
        method: "POST",
        headers: {
            "Content-Type": "application/json"
        },
        body: JSON.stringify({
            "streamName": rtspStream,
			"rtmpUrl": "rtmp://a.rtmp.youtube.com/live2/"+document.getElementById("streamKeyYT").value
        }),
    }
    fetch(fetchUrl, options);
	streamToFB()
}

function streamToFB() {
	fetchUrl = url + "/push/startup";
	const options = {
        method: "POST",
        headers: {
            "Content-Type": "application/json"
        },
        body: JSON.stringify({
            "streamName": rtspStream,
			"rtmpUrl": "rtmps://live-api-s.facebook.com:443/rtmp/"+document.getElementById("streamKeyFB").value
        }),
    }
    fetch(fetchUrl, options);
	document.getElementById("republishStatus").textContent = "Stream republished";
}

function stopStream() {
	fetchUrl = url + "/rtsp/terminate";
    const options = {
        method: "POST",
        headers: {
            "Content-Type": "application/json"
        },
        body: JSON.stringify({
            "uri": rtspStream
        }),
    }
    fetch(fetchUrl, options);
	document.getElementById("republishStatus").textContent = "Stream stopped";
}
Just a little code is required for the minimum implementation. Of course, for the final implementation of features, some adjustments are still needed – adding styles to a web page and various checks for data validity to the JS code. But it really works.
Have a great streaming!


