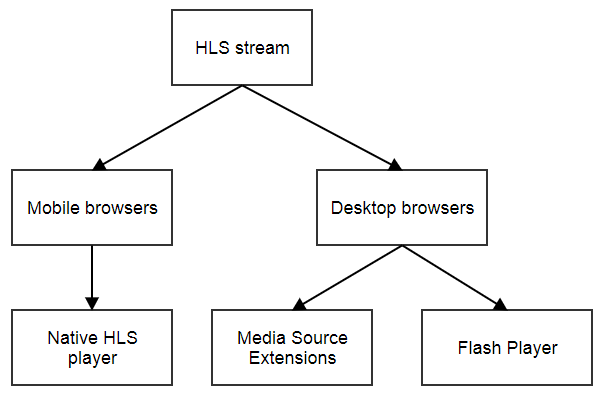
We all know how to embed a usual player for video (VOD – video on demand) to the page. Typically, this is an HLS player that loads the content piece by piece via HTTP and plays those fragments using the native HLS engine. The native HLS player is peculiar for mobile browsers in iOS and Android platforms. On desktop browsers, HLS players work via Media Source Extensions or using Flash Player.
In this article we will show how to embed a WebRTC player to play live streams from web cameras and IP cameras.
And here is a short FAQ off the bat:
– What is a WebRTC player?
This is a web-player to play live streams and broadcasts with low latency that has the WebRTC technology under the hood.
– How is a WebRTC player better than a usual player?
It can play video with low latency, as low as 500 ms.
– What streams does a WebRTC player play?
The player can play streams from webcams, RTSP streams from IP cameras and RTMP streams.
– What if WebRTC is not supported by a browser?
In this case another technology supported by this browser is used.
Embedding
We decided to make embedding as simple as possible and match two key principles of development:
- Keep It Simple, Stupid
- Don’t Make Me Think
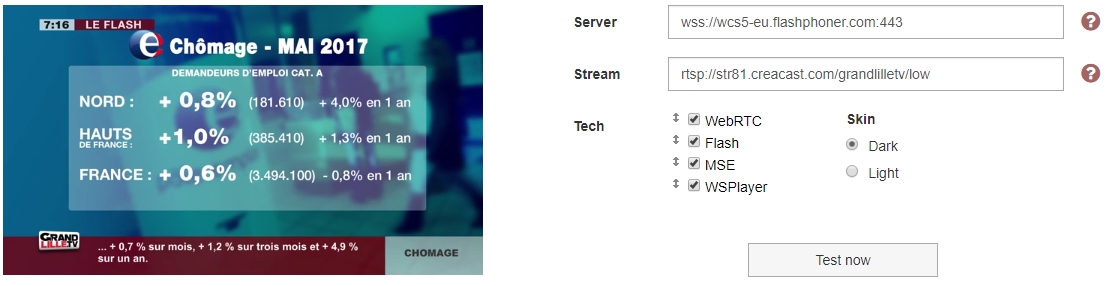
As a result, the interface of the embedding page looks like shown below, and the demo page with the embedded player can be found here.
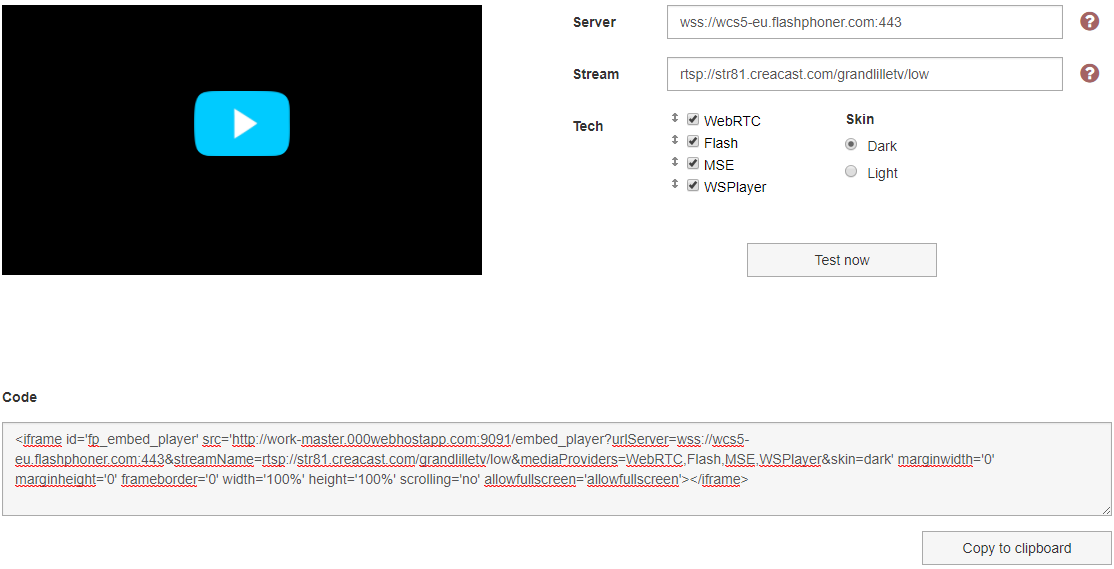
Hence, we simply click the Copy To Clipboard button, and the code of the player is ready to be embedded to your website as iframe:
To run the stream, you should specify its name or the RTSP address to the streamName field.
Like this:
After that, you can test the stream using the Test Now button or immediately paste the code to the page.
So, we made sure the player is working. Now, we can paste its code to a web page. As a result, the page looks like this:
Therefore, the player can be placed anywhere with arbitrary sizes. Embedding is done.
Additional parameters
The iframe src attribute passes the URL of the page that contains the player. This URL can accept parameters that the player will use.
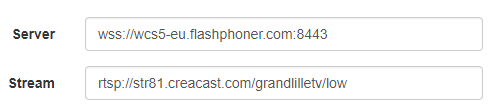
1. urlServer
This is the address of the streaming server that adapts streams for the player.
urlServer=wss://wcs5-eu.flashphoner.com:443
2. streamName
This is the name of the stream or its RTSP address.
streamName=12345
Or RTSP:
streamName=rtsp://192.168.1.55/live.sdp
3. mediaProviders
This is a list of playback technologies listed by priority.
For instance, if you are going to use WebRTC only, pass it as:
mediaProviders=WebRTC
If you want automatic switch to other technologies, add them to the query with the priority descending from left to right:
mediaProviders=WebRTC,MSE,Flash
4. skin
The player can have a skin. For now, there are two: black and white.
skin=dark
5. autoplay
Pass this parameter to make the player start playback automatically after the load.
autoplay=true
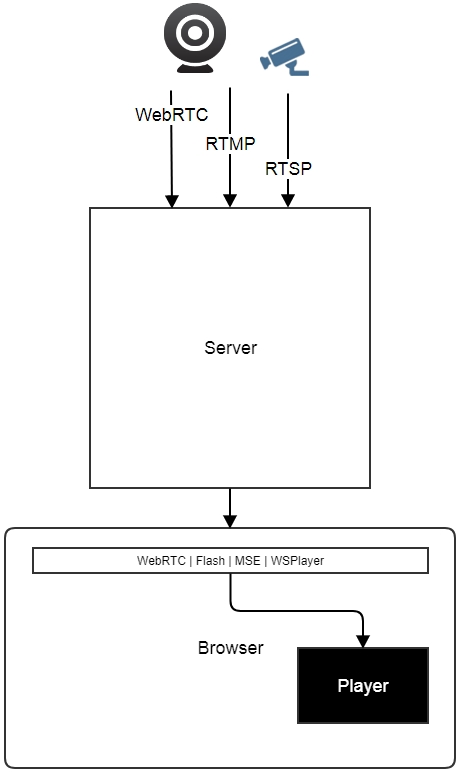
Server
The server-side is responsible for adapting streams. The goal of the server is to take a stream and correctly transmit it to the player using one of the following technologies: WebRTC, Flash, Media Source Extensions, WSPlayer.
Custom player
To customize the player, you have the JavaScript API that allows for total control over the player and envelop it to virtually any design.
The API is a part of the Web SDK for WCS and it works with
Example:
Let’s create an element, myPlayer, and assign such a size to it to make it visible:
Then, to play the video we invoke the following API code:
session.createStream({name:"stream44",display:document.getElementById("myPlayer")}).play()
Here, we pass the name of the stream, stream44, and the div element, myPlayer. This results in the video playing in the specified div.
As you can see, using the API is also pretty simple. However, to make this code work, we need to import the necessary API scripts and establish connection to the server.
var session =Flashphoner.createSession({urlServer:"wss://wcs5-eu.flashphoner.com:443"}).play()
After that, we can add playback controls (stop/play) and volume control.
Conclusion
In this article we have demonstrated how an embedding page of a WebRTC player looks, and what technologies are available if WebRTC is not supported by the browser. We described the embedding code, what parameters can be set for the embedded player and how to customize it using JavaScript API.
References
Embed Player – an example embedding page of a WebRTC player.
Source – the source code of the embedding page.
Player – the embedded player.
Source – the source code of the embedded player.
Web Call Server – a server that adapts streams for a WebRTC player.