Reportedly, today there are hundreds of millions of installed video surveillance IP cameras. Surely, not all of them require low latency video playback. Video surveillance is typically static – the stream records to the storage and is analyzed to detect motion. There are plenty of software and hardware video surveillance solutions that do their job pretty well.
In this article we will introduce a slightly different usage of an IP camera, namely – online broadcasting in applications where low latency communication is required.
First of all, let’s deal with common misunderstanding of terminology when it comes to webcams and IP cameras.
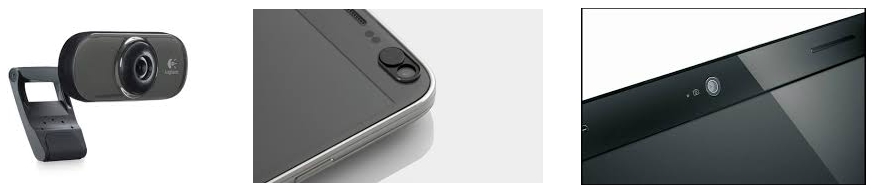
Webcam is a video capturing device that does not have its own CPU and network interface. A web camera needs to be connected to a computer, a smartphone or any other device to use its network capabilities and CPU.
IP camera is a standalone device with its own network interface and a CPU to compress captured video and send it to the network. Therefore, an IP camera is a standalone mini-computer that can connect to the network and does not need any other devices for that. That is, it broadcasts directly to the Internet.
Low latency is a rare requirement to IP cameras and online broadcasts. The need for low latency connections arises when the source of a video signal interacts with viewers of this stream.

Low latency is often a requirement in various gaming usage scenarios. For example: real time video auction, live dealer video casinos, interactive online TV shows with an anchorman, remote quadcopter control and so on.

Live-casino dealer at work.
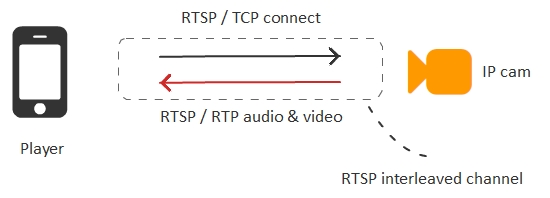
A typical RTSP IP camera usually compresses video to the H.264 codec and can work in two transport modes: interleaved and non-interleaved.
The interleaved mode is more popular and convenient, because in this mode video data are sent via the TCP protocol encapsulated inside the network connection to the camera. To broadcast a stream, from the IP camera in the interleaved mode you only need to open or redirect one RTSP port of the camera (for instance, 554). Then, a player simply connects to the camera via TCP and fetches the video stream already encapsulated to this connection.
The second mode of operation of a camera is non-interleaved. In this case, a connection is established via RTSP / TCP, and the traffic goes independently via the RTP / UDP protocol outside of the created TCP channel.
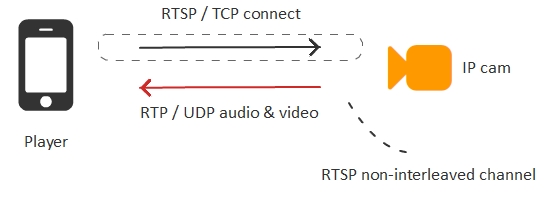
The non-interleaved mode is more suitable for low latency video broadcasting, because it uses the RTP / UDP protocol, but at the same time it causes more problems if the player is behind NAT.
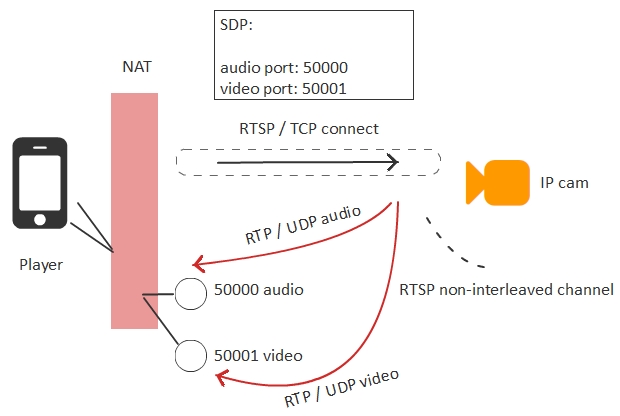
When a player behind NAT connects to the IP camera, the player needs to know external IP addresses and ports it can use to receive audio and video traffic. These ports are specified in the text SDP config file passed to the camera when the RTSP connection is established. If NAT is correct and IP addresses and ports are identified correctly, everything will work just fine.
So to fetch a video from the camera with minimum latency we need to use the non-interleave mode and receive video traffic via the UDP protocol.
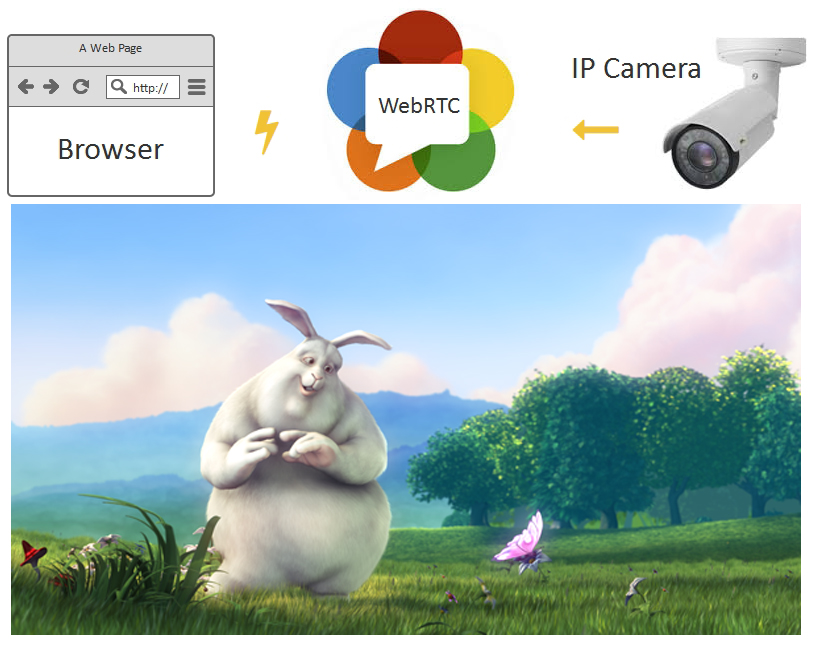
Browsers do not support the stack of RTSP / UDP protocols directly, but they do support the stack of protocols of the embedded WebRTC technology.
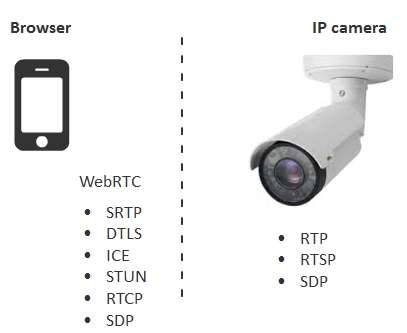
Technologies of browsers and cameras are very similar. In particular, SRTP is encrypted RTP. But to correctly broadcast video directly to browsers, an IP camera would require partial support for the WebRTC stack.
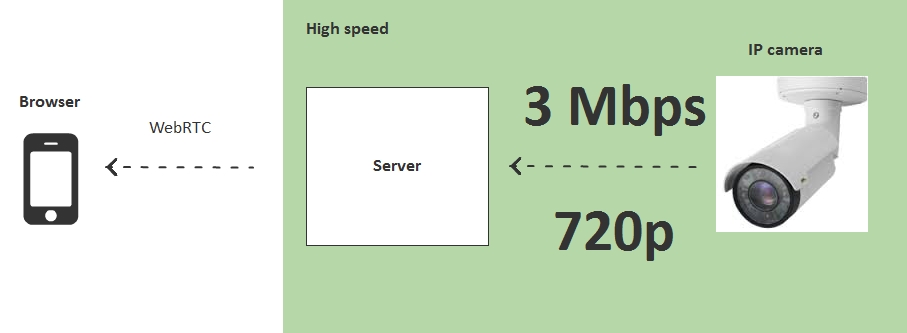
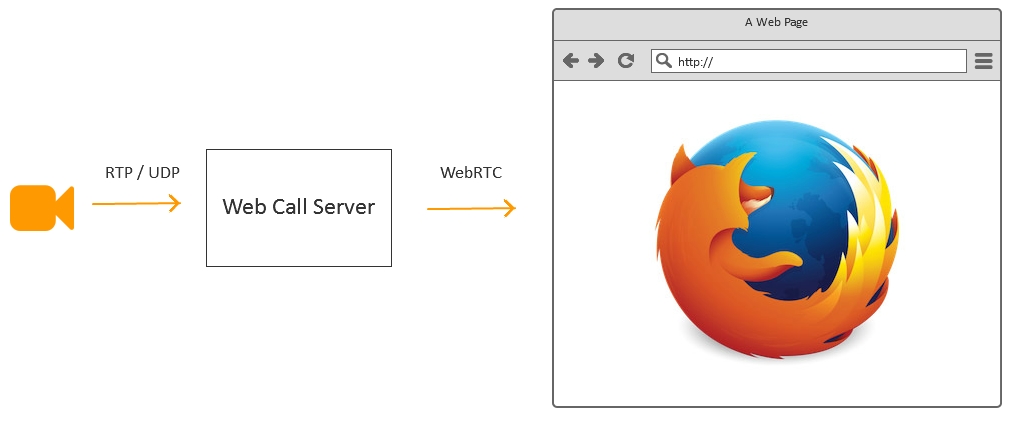
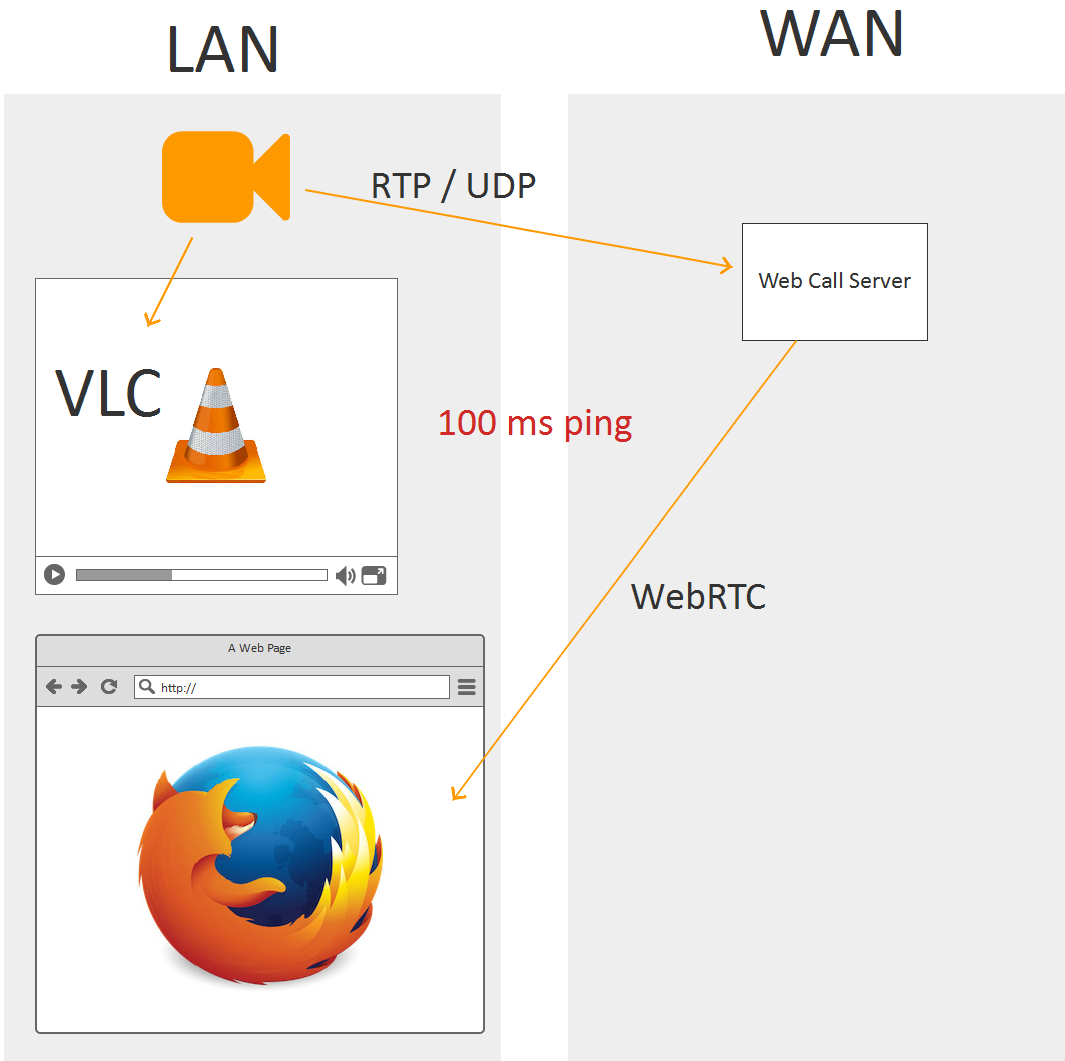
To eliminate this incompatibility we need an intermediate rebroadcasting server that will bridge the gap between protocols of the IP camera and browsers.
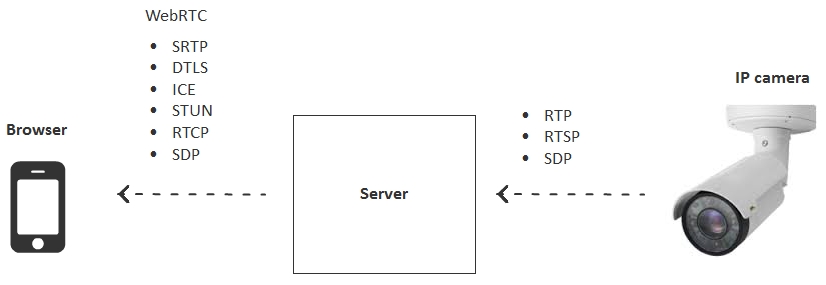
The server takes the stream from the IP camera via RTP / UDP and shares it to all connected browsers via WebRTC.
The WebRTC technology works via the UDP protocol and therefore allows low latency transmission in the Server > Browser direction. The IP camera also works via RTP / UDP and delivers low latency transmission in the Camera > Server direction.
The camera can handle only a limited number of streams due to its limited resources and bandwidth. Using a proxy allows to scale up broadcasting from the IP camera to a large number of viewers.
On the other side, when using the server we have two communication bridges:
- between viewers and the server;
- between the server and the camera.
Such topology has its own advantages and caveats. Let’s take a closer look at them.
Caveat #1 – Codecs
Codecs are one of obstacles that may result in reduced performance and jeopardized low latency operation.
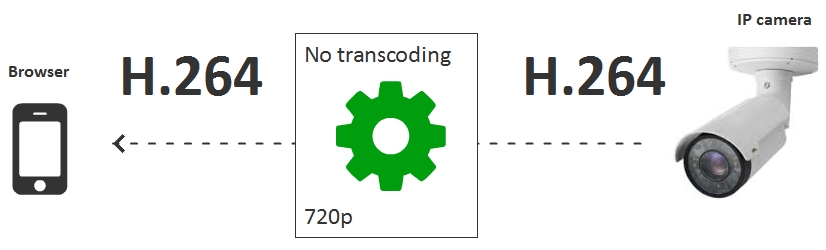
For instance, the camera sends an H.264 video stream in 720p, while the viewer is the Chrome browser on the Android device with VP8 support only.
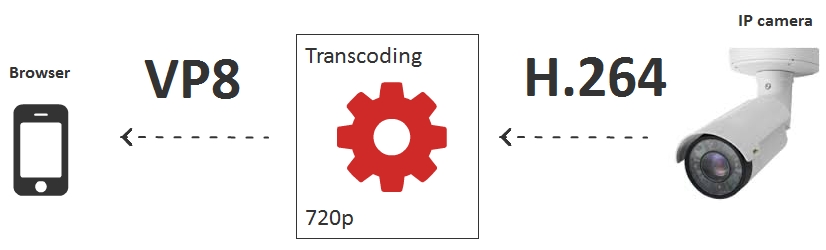
If transcoding is enabled, each connected IP camera require a transcoding session that decodes H.264 and encodes it to VP8. In this case, a 16-core 2-CPU server can handle just 10-15 IP cameras, approximately one camera per core.
That is why transcoding should be avoided if capabilities of a server do not allow to transcode signal from the required number of cameras. For instance, we can serve only H.264 compatible browsers and suggest to install a native application for iOS or Android that provides support for the H.264 codec.
As an option to bypass transcoding in a mobile browser we can also use HLS. But streaming via HTTP does not feature low latency capabilities and currently cannot be used for interactive broadcasts.
Caveat #2 – Bitrate of the camera and lost packets
The UDP protocol help fighting latency, but allows lost packets. Therefore, in spite of low latency, serious losses between the camera and the server may result in a damaged picture.
To prevent lost packets, make sure the stream generated by the camera has bitrate that fits the dedicated band between the camera and the server.
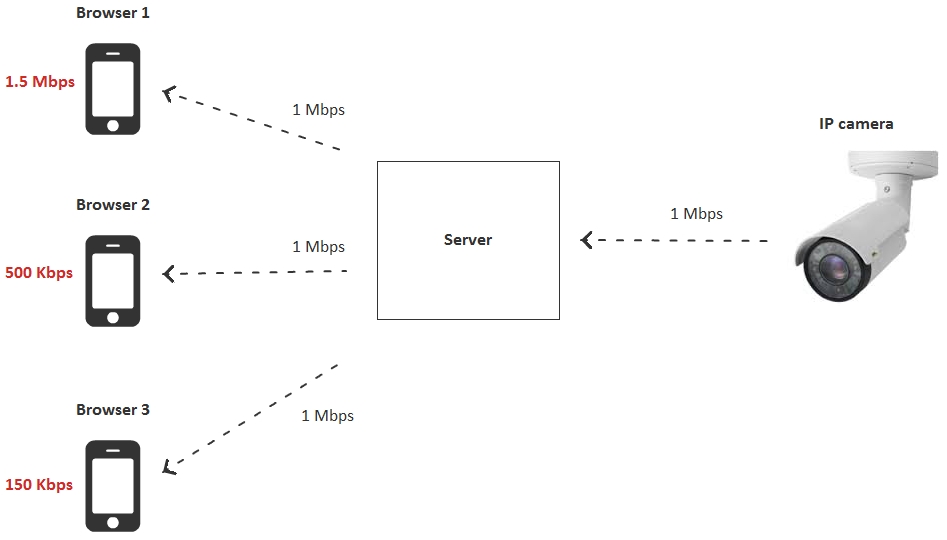
Caveat #3 – Bitrate of viewers and losses
Each viewer connected to the broadcast has its own download bandwidth.
If the IP camera sends a stream that exceeds resources of the viewer (for example, the camera sends 1 Mbps, and the viewer can only receive 500 Kbps), the channel will experience significant losses and as a result – many freezes and artifacts in the video.
In this case we have three options:
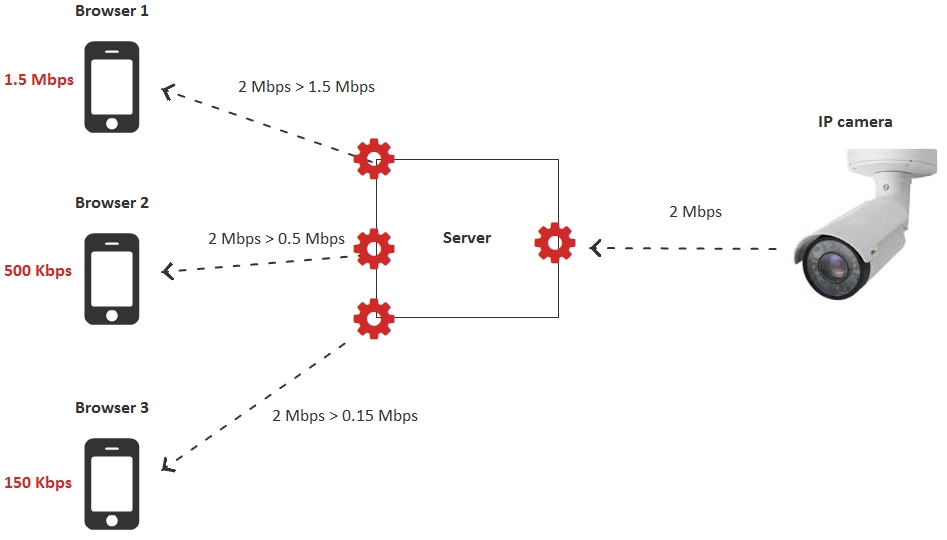
- Transcode the video stream individually for each viewer for the requested bitrate.
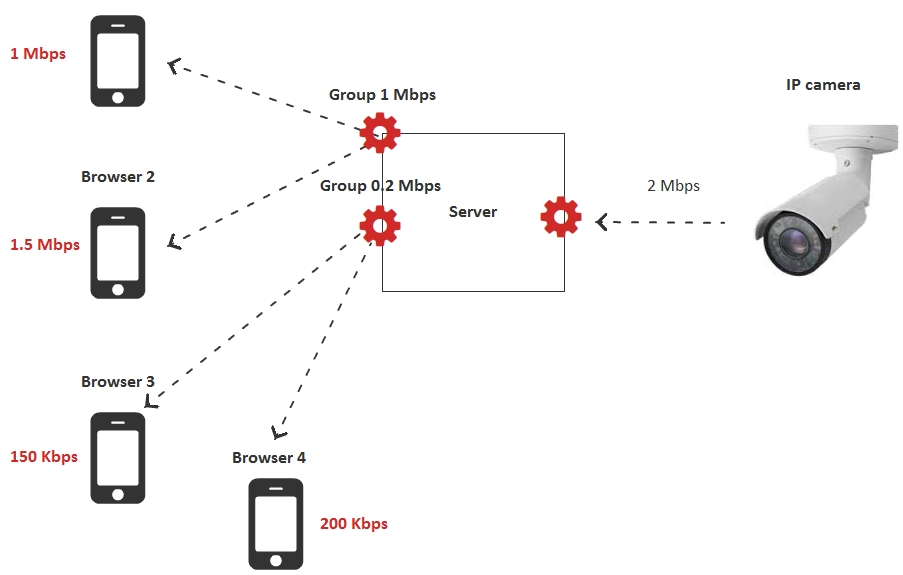
- Transcode streams for groups of viewers, not individually.
- Preliminarily prepare streams from the camera in multiple resolutions and bitrates.
The first option with transcoding may not suit some viewers, because CPU resources will deplete after 10-15 of connected viewers. It is worth mentioning though that it is this option that results in maximum flexibility with maximum CPU usage. This is ideal when you broadcast streams to about 10 people geographically apart, each one receiving dynamic bitrate and low latency.
The second option reduces CPU load by enabling transcoding groups. The server creates several groups by bitrate, for example:
- 200 Kbps
- 1 Mbps
If a viewer lacks the required bandwidth, it automatically switches to the group where it can comfortably receive the video stream. Therefore, the number of transcoding sessions is not equal to the number of viewers like this is in the first option, but is fixed. For instance, 2 if there are two transcoding groups.
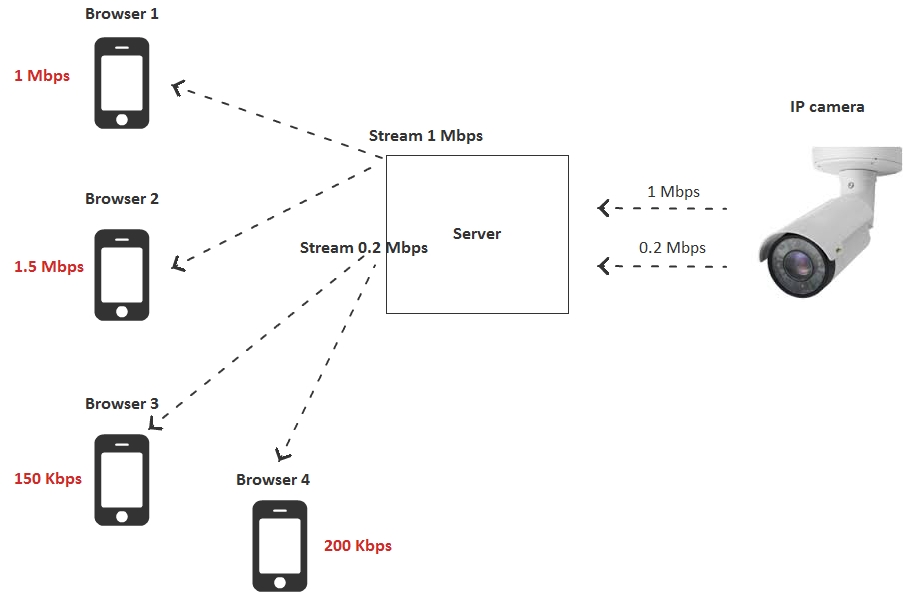
The third option suggests total refusal from transcoding on the server side and usage of preliminarily prepared video streams with varying resolutions and bitrates. In this case the camera is configured to send two or three streams with different resolutions and bitrates, and viewers switch to a particular stream depending on their bandwidths.
In this case, the burden of transcoding shifts from the server to the camera, because the camera has to encode two or more streams instead of just one.
So, we have reviewed all three options to match the broadcast to viewers’ bandwidth. Assuming one transcoding session takes one core of the server, we get the following CPU load comparison table:
| Adjustment option | Number of cores on the server | |
| 1 | Transcode the video stream for each user for the requested bitrate | N – number of viewers |
| 2 | Transcode video streams for groups of users | G – number of user groups |
| 3 | Preliminarily prepare streams from the camera in multiple resolutions and bitrates | 0 |
The table makes it evident that we can delegate transcoding either to the camera or to the server. Options 2 and 3 looks optimal.
Testing RTSP as WebRTC
Now, let’s conduct some tests to see what is really going on in the above scenarios. We took an IP camera and tested it to measure broadcasting latency.
For the test we took an aged IP camera D-link DCS-2103 with the support for RTSP and H.264 and G.711 codecs.
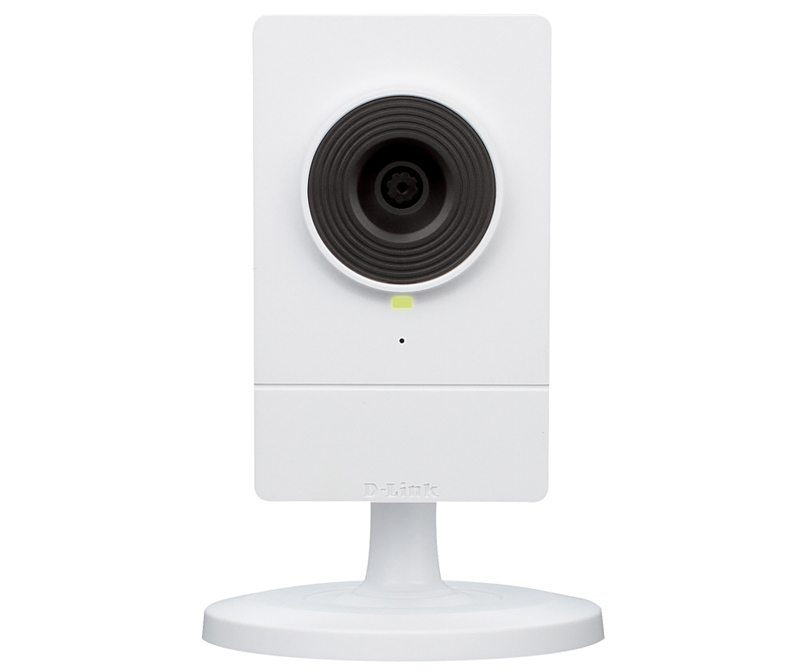
The camera waited for action in a closet for a long time, so we had to Reset it by pressing and holding the button on the backside of the camera for 10 seconds.
As soon as the camera connected to the network, the green light lit and the router detected one more device in the network with the IP 192.168.1.37.
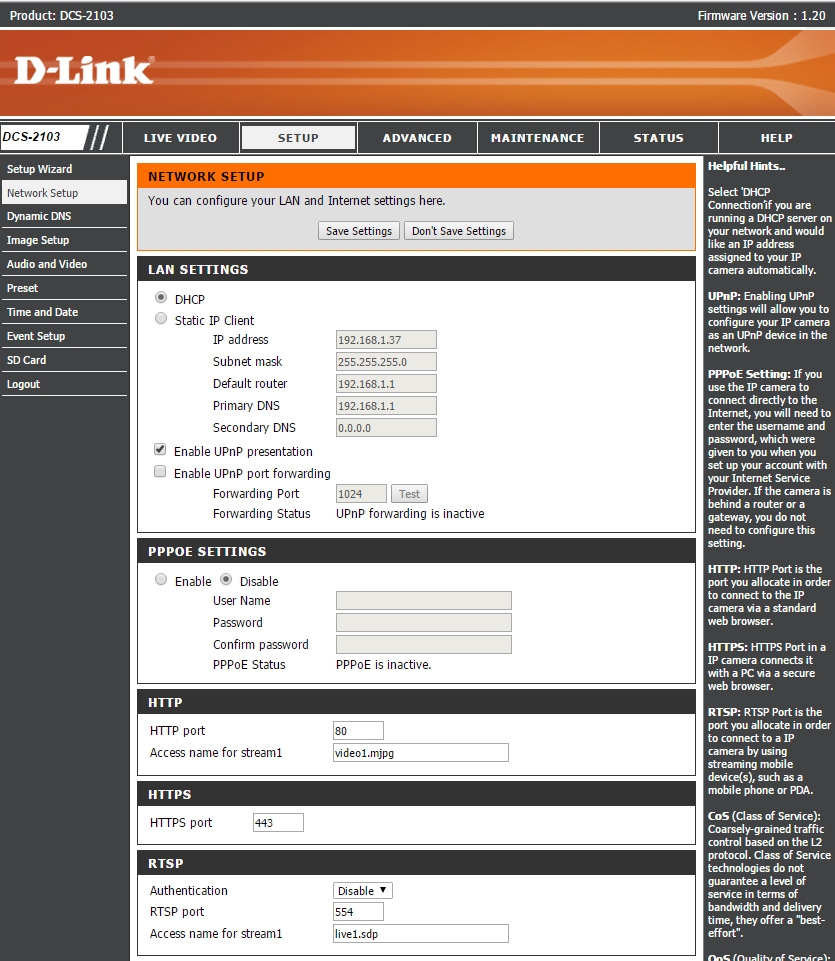
Then, we entered the web interface of the camera and specified codecs and allowed testing:

We needed the RTSP address of the camera, so we opened the network settings. In our case the RTSP-address was live1.sdp, that is the camera is available at rtsp://192.168.1.37/live1.sdp
Availability of the camera can be easily checked using VLC Player. Media – Open Network Stream.
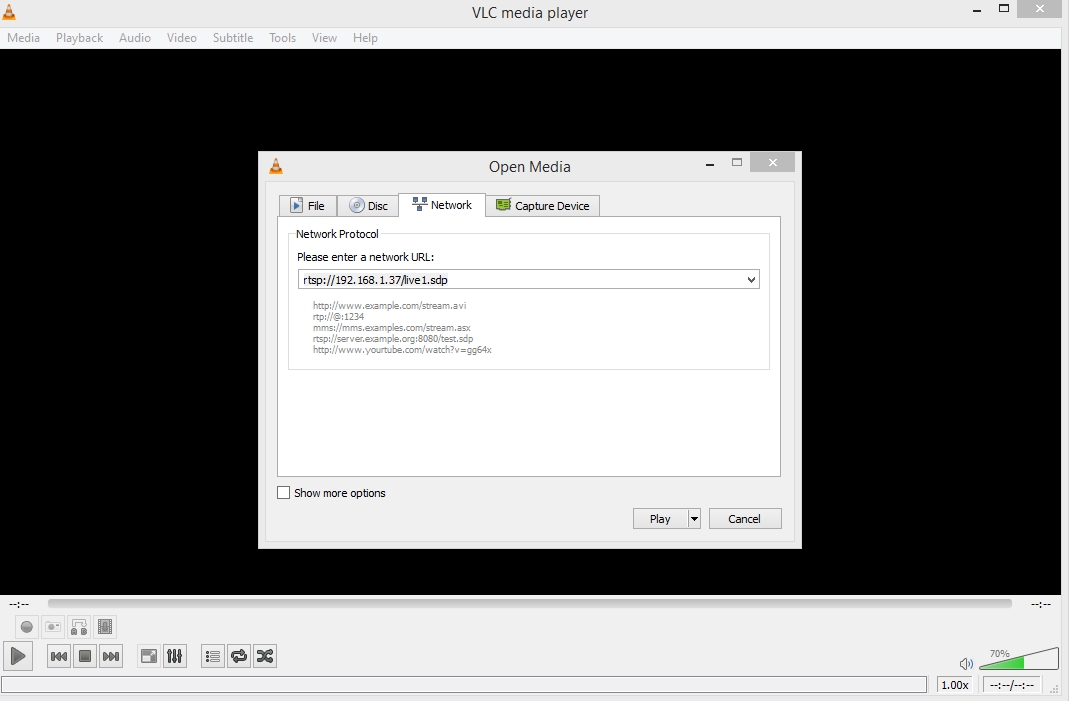
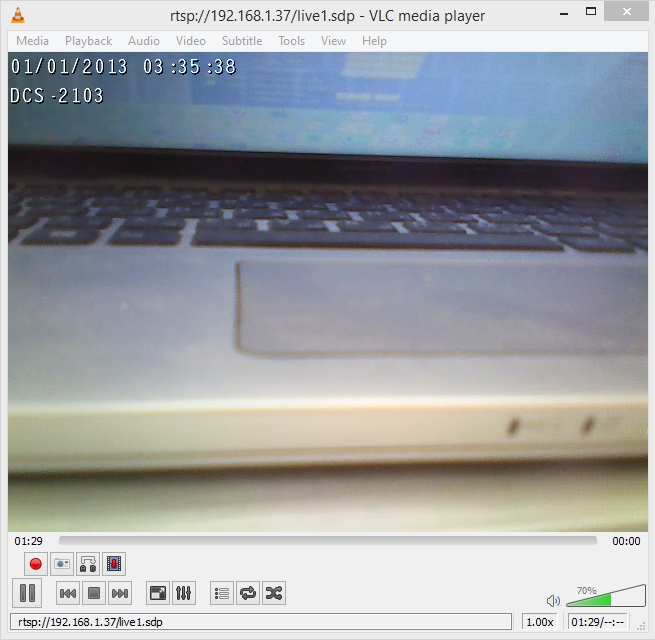
So, we made sure the camera worked and output the video via RTSP.
As the test server we will use Web Call Server 5. This is a streaming server that supports RTSP and WebRTC protocols. It should connect to the IP camera via RTSP and fetch the video stream. Then, the stream is broadcast via WebRTC.
You can install Web Call Server to your own host or run a preconfigured instance at Amazon EC2.
After installing, switch the server to the RTSP non-interleaved mode discussed earlier. You can do this by adding the following parameter
rtsp_interleaved_mode=false
This setting is added to the end of the flashphoner.properties config and requires server restart:
service webcallserver restart
Therefore, we have got a non-interleaved server that accepts packets from the IP camera via UDP and then shares the stream via WebRTC (UDP).
The test server is deployed on the VPS server located in the Frankfurt data-center. It has 2 cores and 2 gigabytes of RAM.
The camera is located in the local framework at 192.168.1.37.
Giving the above, the first thing we need to do is to redirect the port 554 to the IP address 192.168.1.37 for incoming TCP / RTSP connections to allow the server establishing connection to our IP camera. To do this, we add just one rule in the settings of the router:

This rule tells the router to translate all inbound traffic from the port 554 to the specified IP address.
Finally, we need to know our external IP address. It takes like 5 to 15 seconds and only needs some gogleing on whatismyip
If you have a friendly NAT in possession and know your external IP address, you can run tests with the server.
The standard demo player in Google Chrome look as follows:
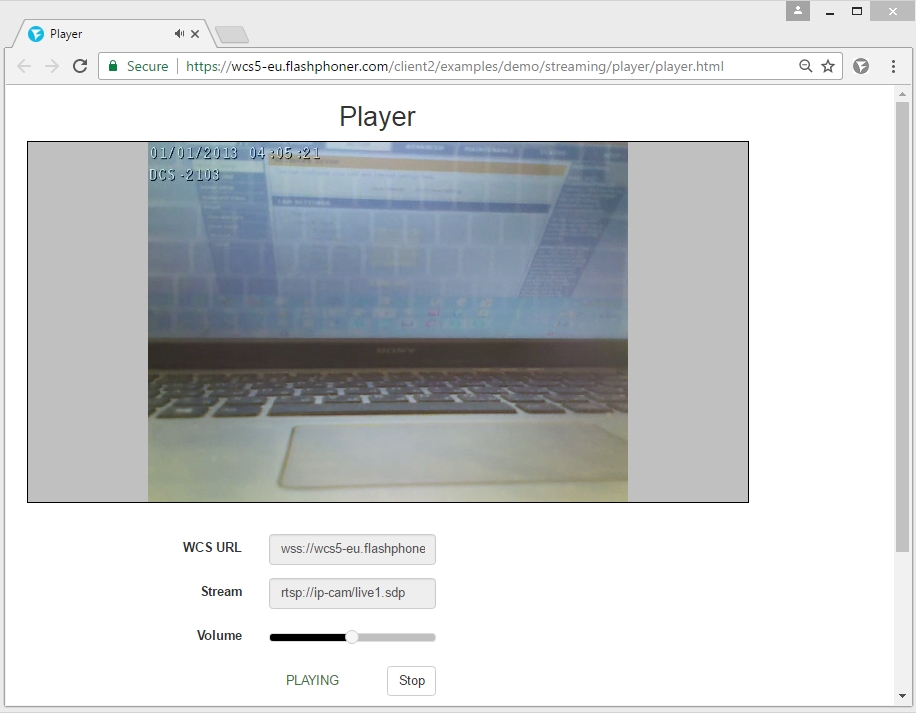
To start playing the RTSP stream, simply enter its address to the Stream field.
In our case, the address of the stream is: rtsp://ip-cam/live1.sdp
Here, ip-cam is the external IP address of your camera. It is this address that the server will attempt to establish connection to.
Testing latencies VLC vs WebRTC
After we installed and configured the IP camera and tested it in VLC, configured the server and tested an RTSP stream sent through the server and cast via WebRTC, we finally can compare latencies.
We use a timer for that. The timer displays fractions of seconds on the screen. We turn on the timer and run the playback simultaneously on the local VLC and in the Firefox browser through the remote server.
Server ping 100 ms.
Local ping1 ms.
The first test with the timer look like this:
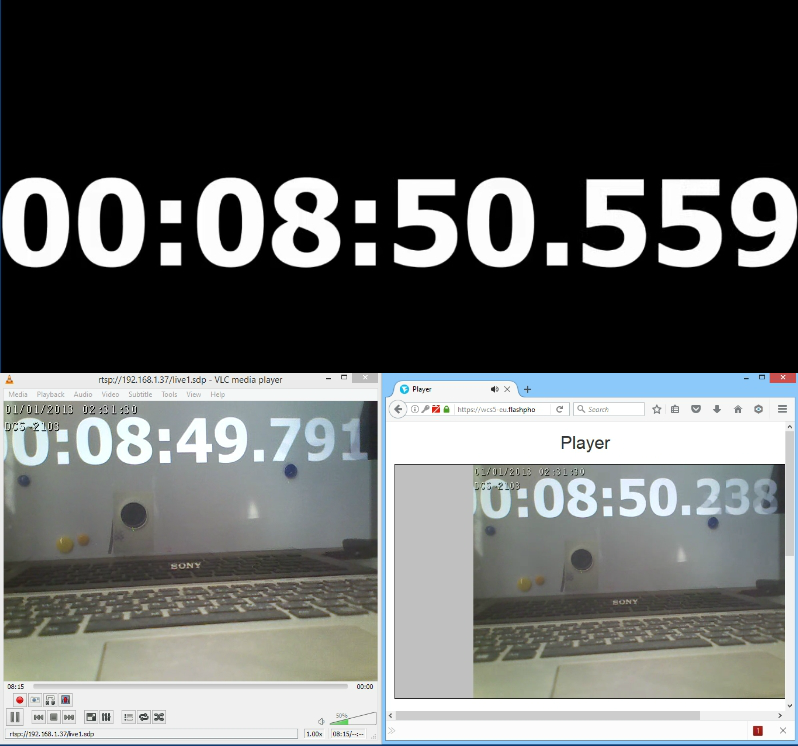
Here, on the black background there is a reference timer. It shows zero latency. On the left, there is VLC, and on the right there is Firefox that receives a WebRTC stream from the remote server.
| Zero | VLC | Firefox, WCS | |
| Time | 50.559 | 49.791 | 50.238 |
| Latency ms | 0 | 768 | 321 |
This test demonstrates twice as big latency of VLC compared to Firefox + Web Call Server, even though the video in МДС is played in the local network, while the video played in Firefox routes to the data-center in Germany and returns back. The difference can be caused by the fact that VLC works over TCP (interleaved mode) and uses some buffering to ensure smooth playback of the video.
We took several photos to log the latency values:
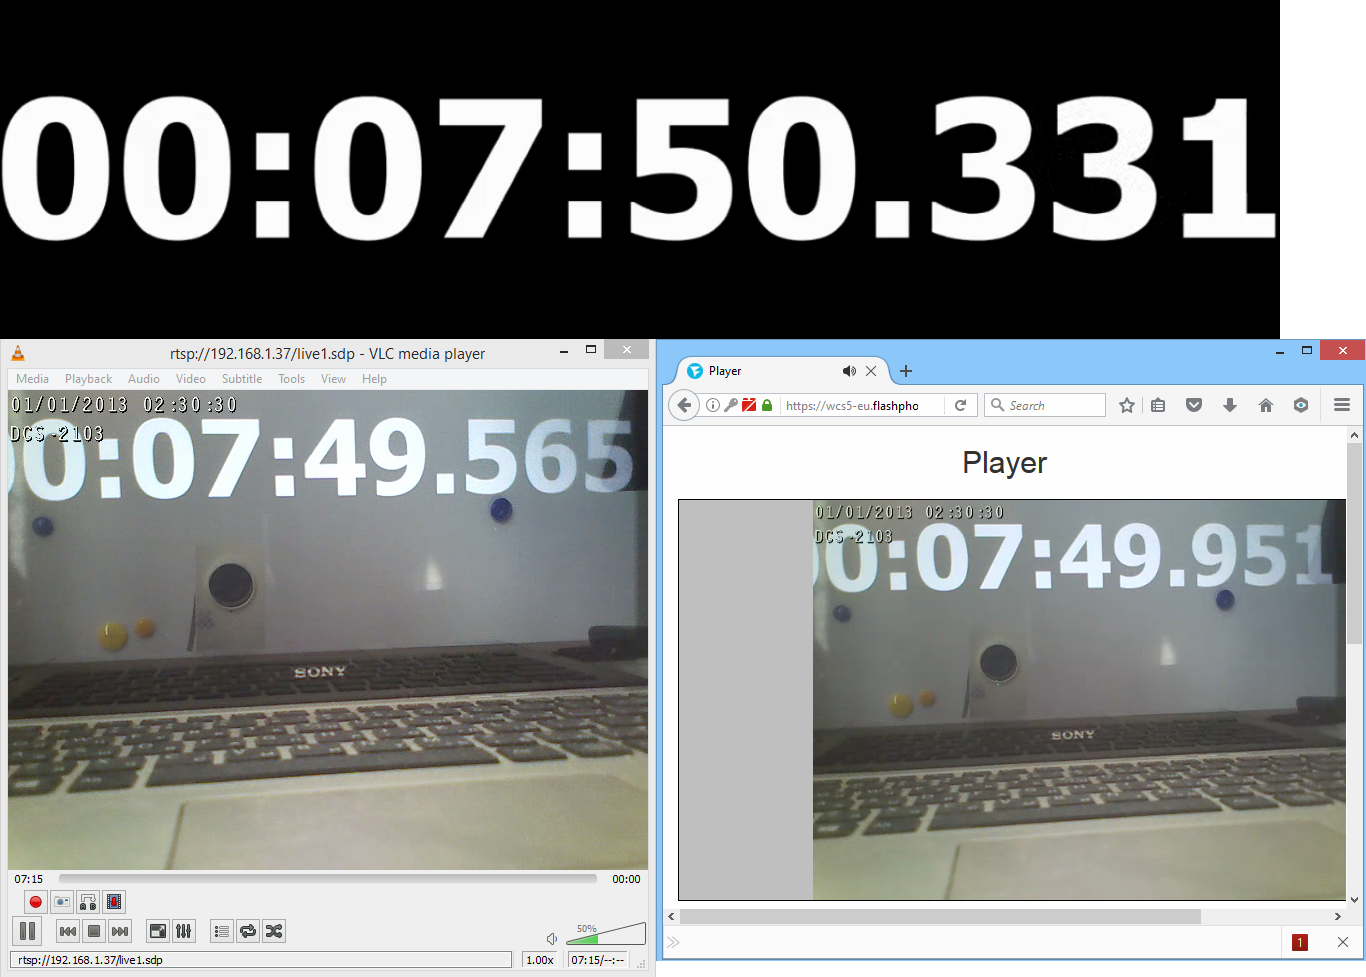
Here are the measurement results:
| Metric | Zero | VLC | Firefox, WCS | |
| Test1 | Time | 50.559 | 49.791 | 50.238 |
| Latency | 0 | 768 | 321 | |
| Test2 | Time | 50.331 | 49.565 | 49.951 |
| Latency | 0 | 766 | 380 | |
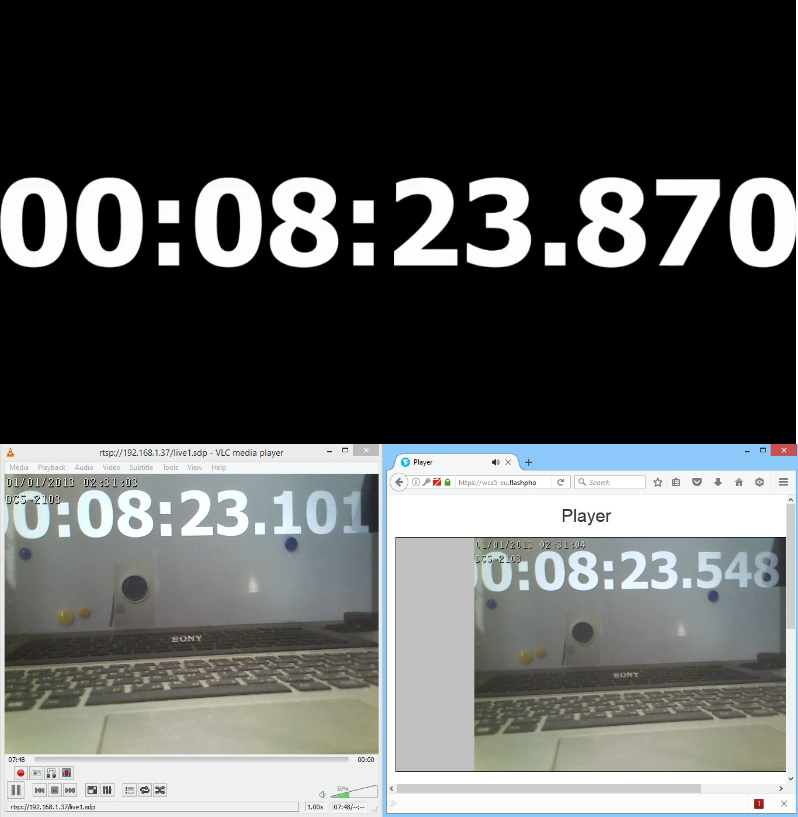
| Test3 | Time | 23.870 | 23.101 | 23.548 |
| Latency | 0 | 769 | 322 | |
| Average | 768 | 341 | ||
Therefore, average latency when testing with VLC in the local network is 768 milliseconds. At the same time, average latency of the video routed via the remote server is 341 milliseconds, that is it is 2 times lower thanks to usage of UDP and WebRTC.
Testing latencies RTMP vs WebRTC
Now, we conducts similar measurements with an RTMP player via the Wowza server and a simultaneous test with a WebRTC player using Web Call Server.
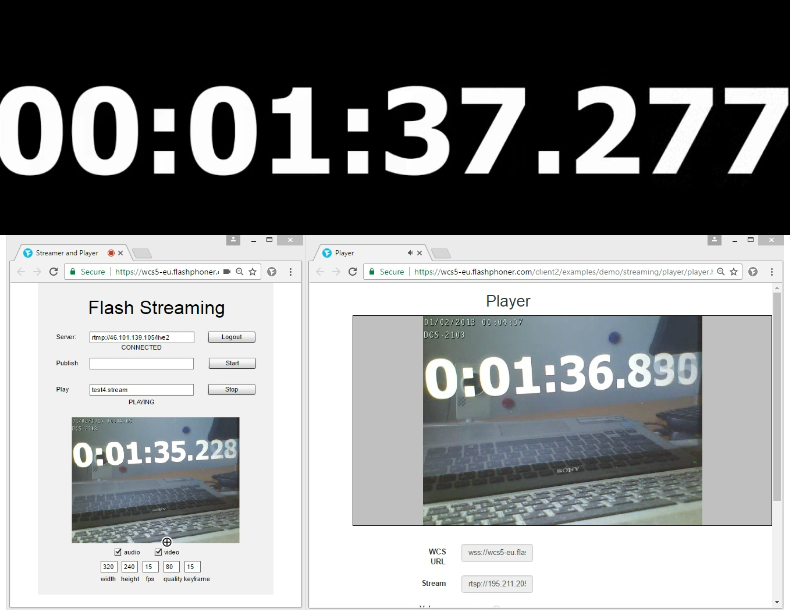
The left part is fetching the video stream with Wowza and the RTMP connection. The right part is fetching using WebRTC. The reference time is above (zero latency).
Test – 1
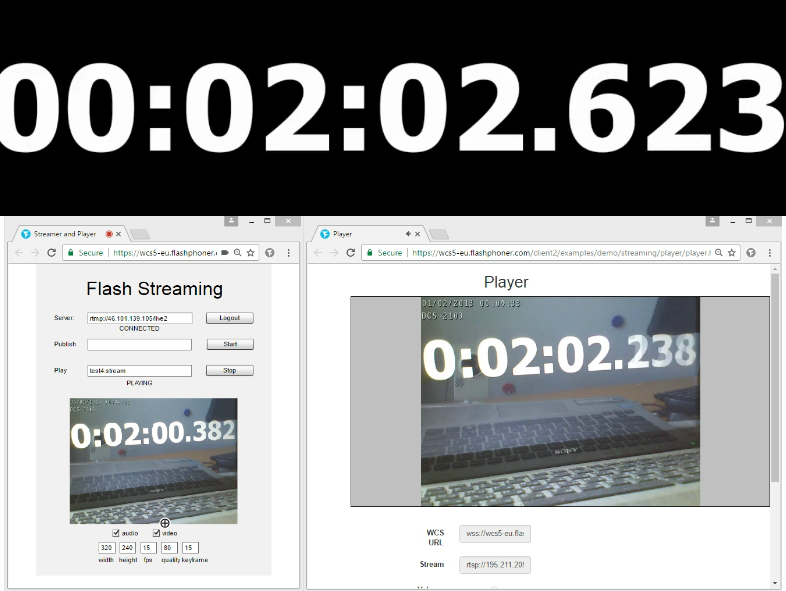
Test – 2
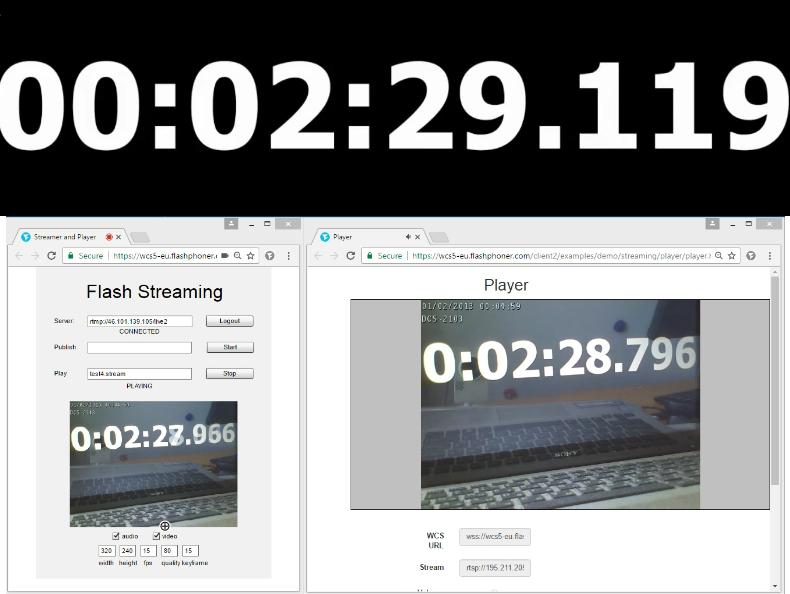
Test – 3
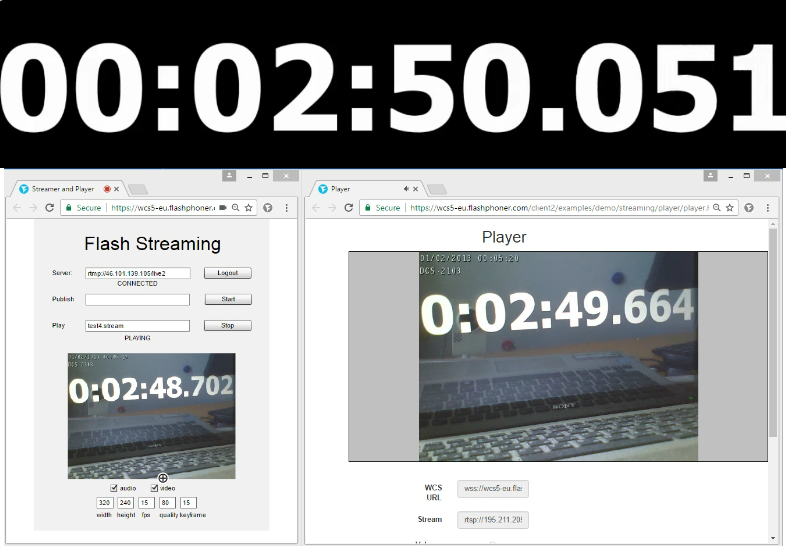
Test – 4
The results of the test compiled to the same table as before:
| Metric | Zero | RTMP | WebRTC | |
| Test1 | Time | 37.277 | 35.288 | 36.836 |
| Latency | 0 | 1989 | 441 | |
| Test2 | Time | 02.623 | 00.382 | 02.238 |
| Latency | 0 | 2241 | 385 | |
| Test3 | Time | 29.119 | 27.966 | 28.796 |
| Latency | 0 | 1153 | 323 | |
| Test4 | Time | 50.051 | 48.702 | 49.664 |
| Latency | 1349 | 387 | ||
| Average | 1683 | 384 | ||
Therefore, average latency during playback of an RTSP stream in Flash Player via RTMP was 1683 milliseconds. Average latency via WebRTC was 384 milliseconds. Therefore WebRTC turned out to be 4 times better in terms of latency.
References
WebRTC technology
RTSP – RFC
RTSP interleaved – RFC, 10.12 Embedded (Interleaved) Binary Data
RTMP – specification
Web Call Server – WebRTC media server with the support for RTSP
VLC – the player to play RTSP