
The embedding of VR 360 player
Embed VR 360 player in your website page by copying a few lines of code
Use these instructions for quick installation and configuration of the server. In addition to that, you can connect to our demo server demo.flashphoner.com to perform the tests.
Step-by-step instructions for implementing a VR player for a browser
For further work, we will use the Delight XR Player, a cross-platform solution for playing VR video in a browser. To gain access to the player, you need to register on the official website of the project delight-vr.com and gain access to your personal account, where will be all the necessary information for further implementation.
There are also other players that allow you to play a stream from a VR camera to web pages. They can also be integrated with WCS using the Web SDK.
To embed a VR player on your web page, create two empty files vr-player-min.html and vr-player-min.js. These files will contain the minimum code for the operation of our player.
Let’s analyze the contents of the files
HTML
Let’s place the necessary elements in vr-player-min.html:
1. Import the main API script
<script type="text/javascript" src="https://flashphoner.com/downloads/builds/flashphoner_client/wcs_api-2.0/current/flashphoner.js"></script>
2. Import the script of our minimum VR player
<script type="text/javascript" src="vr-player-min.js"></script>
3. Import the Delight XR Player API script. You can copy this line in your personal account on the Delight XR project website
<script src="//cdn.delight-vr.com/latest/dl8-your-license-key.js" async></script>
4. Initialize the API on page load
<body onload="init_api()">
6. Add a div element to which the video for our VR player will be mounted. In this div, we place the Delight XR Player tags. The necessary tags can also be copied in your account
<div id="myVideo" style="width:640px;height:480px;border: solid 1px">
		<dl8-video id="remoteVideo" format="STEREO_180_LR" display-mode="inline" loop>
		<source/>
</div>
7. Add a Play button, clicking on which will initiate a connection to WCS and start playing the VR stream from the VR camera in the player
<button id="playBtn">Play</button>
The full HTML code of the page looks like this
<!DOCTYPE html>
<html lang="en">
<head>
    <script type="text/javascript" src="https://flashphoner.com/downloads/builds/flashphoner_client/wcs_api-2.0/current/flashphoner.js"></script>
	<script type="text/javascript" src="vr-player-min.js"></script>
	<script src="//cdn.delight-vr.com/latest/dl8-your-license-key.js" async></script>
</head>

<body onload="init_api()">
	<div id="myVideo" style="width:640px;height:480px;border: solid 1px">
		<dl8-video id="remoteVideo" format="STEREO_180_LR" display-mode="inline" loop>
		<source/>
	</div>
	<br>
	<button id="playBtn">Play</button>
</body>
</html>

JavaScript
1. Create the constant for the player’s operating status
var SESSION_STATUS = Flashphoner.constants.SESSION_STATUS;
var STREAM_STATUS = Flashphoner.constants.STREAM_STATUS;
2. Create a variable for WebSocket session
var session;
3. We initialize the API when loading the HTML page and call the function to handle the click of the “Play” button
function init_api() {
    Flashphoner.init({});
    playBtn.onclick = playstream;
}
4. We connect to the WCS server via WebSocket, launch Delight XR Player and play the stream from the VR camera. For this function to work, pass to WCS as parameters the stream name “stream1” and the div element “myVideo” into which Delight XR Player is embedded as parameters. In this example, we are using our demo server. To test your own server, replace “wss: //demo.flashphoner.com” WebSocket URL of your WCS.
function playstream() {
    var dl8video = document.getElementById('remoteVideo');
    var video = dl8video.contentElement;
    session = Flashphoner.createSession({
        urlServer: "wss://demo.flashphoner.com"
    }).on(SESSION_STATUS.ESTABLISHED, function(session) {
        console.log("connection established"); {
            var options = {
                name: "stream1",
                display: document.getElementById("myVideo"),
                remoteVideo: video,
                transport: "TCP",
            };
            var stream = session.createStream(options).on(STREAM_STATUS.PLAYING, function(stream) {
                console.log("playing");
                dl8video.start();
            });
            stream.play();
        }
    });
}
Full JavaScript code looks like this
var SESSION_STATUS = Flashphoner.constants.SESSION_STATUS;
var STREAM_STATUS = Flashphoner.constants.STREAM_STATUS;
var session;

function init_api() {
    Flashphoner.init({});
    playBtn.onclick = playstream;
}

function playstream() {
    var dl8video = document.getElementById('remoteVideo');
    var video = dl8video.contentElement;
    session = Flashphoner.createSession({
        urlServer: "wss://demo.flashphoner.com"
    }).on(SESSION_STATUS.ESTABLISHED, function(session) {
        console.log("connection established"); {
            var options = {
                name: "stream1",
                display: document.getElementById("myVideo"),
                remoteVideo: video,
                transport: "TCP",
            };
            var stream = session.createStream(options).on(STREAM_STATUS.PLAYING, function(stream) {
                console.log("playing");
                dl8video.start();
            });
            stream.play();
        }
    });
}
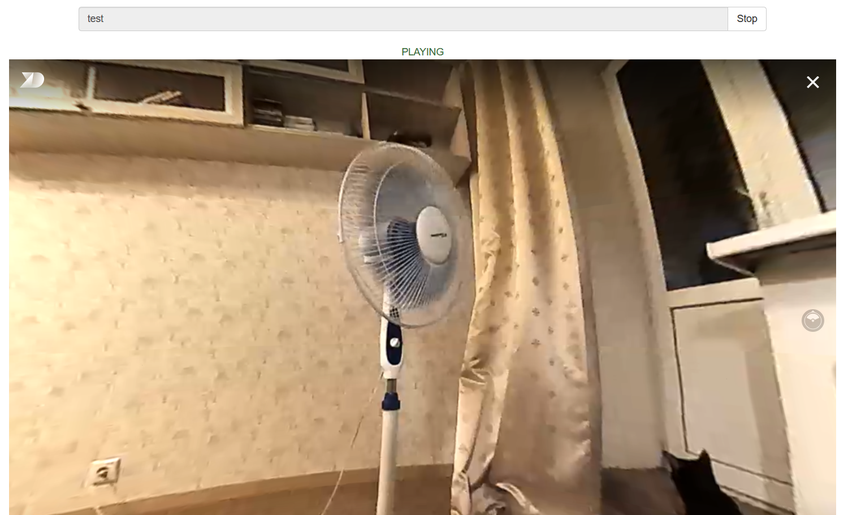
As a result, we get a player embedded on a web page that is capable of playing a VR 360 video stream from a camera. The broadcast can be rotated using the mouse in real time, and when playing a video stream in a browser on a mobile device, the picture in the player rotates when the gadget moves in space.

Download Web Call Server 5
System requirements: Linux x86_64, 1 core CPU, 2 Gb RAM, Java
Download Now
Installation:
- wget https://flashphoner.com/download-wcs5.2-server.tar.gz
- Unpack and install using 'install.sh'
- Launch server using command 'service webcallserver start'
- Open the web interface https://host:8444 and activate your license
If you are using Amazon EC2, you don't need to download anything.
Launch WCS5 on Amazon EC2
Web Call Server Monthly Subscription
$145 per month
Purchase

Testing VR 360 Video Stream Playback
Test the player to play VR 360 video stream in Google Chrome
Use these instructions for quick installation and configuration of the server. In addition to that, you can connect to our demo server demo.flashphoner.com to perform the tests.
Test plan
- Connect to the web-based interface of the WCS server
- Publish a video stream from a VR camera to WCS
- Play the published stream using a regular player
- Play the published stream using a special VR player
Testing the player in the Google Chrome browser
1. On the WCS server side, in the flashphoner.properties settings file, set the necessary bitrate limits and SDP parameters
webrtc_cc_min_bitrate=5000000
webrtc_cc_max_bitrate=10000000
webrtc_sdp_min_bitrate_bps=5000000
webrtc_sdp_max_bitrate_bps=10000000

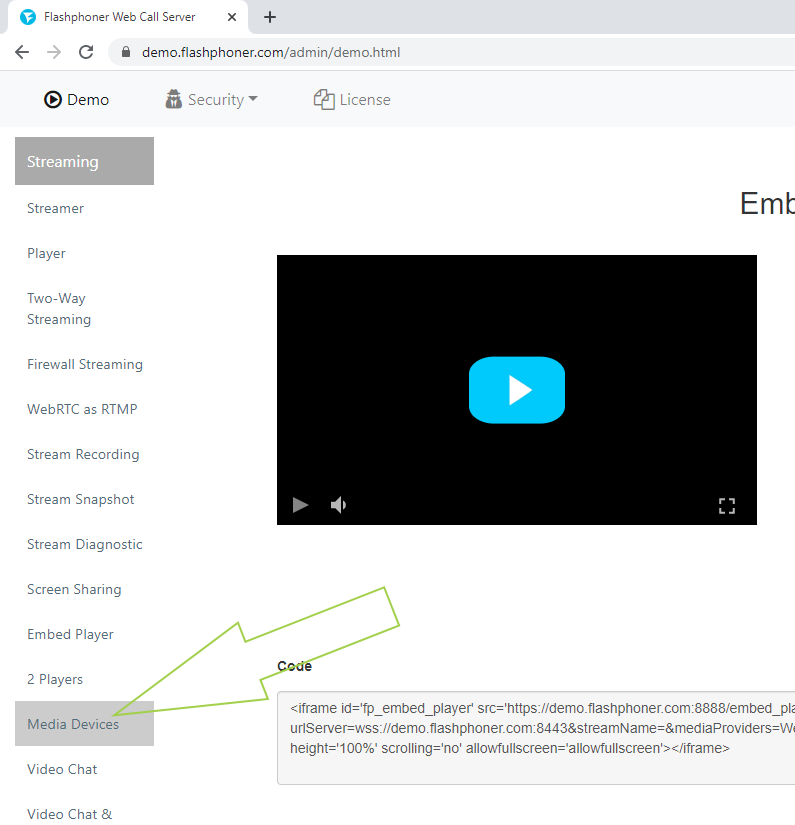
2. Log in to the web interface of the server demo.flashphoner.com

3. From the menu on the left side of the page, select “Media Devices”
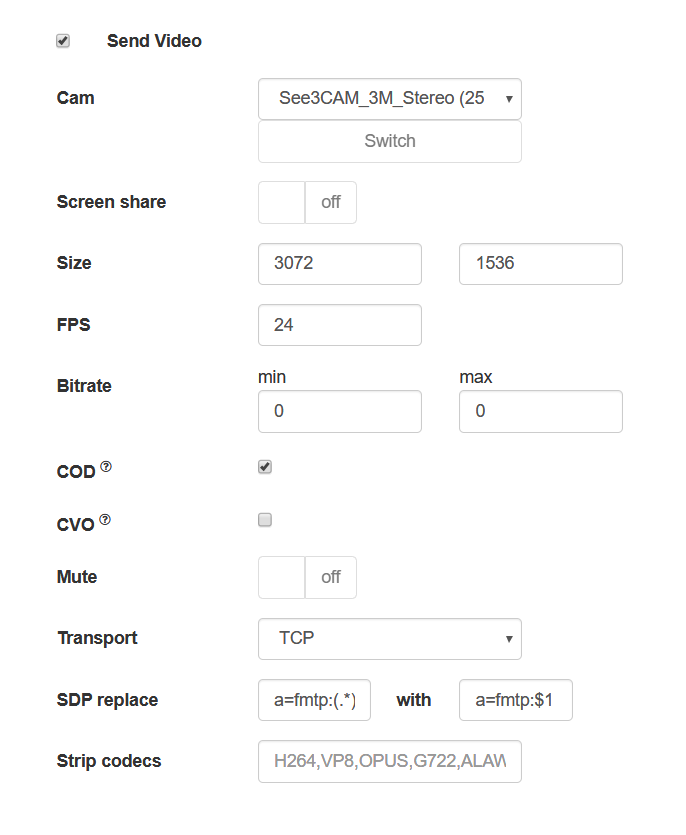
4. On the page that opens, in the “Send Video” section, set the necessary parameters for capturing the stream from the camera:
- resolution 3072 × 1536
- FPS 24 (when broadcasting from a browser, the camera that we used for testing only supports such FPS)
- TCP transport
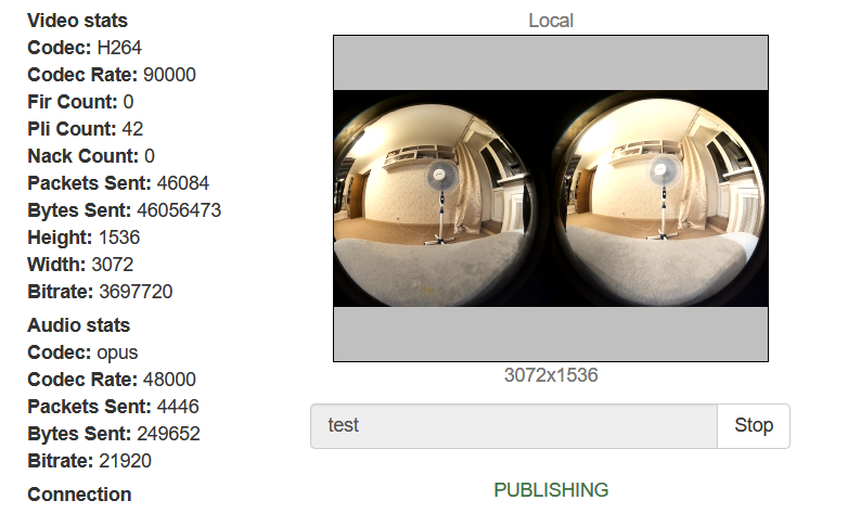
5. At the top of the same page we publish a stream from a VR camera
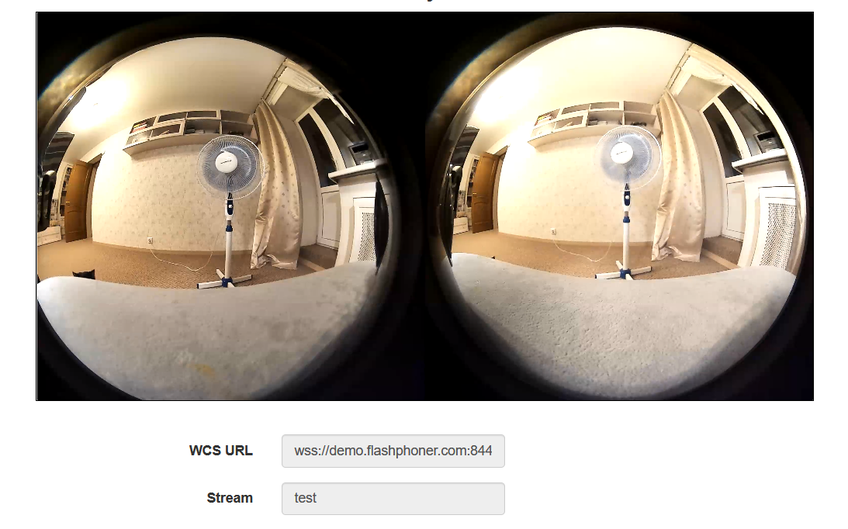
6. In a new browser tab, open the “Player” example from the menu on the left side of the page and try to play the published video stream. As you can see, in a “regular” WebRTC player, the stream from the VR camera is not collected in one picture
7. Now try to play the VR video stream in a special player. In this case, the stream from the VR camera is collected in one picture and you can change the viewing direction (right, left, top, bottom) with the mouse.
For more information on embedding such a player in your web project, see the Embedding page.
Download Web Call Server 5
System requirements: Linux x86_64, 1 core CPU, 2 Gb RAM, Java
Download Now
Installation:
- wget https://flashphoner.com/download-wcs5.2-server.tar.gz
- Unpack and install using 'install.sh'
- Launch server using command 'service webcallserver start'
- Open the web interface https://host:8444 and activate your license
If you are using Amazon EC2, you don't need to download anything.
Launch WCS5 on Amazon EC2
Web Call Server Monthly Subscription
$145 per month
Purchase

VR 360 streaming
Broadcast VR 360 stream from specialized webcams with playback in a VR player or helmet
VR 360 is a video stream format with viewing angles of 360° x 180°. When watching from a PC, the viewer can change the angle using the mouse, and when watching such a video from a smartphone, the viewing angle is controlled by moving the device in space.
VR stream can be played in virtual and mixed reality devices if one of the supported browsers is running on this device. The playback quality of the stream in the VR device directly depends on the quality of the published stream.
Specifications
Playback
platforms |
Playback
technologies |
Codecs |
- VR helmets
- Chrome
- Firefox
- Opera
- Safari, Mac OS
- Safari, iOS
- IE
- Edge
|
|
- VP8
- Vorbis
- H.264
- AAC
- Speex
- G.711
- Opus
|
Playback platforms
- VR helmets
- Chrome
- Firefox
- Opera
- Safari, Mac OS
- Safari, iOS
- IE
- Edge
Codecs
- VP8
- Vorbis
- H.264
- AAC
- Speex
- G.711
- Opus
VR stream playback workflow
WCS receives a VR video stream from a VR camera and plays it in the player

Step-by-step scheme of the player work
- VR video stream from a VR camera is published on WCS
- VR player requests VR video stream
- Web Call Server streams to the player for playback

Download Web Call Server 5
System requirements: Linux x86_64, 1 core CPU, 2 Gb RAM, Java
Download Now
Installation:
- wget https://flashphoner.com/download-wcs5.2-server.tar.gz
- Unpack and install using 'install.sh'
- Launch server using command 'service webcallserver start'
- Open the web interface https://host:8444 and activate your license
If you are using Amazon EC2, you don't need to download anything.
Launch WCS5 on Amazon EC2
Web Call Server Monthly Subscription
$145 per month
Purchase
Today, the words “virtual reality” will not surprise anyone. Futuristic equipment, which we could only see in science fiction movies a couple of dozen years ago, is now available to regular users. Even those who cannot afford proper equipment can build a VR headset of available materials following a variety of DIY-tips with YouTube.
Latest news
-
Sales migration from Skype to Teams on 16 Apr 2025
On April 16, 2025, we began the transition from Skype to Teams.
On the same day, we sent out a message via our Skype account (flashphoner.com / Flashphoner Sales) informing users about the move.
Unfortunately, this message appears to have triggered a block on our Microsoft account (Skype + Teams), most likely due to being flagged as spam. As of now, appeals have not been successful, and the account remains blocked.
Our current contact details:
Microsoft Teams: sales@flashphoner.com — for sales, pre-sales, and licensing inquiries
See also updated contacts page: https://flashphoner.com/contact
21, April 2025
-
Card payments were successfully restored on September 13, 2024
We have restored card payments since September 13, 2024.
Please write to sales@flashphoner.com or Skype flashphoner.com with any questions regarding payments and subscription renewals.
13, September 2024
-
Card payments temporary unavailable since August 16, 2024
Due to technical reasons, we are temporarily unable to accept card payments.
For direct payments via Wire-Transfer or USDT, please contact us at:
sales@flashphoner.com
Sorry for the inconvenience.
We will inform you as soon as payments are operational. Stay tuned for updates on our website.
16, August 2024
More News