We have been staying at home for quite a long time now. In this situation, communication between people is coming to the fore. We need to call each other and communicate somehow. For some people, it is entertainment as they are missing their loved ones, while for others it is associated with business.
On one of those languid evenings, I had a phone call from a friend who opened a school for teaching programming to children and teenagers long before all the quarantine-related events. Of course, the circumstances made him move his classes to online. A well-known platform was chosen as the main tool as it promised to enable free video conferences for up to 1000 participants. But, apparently due to an influx of those wishing to use the platform, the quality of its operation left much to be desired. Lots of students began to abandon classes. My friend faced the challenge of how to preserve the number of students. He considered developing a proprietary system for online learning as one of possible solutions.
Before reinventing the wheel, let’s have a look at the reasons why I would not like to use popular conferencing platforms. After all, an online group lesson is a multi-point conference as it is.
Parents of children who had to switch to studying from home in the middle of the school year faced most shortcomings of popular platforms. The platform “recommended” for use at secondary schools simply could not cope with the load.
Several students who were the first to join the lesson, were able to see and hear the teacher while others either had the image without the sound, or the sound without the image, or could not access at all. And those “lucky ones” who joined successfully had to worry about a possible failure because successful reconnection was practically impossible. For sure, all these things make good learning outcomes unattainable.
Thus, limitations of video conferencing platforms include the following:
- low quality communication;
- interface which is not always user-friendly;
- poor security of transmitted data;
- dependence on third-party servers and communication channels;
- high cost of the solution for organizations
End users do not want to bother with subtle settings, lengthy authorizations, etc. They only want a magic button to press to make everything work well. Besides, users are not going to change their hardware every year; they need everything to work properly on a 3-5 year old computer.

Problem to be Solved
Developing a web application to be used for teaching programming basics to children. The teacher should be able to not only explain educational material via video connection but also share his or her desktop. Each lesson has to be recorded and available for download at the school portal.
The application should operate correctly on computers with modest technical characteristics and an average Internet connection channel, in a browser, without installation of any additional software or plug-ins.
Selecting a Solution
Four types of architecture of multi-point video conferencing systems can be distinguished.
- SFU – Video conferencing based on simple stream forwarding;
- Simulcast – Video conferencing based on parallel streaming;
- SVC – Video conferencing based on scalable video coding;
- MCU –Video conferencing based on stream mixing.
Video conferencing based on simple stream forwarding (SFU) — is a classic video conference relying on the following principle:
- Each user connected publishes his or her video stream to the server.
- The server creates copies of the streams without re-encoding them and sends them to other participants “as is”.
Thus, each participant a five-party video conference will have to play four video streams with audio and broadcast his or her stream to other participants. In this case, the formula for the number of streams is simple:
N participants = N-1 incoming video streams + 1 outgoing video stream
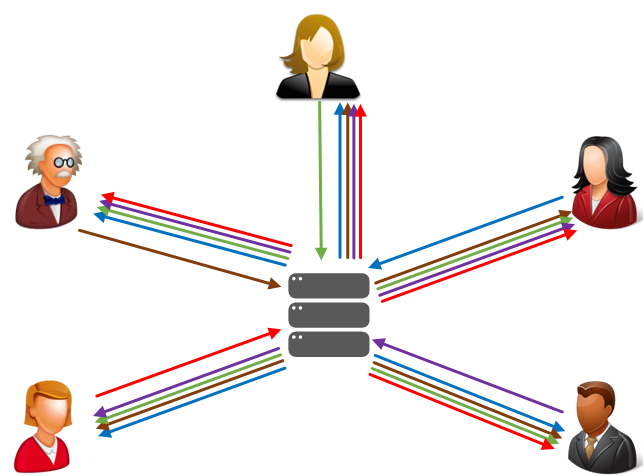
And if a user receives 4 streams of 1 Mbps each, the total bitrate is 4 Mbps which creates a significant load on the network and the user’s computer CPU and RAM resources.
Of course, this is no good and is not compliant with the statement of our problem.
Video conferencing based on parallel streaming (Simulcast) — streaming is a technology that can be considered an add-in to SFU. Simulcast does not only allow forwarding streams, it allows redirecting them in a smart way: high-resolution streams to those having a good connection, and low-resolution streams to those having poor one.
This is how it works:
- Each user connected publishes 3-5 video streams with different resolution and quality to the server.
- The server selects stream copies with the characteristics required for each receiver and sends them to other participants without re-encoding.
The number of incoming and outgoing streams can be described by the following formula:
N participants = N-1 incoming video streams + 3 outgoing video streams
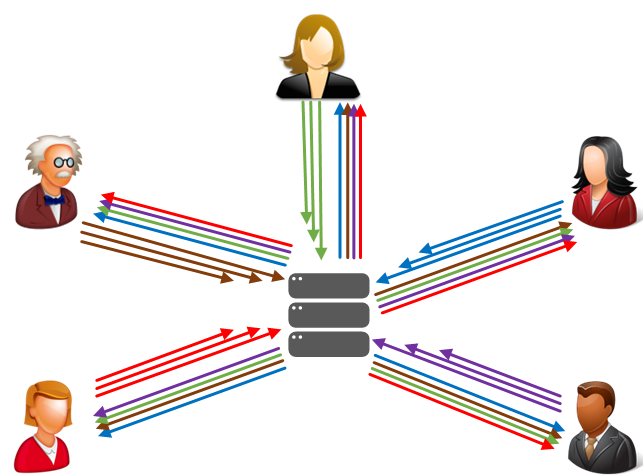
This option is not compliant with the statement of our problem because the entire load associated with supporting several levels of video stream quality falls on users’ computers. And a system like that seems redundant because the transmitted streams are essentially the same, they only have different quality
The essence of video conferencing based on scalable video coding (SVC) is that the video stream on the user’s side is compressed in layers. Each additional layer improves the video resolution, quality and fps. If there is a stable wide communication channel between the user and the video conferencing server, the user sends a video stream with the maximum number of such layers to the server. The server, after receiving the video stream with layers, simply cuts off extra layers according to a certain algorithm and sends the number of stream layers depending on the channel width to other users.
The number of incoming and outgoing streams can be described by the following formula:
N participants = N-1 incoming video streams + 1 outgoing video stream
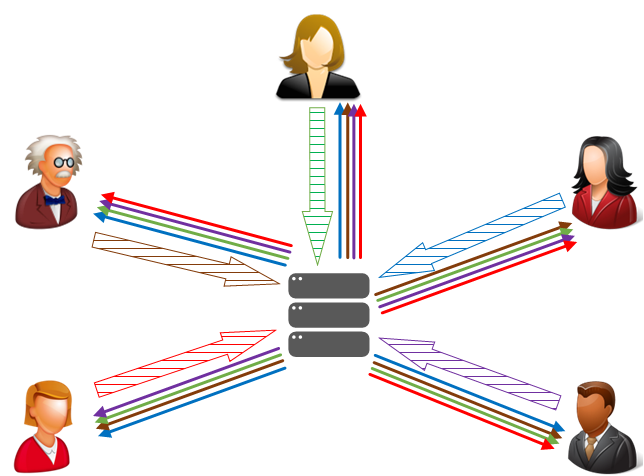
The advantage of this technology is that it is the video codec itself that provides cutting of layers.
The disadvantage of the technology is that it is not supported in the browser out of the box and requires additional software to be installed which is not compliant with the statement of the problem.
Video conferencing based on real-time mixer (MCU)
The key difference between the MCU and other types of video conferencing is the number of video streams received by each participant.
The number of incoming and outgoing streams can be described by the following formula:
N participants = 1 incoming video stream + 1 outgoing video stream
In the case of MCU, each participant receives only 1 mosaic stream, assembled from other participants’ streams with a fixed bitrate which depends on the output resolution of the mixer, for example 720p 2Mbps. And it plays in one <video> element on the web page. Mixing is performed on the server side and consumes CPU and RAM resources of the server instead of those of the user.
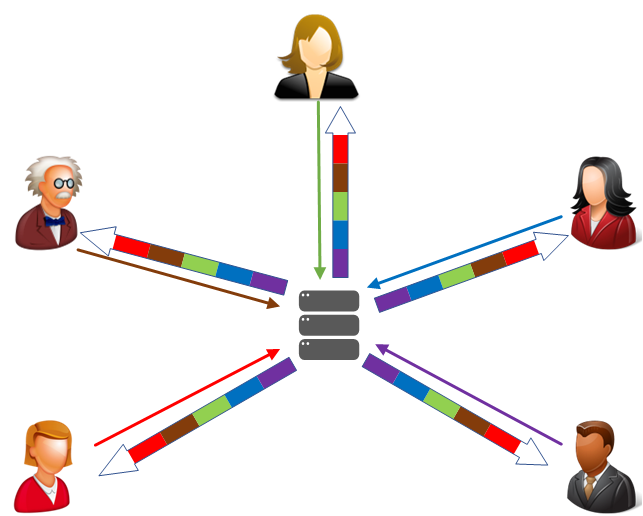
The advantage of MCU can be clearly seen on mobile platforms. In order to play several streams, a mobile device would have to accept them all over the network, process them correctly, decode and display them on the screen. And with a single MCU stream, smartphones can play it with almost no effort.
As for disadvantages, server capacities will have to be provided for the real-time mixer to work as part of the MCU.
Implementation
So, let us figure out the steps for solving our problem.
- Install and configure a server that will be the backend and a frontend web server.
- Create a conference page on the web-server
- Write a script that will control the conference functionality.
- Check the conference operation.
The web server on which the school’s website “rotates” will be used as the frontend.
One may ask: Can deployment of a multi-user conference on the main web server affect the operation of the website? Can it result in the website stuttering due to the increased load?
You do not have to worry about increasing load on the web server because the main work for supporting the conference will be carried out on the backend side. The front is only needed for organizing the user interface.
In this article we are not going into detail about deployment of a web server, for those “in the know” it is a trivial task and there are enough manuals on the web. For example – LAMP under Ubuntu
Flashphoner Web Call Server 5 (hereinafter referred to as “WCS”) will be used as the backend. Two options for conferences are implemented in the WCS: video conferencing based on multiplexing (SFU) and video conferencing based on stream mixing (MCU). We have already decided above on the technology our future conference will rely on: MCU. MCU as part of WCS is implemented on the basis of a real-time mixer that combines video into a single image and mixes audio for each participant individually.
Each MCU participant sends video + audio streams to the WCS. The WCS provides a mixed stream to MCU participants that contains all participants’ video and everyone’s audio except their own one.

In order to deploy your WCS quickly, use these instructions or launch one of virtual instances on Amazon, DigitalOcean or in Docker. After the server is deployed, specify the following settings in the flashphoner.properties configuration file to activate the MCU functionality based on the real-time mixer.
mixer_auto_start=true
mixer_mcu_audio=true
mixer_mcu_video=true
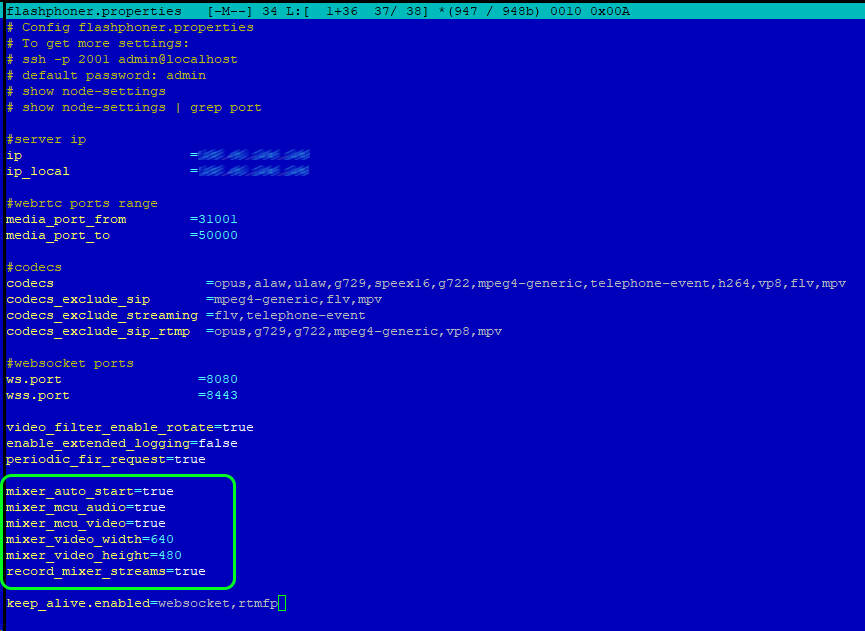
Mixer stream recording is activated in the same file by means of the following setting:
record_mixer_streams=true
This setting will make each conference be automatically recorded in .mp4 files on the WCS server. The files can then be found through the following path:
/usr/local/FlashphonerWebCallServer/client/records

Now that we have finished with servers, let’s move on to programming. In this article we are only going to consider the “framework” of multi-point conferencing with screen sharing and recording features. In future, you can add both the desired interface and additional functions to this “framework”, such as making snapshots, adding watermarks, etc.
Create two files on the web server: a page for the future conference interface and a script that will control the operation of our MCU.
In this case they are “mcu-min.html” and “mcu-min.js”.
Place a simple div block with a frame on the HTML page where all the multi-user conference participants’ video will be displayed:
<div id="remoteVideo" class="display" style="width:640px;height:480px;border:solid 1px"></div>
In the page header, we specify styles for the “display” class. This is necessary for video to be later displayed in the div element correctly:
<style>
.display {
width: 100%;
height: 100%;
display: inline-block;
}

.display > video, object {
width: 100%;
height: 100%;
}
</style>
Add a field for entering the username and a button for joining the conference:
<input id="login" type="text" placeholder="Login"/>
<button id="joinBtn">Join</button>
For our MCU to work correctly on the HTML page, an invisible div element is also required for displaying preview of the user’s local video stream:
<div id="localDisplay" style="display: none"></div>
Complete listing of the HTML page code:
<!DOCTYPE html>
<html lang="en">
<head>
<meta charset="UTF-8">
<script type="text/javascript" src="https://flashphoner.com/downloads/builds/flashphoner_client/wcs_api-2.0/current/flashphoner.js"></script>
<script type="text/javascript" src="mcu-min.js"></script>
<style>
.display {
width: 100%;
height: 100%;
display: inline-block;
}

.display > video, object {
width: 100%;
height: 100%;
}
</style>
</head>
<body onload="init_page()">
<div id="localDisplay" style="display: none"></div>
<div id="remoteVideo" class="display" style="width:640px;height:480px;border:solid 1px"></div>
<br>
<input id="login" type="text" placeholder="Login"/>
<button id="joinBtn">Join</button>
</body>
</html>
Then, the most interesting part begins. We are going to vitalize our HTML page.
Open “mcu-min.js” file for editing
When loading the HTML page, we initialize the main API, attach the “joinBtnClick()” function to pressing of the HTML “Join” button, and create a connection to the WCS via WebSockets. When copying the code, be sure to replace “demo.flashphoner.com” with your WCS address.
function init_page() {
Flashphoner.init({});
joinBtn.onclick = joinBtnClick;
var remoteVideo = document.getElementById("remoteVideo");
var localDisplay = document.getElementById("localDisplay");
session = Flashphoner.createSession({
urlServer: "wss://demo.flashphoner.com"
}).on(SESSION_STATUS.ESTABLISHED, function(session) {});
}
The “joinBtnClick()” function starts publishing of the local video stream to the WCS and calls the next “playStream()” function in the chain.
When a local video stream is created and published, the following parameters are transmitted:
- streamName – the name of the stream published by a conference participant (in this case, login + “# room1”, where login is the name of the participant that was indicated on the HTML page.)
- display – an invisible div element for displaying the preview of the local video stream that we have created in the HTML file (localDisplay)
- constraints — parameters of audio and video playback availability
function joinBtnClick() {
var login = document.getElementById("login").value;
var streamName = login + "#room1";
var constraints = {
audio: true,
video: true
};
publishStream = session.createStream({
name: streamName,
display: localDisplay,
receiveVideo: false,
receiveAudio: false,
constraints: constraints,
}).on(STREAM_STATUS.PUBLISHING, function(publishStream) {
playStream(session);
})
publishStream.publish();
}
And finally, the last function in the chain – “playStream()”. This function starts playback of the audio and video stream of our multi-user conference on the HTML page. The following is transmitted as parameters:
- name – the name of the mixer to be played for the participant (in this case room1)
- display – the div-element in which the video will be displayed (remoteVideo)
- constraints – parameters for availability of audio and video playback.
function playStream(session) {
var constraints = {
audio: true,
video: true
};
conferenceStream = session.createStream({
name: "room1",
display: remoteVideo,
constraints: constraints,
}).on(STREAM_STATUS.PLAYING, function (stream) {})
conferenceStream.play();
}
Complete listing of the js script.
var SESSION_STATUS = Flashphoner.constants.SESSION_STATUS;
var STREAM_STATUS = Flashphoner.constants.STREAM_STATUS;
var session;
var conferenceStream;
var publishStream;

function init_page() {
Flashphoner.init({});
joinBtn.onclick = joinBtnClick;
shareBtn.onclick = startShareScreen;
var remoteVideo = document.getElementById("remoteVideo");
var localDisplay = document.getElementById("localDisplay");
session = Flashphoner.createSession({
urlServer: "wss://demo.flashphoner.com"
}).on(SESSION_STATUS.ESTABLISHED, function(session) {});
}

function joinBtnClick() {
var login = document.getElementById("login").value;
var streamName = login + "#room1";
var constraints = {
audio: true,
video: true
};
publishStream = session.createStream({
name: streamName,
display: localDisplay,
receiveVideo: false,
receiveAudio: false,
constraints: constraints,
}).on(STREAM_STATUS.PUBLISHING, function(publishStream) {
playStream(session);
})
publishStream.publish();
}

function playStream() {
var constraints = {
audio: true,
video: true
};
conferenceStream = session.createStream({
name: "room1",
display: remoteVideo,
constraints: constraints,
}).on(STREAM_STATUS.PLAYING, function(stream) {})
conferenceStream.play();
}
After programming has been completed, time has come to check how it all works.
Open the HTML page that has been created, indicate the name of the first MCU participant and press “Join”.
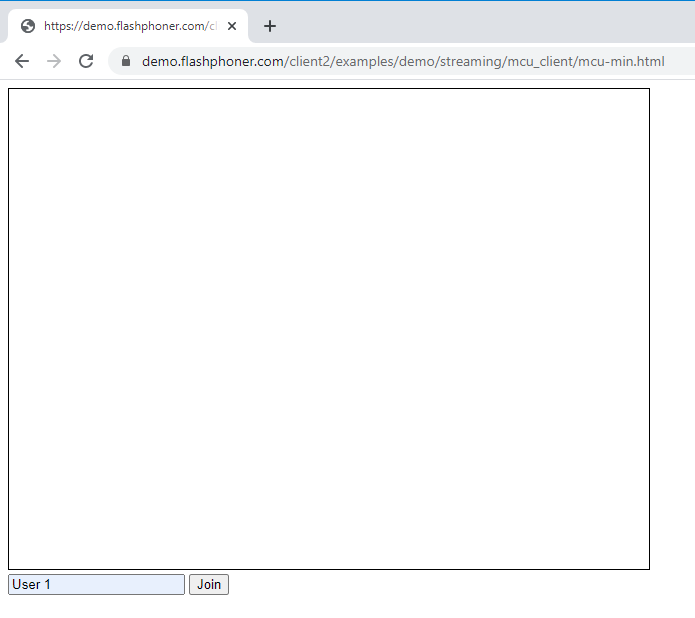
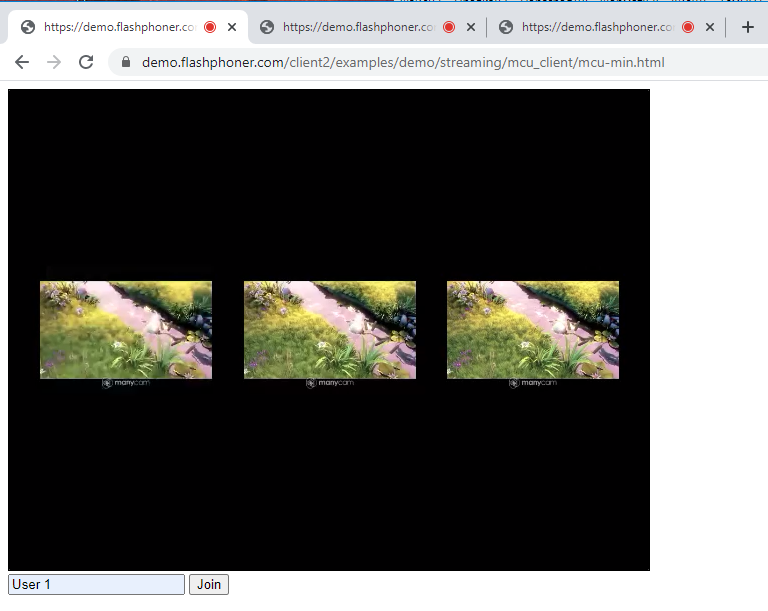
Repeat the actions for the second and third users in new browser tabs. A view of a multi-user conference for three users is shown in the screenshot below.
But the statement of the problem requires that screen sharing and recording features be implemented in the conference.
Let’s see how we can slightly modify the code to add screen sharing to the conference.
Add a “Share Screen” button to the HTML page
<button id="shareBtn">Share Screen</button>
Add the “startShareScreen()” function to “mcu-min.js” script file to process pressing of the “Share Screen” button and start broadcasting of the screen sharing stream in the MCU
function startShareScreen() {
var login = document.getElementById("login").value;
var streamName = login + "#room1" + "#desktop";
var constraints = {
audio: true,
video: {
width: 640,
height: 480
}
};
constraints.video.type = "screen";
constraints.video.withoutExtension = true;
publishStream = session.createStream({
name: streamName,
display: localDisplay,
receiveVideo: false,
receiveAudio: false,
constraints: constraints,
}).on(STREAM_STATUS.PUBLISHING, function(publishStream) {})
publishStream.publish();
}
When a screen sharing stream is created and published, the following parameters are transmitted:
- streamName – the name of the screen sharing stream (in this case login + “# room1” + “#desktop”, where login is the name of the participant that was indicated on the HTML page.)
- display – an invisible div element for displaying the preview of the local video stream that we have created in the HTML file (localDisplay)
- constraints – parameters of audio and video playback availability. In order to capture the screen instead of the camera, two parameters have to be specified explicitly in constraints:
constraints.video.type = "screen";
constraints.video.withoutExtension = true;
The complete minimal JS code for a multi-user conference with screen sharing will look as follows:
var SESSION_STATUS = Flashphoner.constants.SESSION_STATUS;
var STREAM_STATUS = Flashphoner.constants.STREAM_STATUS;
var session;
var conferenceStream;
var publishStream;

function init_page() {
Flashphoner.init({});
joinBtn.onclick = joinBtnClick;
shareBtn.onclick = startShareScreen;
var remoteVideo = document.getElementById("remoteVideo");
var localDisplay = document.getElementById("localDisplay");
session = Flashphoner.createSession({
urlServer: "wss://demo.flashphoner.com"
}).on(SESSION_STATUS.ESTABLISHED, function(session) {});
}

function joinBtnClick() {
var login = document.getElementById("login").value;
var streamName = login + "#room1";
var constraints = {
audio: true,
video: true
};
publishStream = session.createStream({
name: streamName,
display: localDisplay,
receiveVideo: false,
receiveAudio: false,
constraints: constraints,
}).on(STREAM_STATUS.PUBLISHING, function(publishStream) {
playStream(session);
})
publishStream.publish();
}

function playStream() {
var constraints = {
audio: true,
video: true
};
conferenceStream = session.createStream({
name: "room1",
display: remoteVideo,
constraints: constraints,
}).on(STREAM_STATUS.PLAYING, function(stream) {})
conferenceStream.play();
}

function startShareScreen() {
var login = document.getElementById("login").value;
var streamName = login + "#room1" + "#desktop";
var constraints = {
audio: true,
video: {
width: 640,
height: 480
}
};
constraints.video.type = "screen";
constraints.video.withoutExtension = true;
publishStream = session.createStream({
name: streamName,
display: localDisplay,
receiveVideo: false,
receiveAudio: false,
constraints: constraints,
}).on(STREAM_STATUS.PUBLISHING, function(publishStream) {})
publishStream.publish();
}
Now let’s see how it works in practice.
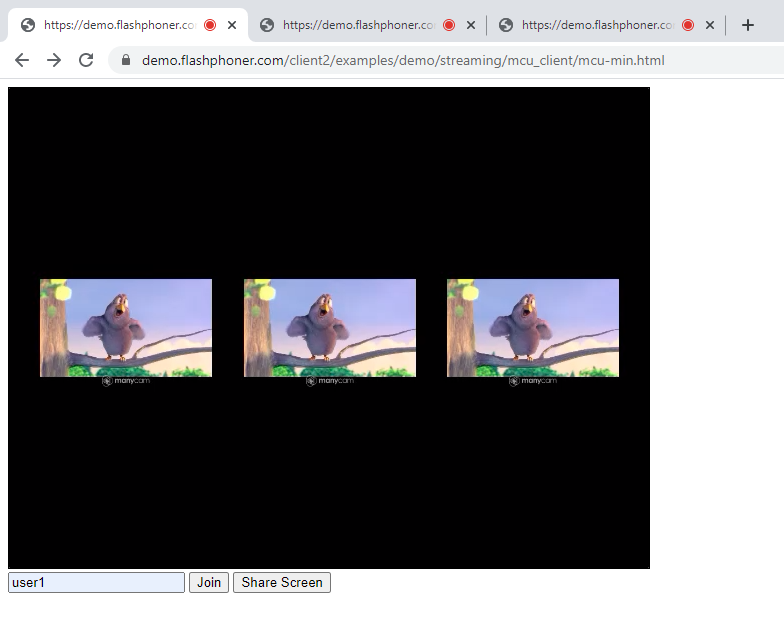
Open the HTML page that has been created, indicate the name of the first MCU member and press “Join”. Repeat several more times in new browser tabs.
We get the following view of the MCU:
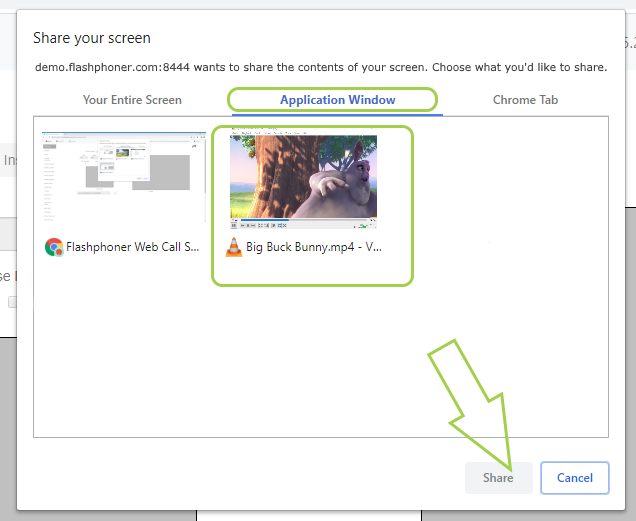
Then, press “Share Screen” for one of the users. After the “Share Screen” button is pressed, the browser asks what exactly needs to be shared: the entire screen, an application or a particular browser tab. For this test, we have selected “Application Window” and “VLC media player”. Make a selection and press “Share”.
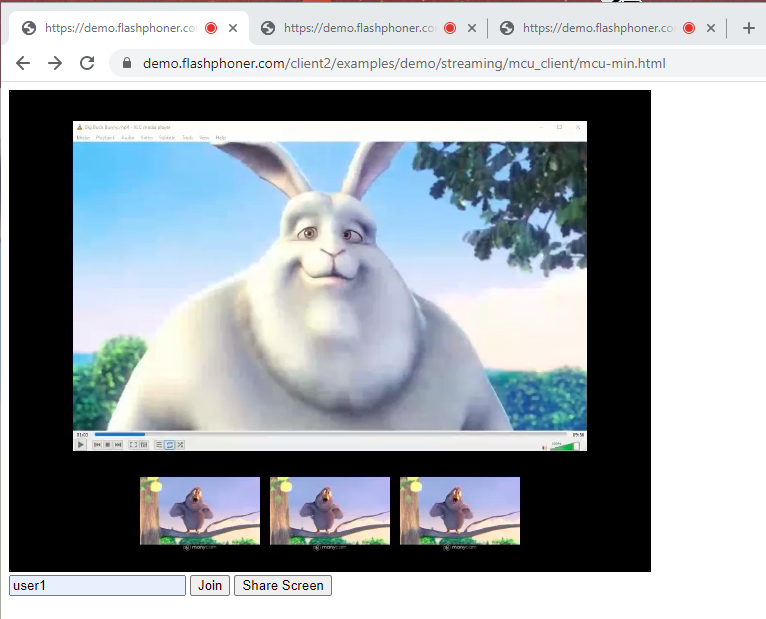
A view of the MCU with screen sharing enabled, the conference participants’ streams are displayed in small size while the screen of the participant “user 1” is shown big.
This is how, without writing sophisticated algorithms, we have made a multi-point audio and video conference with a screen sharing feature. Complex algorithms are, of course, used in MCU operation, but they are on the WCS side and operate completely unnoticed, for both the end user and the designer.
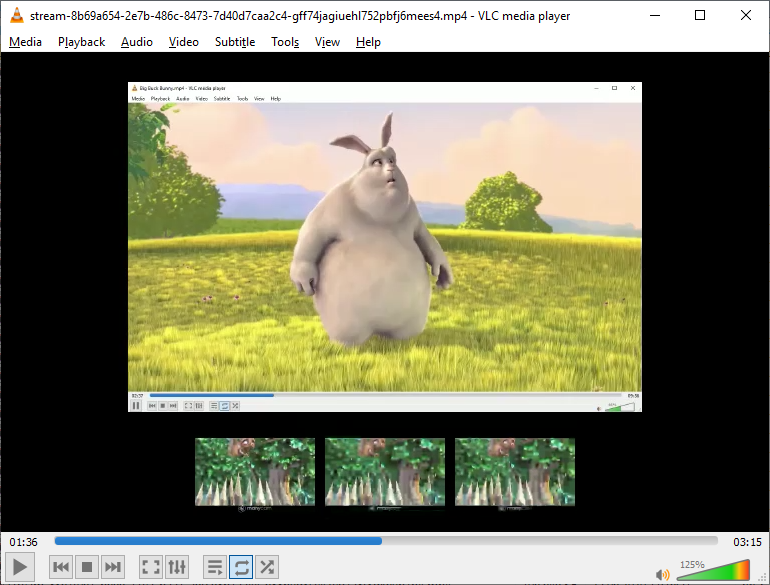
The problem statement also mentions recording. Here everything is quite simple. The WCS automatically generates a recording file that can later be handled: copied, relocated, deleted, played or archived.
In order to download the file from the server, you can use file managers (FAR, TotalCommander, WinSCP), commands built into the Linux shell, and/or add a direct link to the conference web page for downloading the file from the server via browser.
The downloaded file can be opened using any convenient player. We used VLC Media Player. The screenshot below shows a frame from the video file into which the stream of our minimal multi-point video conference was recorded.
In Conclusion
Our JS script only took 70 lines which is really very little.
In the example, we do not use any additional frameworks and checks for data existence and/or fulfillment of conditions. They are of course necessary for the final product which is launched for production, but the purpose of this article is to discuss an example of the minimum code necessary for a multi-user conference to work and, as you can see, the goal has been achieved: the conference is working.
Have a good streaming!


