Screencasting (demo screen, screensharing) already works in Google Chrome. The technology allows capturing a window of the browser itself as well as windows of other applicaitons. For example, you can capture Firefox running in a separate window.
It’s fine, but there is a security issue. In the Chrome browser screencasting is turned off.
To enable screencasting, you need Chrome Desktop Capture API, and this article shows how to do this.
Screencasting extension
To make screencasting work, the user should install your Chrome extension designed specifically for your website (domain).
The very first run of screencasting requires the follows actions from a user:
- The user opens the website and clicks Start screensharing.
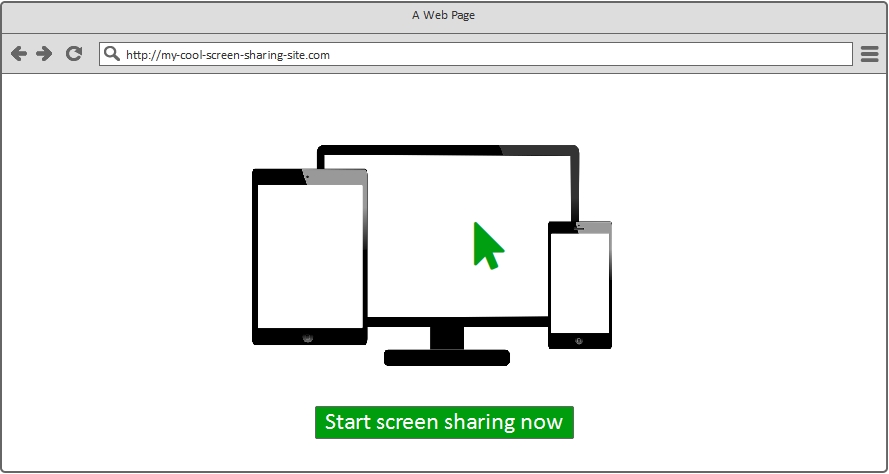
- The user is asked to add the extension for this action.
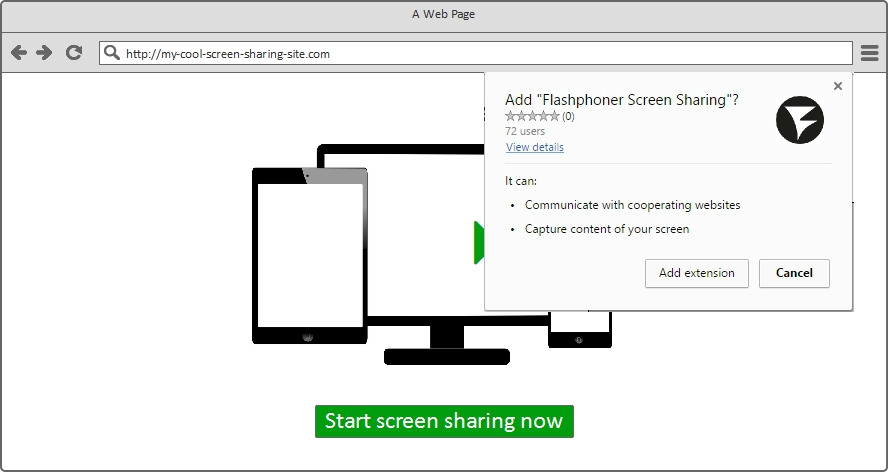
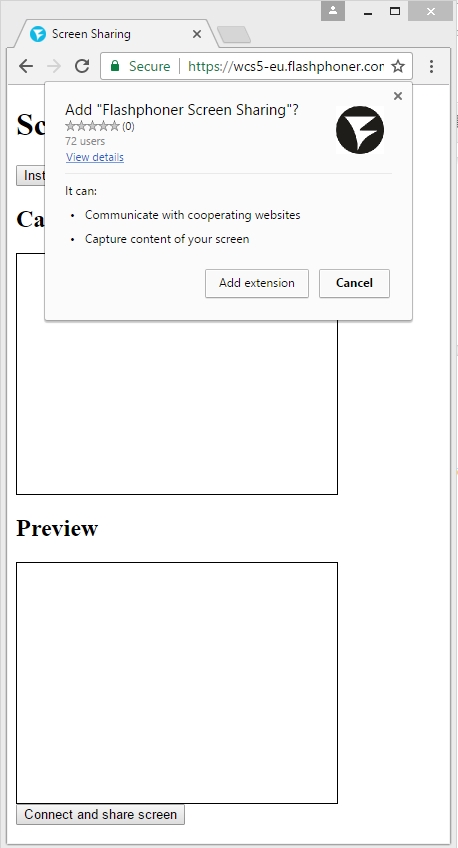
The Chrome browsers asks to add the extension in a standard box, where a user can add the extension in just one click. The box notifies the user that the extension can capture the screen.
Your own extension
The next step is creating an extension for your domain. Let’s say your test domain is mysupercat.com. In this case, when creating the extension, you should put the domain name into the code.
Besides, your domain (the website on this domain) must work via HTTPS. Correspondingly, your screencasting page should opens something like this: https://mysupercat.com/screen-sharing.php
The domain and HTTPS are, basically, all you need to create your own extension for screencasting. And you don’t need to purchase SSL certificates. Self-signed certificates will do fine as long as your page does open via HTTPS, even if it’s read and strikethrough:

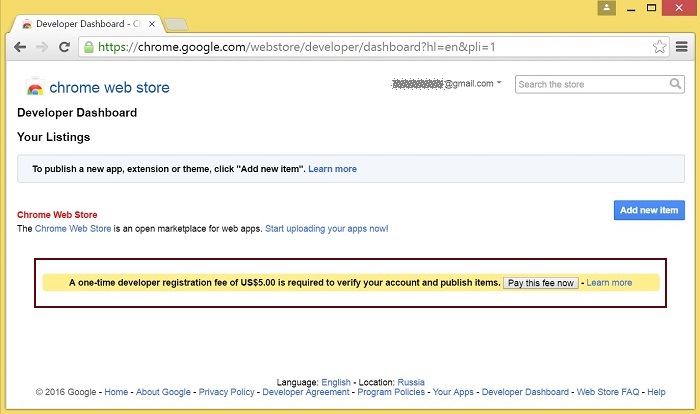
Oh, and you need spare five bucks. This is what you need to pay to become a Chrome developer community.
Let’s conclude. To start creating and testing your own extension you need:
- domain name
- HTTPS hosting
- 5 dollars on your credit card

Publishing the extension
- Go to Chrome Developer Dashboard and pay 5 bucks for membership.
- Prepare a ZIP containing files of the extension.To do this, download 2 files here.
Edit the manifest.json file and put your own:
- name
- author
- description
- homepage_url
For example:
"Name" : "My cool screen sharing extension",
"Author" : "I am",
"Description" : "The extensions shares screens from my website",
"Homepage_url" : "https://mysupercat.com",
{
  "name" : "Flashphoner Screen Sharing",
  "author": "Flashphoner",
  "version" : "1.4",
  "manifest_version" : 2,
  "minimum_chrome_version": "34",
  "description" : "This Chrome extension is developed for https://flashphoner.com WCS Api to enable screen capture.",
  "homepage_url": "https://flashphoner.com",
  "background": {
    "scripts": ["background-script.js"],
    "persistent": false
  },
  "externally_connectable": {
    "matches": [
      "https://flashphoner.com/*",
      "https://*.flashphoner.com/*",
      "*://localhost/*",
      "*://127.0.0.1/*"
    ]
  },
  "icons": {
    "16": "logo16.png",
    "48": "logo48.png",
    "128": "logo128.png"
  },
  "permissions": [
    "desktopCapture"
  ],
  "web_accessible_resources": [
    "logo48.png"
  ]
}
After that, change icons and substitute your own domain to externally_connectable
"externally_connectable": {
    "matches": [
      "https://mysupercat.com/*",
      "https://*.mysupercat.com/*",
      "*://localhost/*",
      "*://127.0.0.1/*"
    ]
  }
Here’s manifest.json you should end up with:
{
  "name" : "My cool screen sharing extension",
  "author": "I am",
  "version" : "1.0",
  "manifest_version" : 2,
  "minimum_chrome_version": "34",
  "description" : "The extensions shares screens from my website",
  "homepage_url": "https://mysupercat.com",
  "background": {
    "scripts": ["background-script.js"],
    "persistent": false
  },
  "externally_connectable": {
    "matches": [
      "https://mysupercat.com/*",
      "https://*.mysupercat.com/*",
      "*://localhost/*",
      "*://127.0.0.1/*"
    ]
  },
  "icons": {
    "16": "logo16.png",
    "48": "logo48.png",
    "128": "logo128.png"
  },
  "permissions": [
    "desktopCapture"
  ],
  "web_accessible_resources": [
    "logo48.png"
  ]
}
Pack these files to a ZIP archive with all the icons and other pictures. You can read more about icons here. Additional images are discussed here.
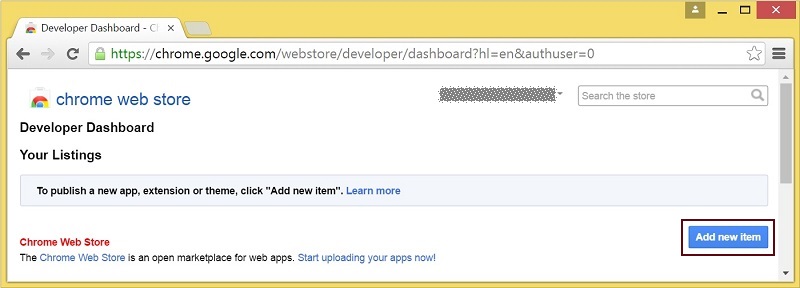
Then click Add new item.
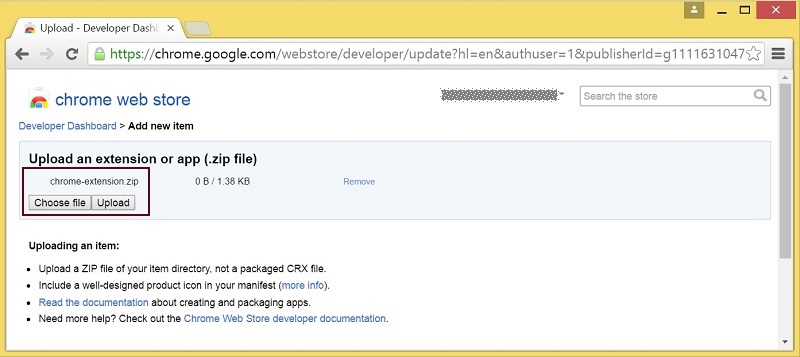
Then, after reading the agreement, upload your ZIP archive
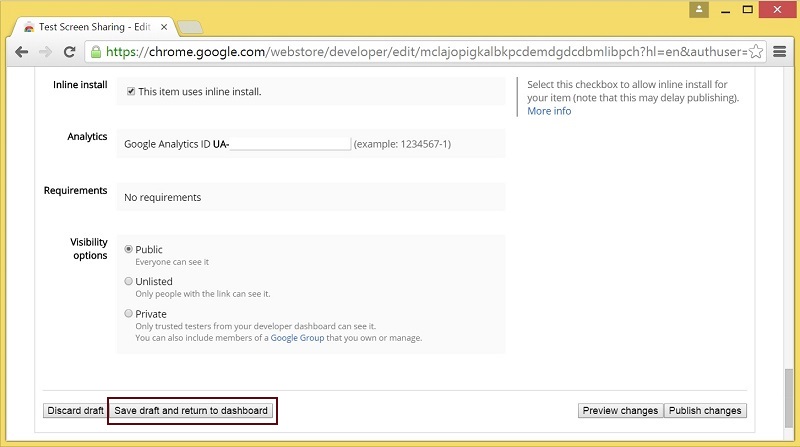
After the archive is uploaded, verify everything and save
Now, you only need to publish the extension from the Dashboard by clicking the Publish button.
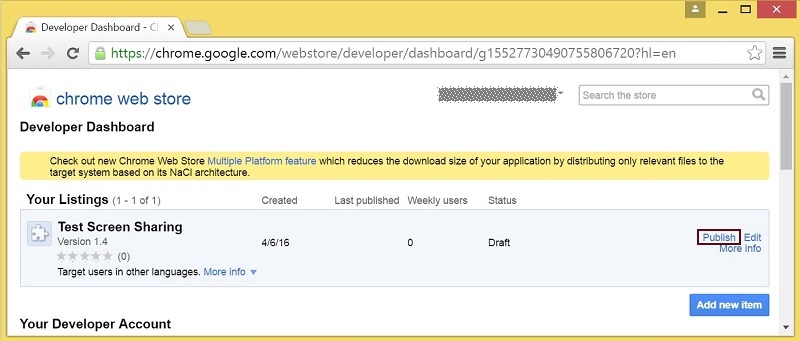
The published extension looks like this in the Dashboard:
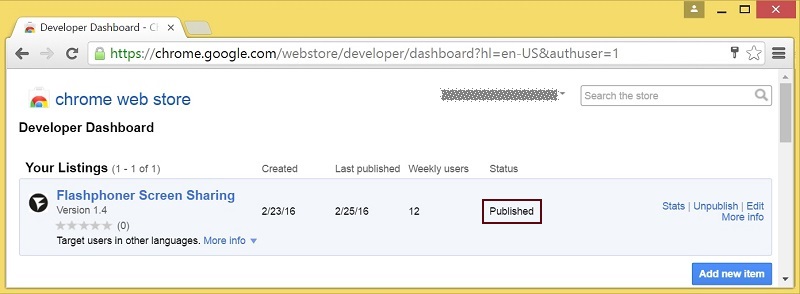
Done. The extension is packed, published and is available for installing to a browser.
In-line install
Without in-line install, your users would have to open Chrome Store and install your extension from there. Not a big deal, but:
- This is not very convenient to a user.
- The user can get lost on the extension installation page and never get back to your page.
In-line installing of an extension is that nifty standard box that allows a user to skip visiting Chrome Store:
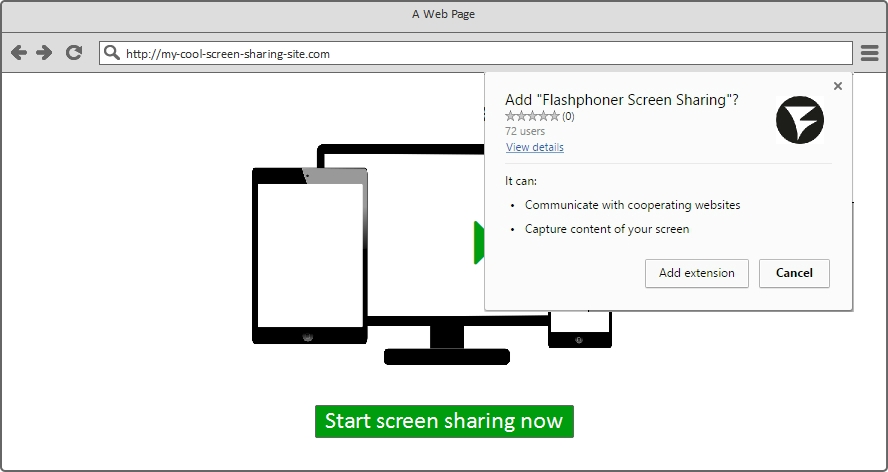
To configure in-line install, you should have a control over the domain and hosting specified in the manifest (manifest.json file).
For example, if your domain is mysupercat.com, you will need to pass the standard verification procedure and confirm your ownership of this domain.
To enable in-line install, enable the This item uses in-line install flag on the configuration page of the extension.
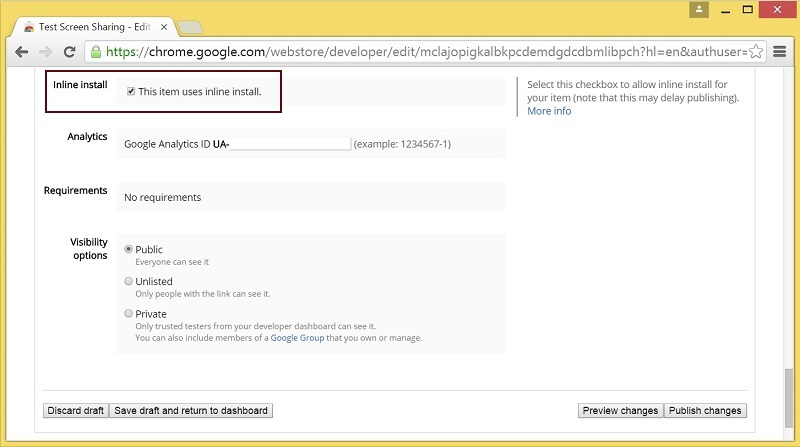
Then, you add your own website.

Search Console will open in a new window where you can pass verification.
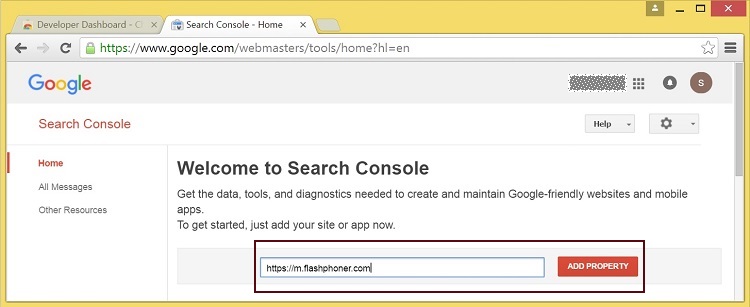
The next step is to upload the identifier file to your hosting to confirm ownership of your domain / website
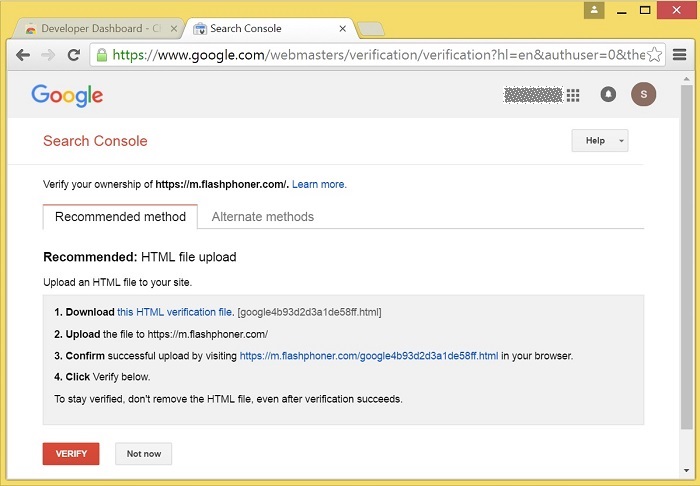
Verification is successful.

The verified site is displayed in the list of websites available for this extension, and now you can use in-line installing for the extension

Integrating screencasting to the web page
The extension is read and configured for in-line installing. We only need to embed the code to invoke the extension to the HTML page and test it.
Screencasting in Google Chrome uses WebRTC API. So, to finish this test we need a WebRTC platform.
As a server-side WebRTc platform we will use Web Call Server and Web SDK – a set of API scripts for this server.
1. Create an HTML page for screencasting screen-sharing.html
The page is 16 lines of code looking as follows:
<html>
<head>
    <script type="text/javascript" src="https://flashphoner.com/downloads/builds/flashphoner_client/wcs_api-2.0/current/flashphoner.js"></script>
    <script type="text/javascript" src="screen-sharing.js"></script>
</head>
<body onload="init_api()">
<h1>Screen Sharing</h1>
<button id="installExtensionButton" type="button">Install Now</button>
<h2>Capture</h2>
<div id="localVideo" style="width: 320px; height: 240px; border: 1px solid;"></div>
<h2>Preview</h2>
<div id="remoteVideo" style="width: 320px; height: 240px; border: 1px solid;"></div>
<button id="publishBtn" type="button">Connect and share screen</button>
<p id="status"></p>
</body>
</html>
Let’s examine it line by line.
1) Load the API in flashphoner.js
<script type="text/javascript" src="https://flashphoner.com/downloads/builds/flashphoner_client/wcs_api-2.0/current/flashphoner.js"></script>
2) Upload the screen-sharing.js script. We will examine it in detail later.
<script type="text/javascript" src="screen-sharing.js"></script>
3) Specify where to look for the screencasting extension.
4) Add a button to execute installing of the extension.
<button id="installExtensionButton" type="button">Install Now</button>
5) Add a div – the localVideo element that will display the captured screen locally
<div id="localVideo" style="width: 320px; height: 240px; border: 1px solid;"> </div>
6) Add a div – the remoteVideo element that will act as a player displaying what was received from the server, that is it displays the video stream captured to localVideo and sent to the server.
<div id="remoteVideo" style="width: 320px; height: 240px; border: 1px solid;"> </div>
7) The button that initiates screencasting and displays the status of the stream.
<button id="publishBtn" type="button">Connect and share screen</button>
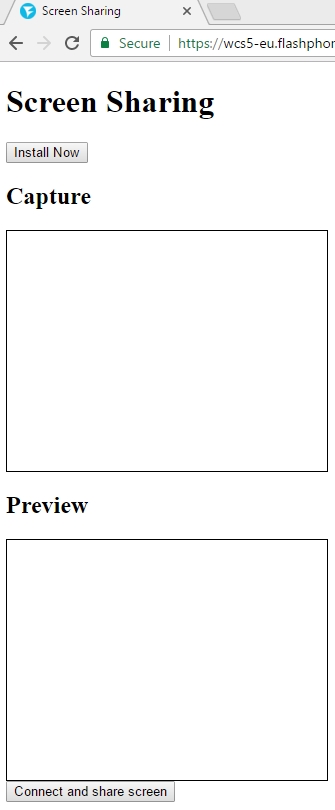
Or page looks like this.
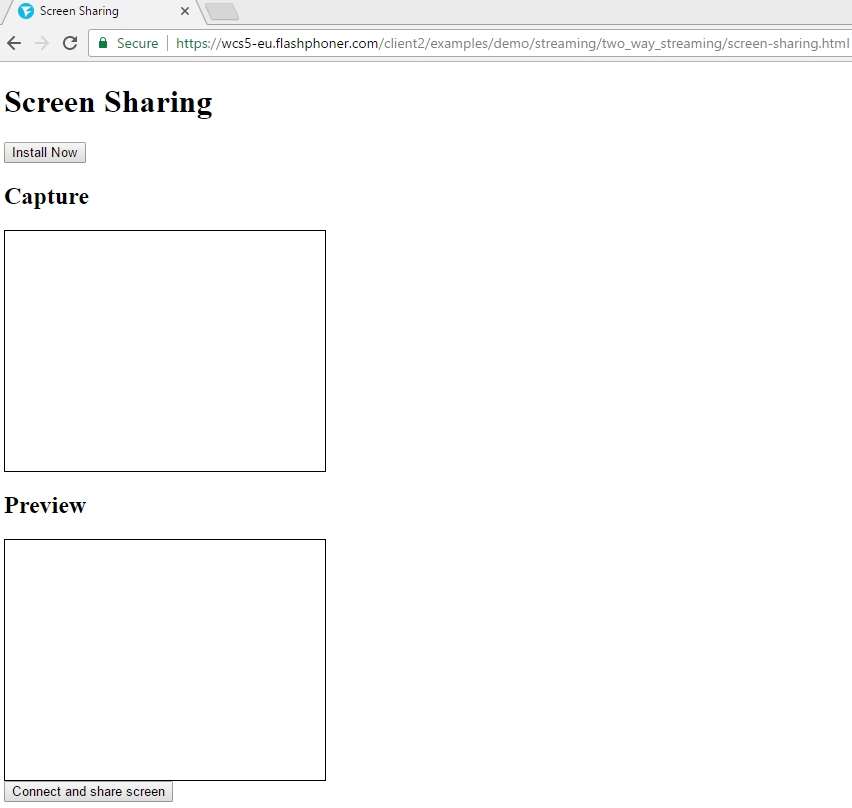
2. Create JavaScript code for screencasting screen-sharing.js
The code is available for download here. The code is a couple of screens with 5 main functions.
var SESSION_STATUS = Flashphoner.constants.SESSION_STATUS;
var STREAM_STATUS = Flashphoner.constants.STREAM_STATUS;
var localVideo;
var remoteVideo;
var extensionId = "nlbaajplpmleofphigmgaifhoikjmbkg";

function init_page() {
   //init api
   try {
       Flashphoner.init({screenSharingExtensionId: extensionId});
   } catch (e) {
       //can't init
       return;
   }

   var interval = setInterval(function () {
       chrome.runtime.sendMessage(extensionId, {type: "isInstalled"}, function (response) {
           if (response) {
               document.getElementById("installExtensionButton").disabled = true;
               clearInterval(interval);
               localVideo = document.getElementById("localVideo");
               remoteVideo = document.getElementById("remoteVideo");
           } else {
               document.getElementById("installExtensionButton").disabled = false;
           }
       });
   }, 500);

}

function connectAndShareScreen() {
   var url = "wss://wcs5-eu.flashphoner.com:8443";
   console.log("Create new session with url " + url);
   Flashphoner.createSession({urlServer: url}).on(SESSION_STATUS.ESTABLISHED, function (session) {
       //session connected, start streaming
       startStreaming(session);
   }).on(SESSION_STATUS.DISCONNECTED, function () {
       setStatus(SESSION_STATUS.DISCONNECTED);
   }).on(SESSION_STATUS.FAILED, function () {
       setStatus(SESSION_STATUS.FAILED);
   });

}

function startStreaming(session) {
   var streamName = "test123";
   var constraints = {
       video: {
           width: 320,
           height: 240,
           frameRate: 10,
           type: "screen"
       }
   };
   session.createStream({
       name: streamName,
       display: localVideo,
       constraints: constraints
   }).on(STREAM_STATUS.PUBLISHING, function (publishStream) {
       setStatus(STREAM_STATUS.PUBLISHING);
       //play preview
       session.createStream({
           name: streamName,
           display: remoteVideo
       }).on(STREAM_STATUS.PLAYING, function (previewStream) {
           //enable stop button
       }).on(STREAM_STATUS.STOPPED, function () {
           publishStream.stop();
       }).on(STREAM_STATUS.FAILED, function () {
           //preview failed, stop publishStream
           if (publishStream.status() == STREAM_STATUS.PUBLISHING) {
               setStatus(STREAM_STATUS.FAILED);
               publishStream.stop();
           }
       }).play();
   }).on(STREAM_STATUS.UNPUBLISHED, function () {
       setStatus(STREAM_STATUS.UNPUBLISHED);
       //enable start button
   }).on(STREAM_STATUS.FAILED, function () {
       setStatus(STREAM_STATUS.FAILED);
   }).publish();
}

//show connection or local stream status
function setStatus(status) {
   var statusField = document.getElementById("status");
   statusField.innerHTML = status;
}

//install extension
function installExtension() {
   chrome.webstore.install();
}
Let’s examine this code in detail.
1) First, we declare several variables: statuses, localVideo and remoteVideo elements, and extensionId that contains the unique id of the screencasting extension.
var SESSION_STATUS = Flashphoner.constants.SESSION_STATUS;
var STREAM_STATUS = Flashphoner.constants.STREAM_STATUS;
var localVideo;
var remoteVideo;
var extensionId = "nlbaajplpmleofphigmgaifhoikjmbkg";
2) The we send extensionId to the Flashphoner API, as a result the API knows which extension is used for screencasting.
Flashphoner.init({screenSharingExtensionId: extensionId});
3) Periodically we check Chrome and see if the extension is installed. If the extension is installed, we don’t need the Install extension button any more and we can hide it.
chrome.runtime.sendMessage(extensionId, {type: "isInstalled"}, function (response) {...}
4) The connectAndShareScreen function establishes connection to the server, and as soon it does (ESTABLISHED) it begins capturing and sending the video stream by delegating control to the startStreaming function.
function connectAndShareScreen() {
   var url = "wss://wcs5-eu.flashphoner.com:8443";
   console.log("Create new session with url " + url);
   Flashphoner.createSession({urlServer: url}).on(SESSION_STATUS.ESTABLISHED, function (session) {
       //session connected, start streaming
       startStreaming(session);
   }).on(SESSION_STATUS.DISCONNECTED, function () {
       setStatus(SESSION_STATUS.DISCONNECTED);
   }).on(SESSION_STATUS.FAILED, function () {
       setStatus(SESSION_STATUS.FAILED);
   });
}
5) Before screencasting starts, we set such stream parameters as video resoultion and FPS.
var constraints = {
       video: {
           width: 320,
           height: 240,
           frameRate: 10,
           type: "screen"
       }
   };
6) Then we create the stream itself and invoke the publish() method. Please note, the stream is named test123
session.createStream({
       name: streamName,
       display: localVideo,
       constraints: constraints
   }).publish();
7) After the test123 stream is successfull sent to the server, the execution is transferred to the handler of the PUBLISHING event.
on(STREAM_STATUS.PUBLISHING, function (publishStream) {...}
8) Now we only need to play the stream in the adjacent div remoteVideo. To do this, we invoke the play() function.
session.createStream({
           name: streamName,
           display: remoteVideo
       }).play();
The page and the script are ready for testing.
Preparing to testing
As a result we have the following files:
- screen-sharing.html
- screen-sharing.js
- flashphoner.js
flashphoner.js is included to Web SDK build. The latest build is available for download here.
In addition to html and js files, we need the rebroadcasting server that accepts a video stream and broadcasts it to all others (in our case – back to the same page).
We use Web Call Server 5 for testing. So, we have several options:
- Install to your own host
- Run on Amazon EC2
- Use the demo server/a> at wss://wcs5-eu.flashphoner.com:8443
Testing of screencasting follows the below diagram:
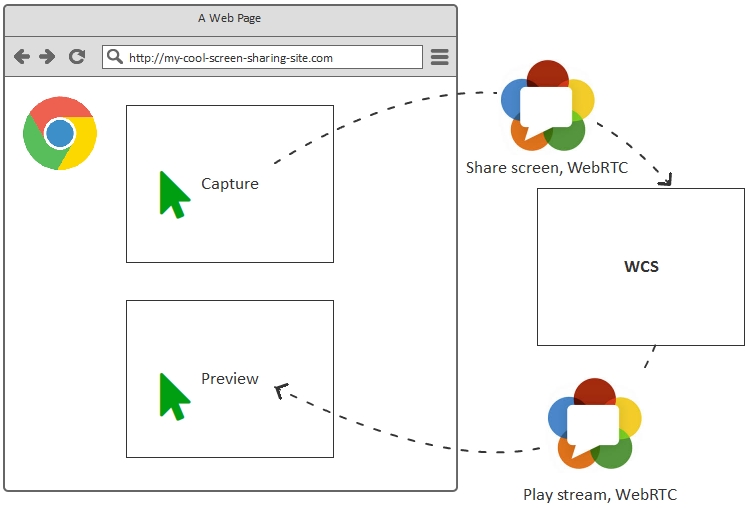
The same way we can broadcast the screencasting stream to multiple connected users
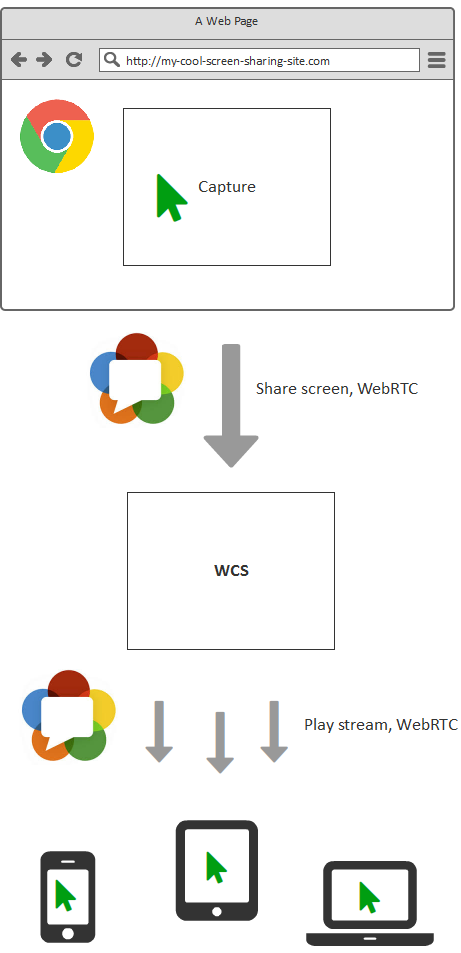
Testing screencasting in Chrome
- Open the screen-sharing.html page via HTTPS in Google Chrome
- Click the Install Now button to add the extension using in-line installing
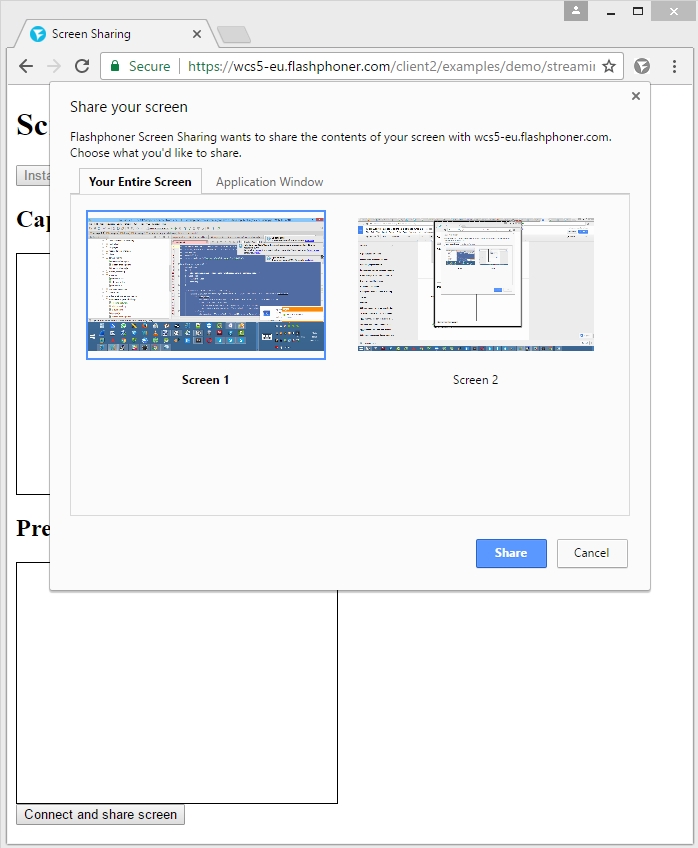
- Click Add extension and start screencasting by clicking Connect and share screen. Chrome asks to choose what to capture. This can be a tab or a window of Chrome itself, or another appliciaton.
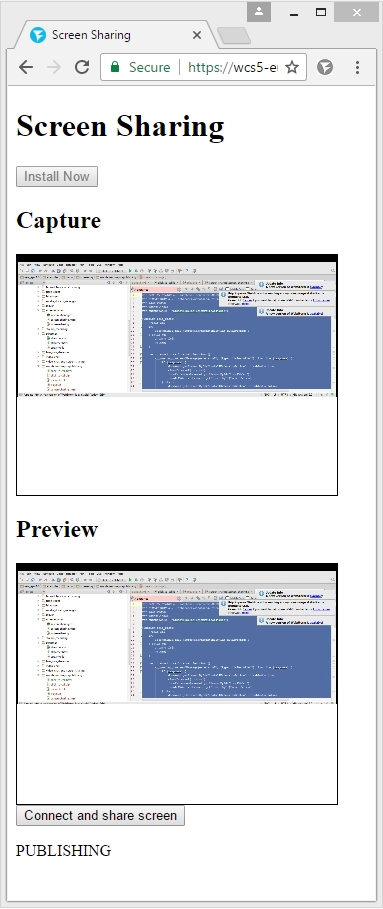
- Click Share and end up enjoying the final result. The screen is captured, sent to the server via WebRTC and returns back when the Preview block displays it.
Conclusion
Therefore we successfully tested screencasting using a simple test page screen-sharing.html in the Google Chrome browser. The test page contains the extension for screencasting that we published in Chrome Store and installed in one click without opening the Store.
During testing the page operated via the HTTPS protocol and have sent and received video via Web Call Server – a WebRTC media server to broadcast streaming video.
To integrate screencasting to the HTML page we used the flashphoner.js script that is a part of the Web SDK build for the WCS server.
References
Chrome API to capture video from the desktop
Developer Dashboard for Chrome
Minimum code for a screencasting extension
Packing icons to the extension
Packing additional icons to the extension
Download the sample code of screencasting
Installing Web Call Server to your own host
Run WCS on Amazon EC2
Web Call Server 5 demo server
Web Call Server
Web SDK

