It’s been a while since HTTP-based video content delivery protocols such as HLS and DASH edged out Flash as a primary way to play online video content in browsers.
Nevertheless, the RTMP protocol initially intended for Flash is still one of the most popular ways to transfer Live video from the source of the video to the rebroadcasting server. RTMP is still used by such services as Facebook Live, Youtube Live, and others where live video broadcasting is a must. Therefore, in spite of predictions and prophecies of untimely death of Flash, the RTMP protocol is still in the catbird seat and holds the fort in the video broadcasting niche.
There are a number of available hardware and software solutions to capture video from cameras with subsequent encoding to RTMP. Such boxes are connected to one or more cameras, process received video signals and send the resulting picture via RTMP to a remote server or a rebroadcasting service. The classic broadcasting scheme looks as follows:
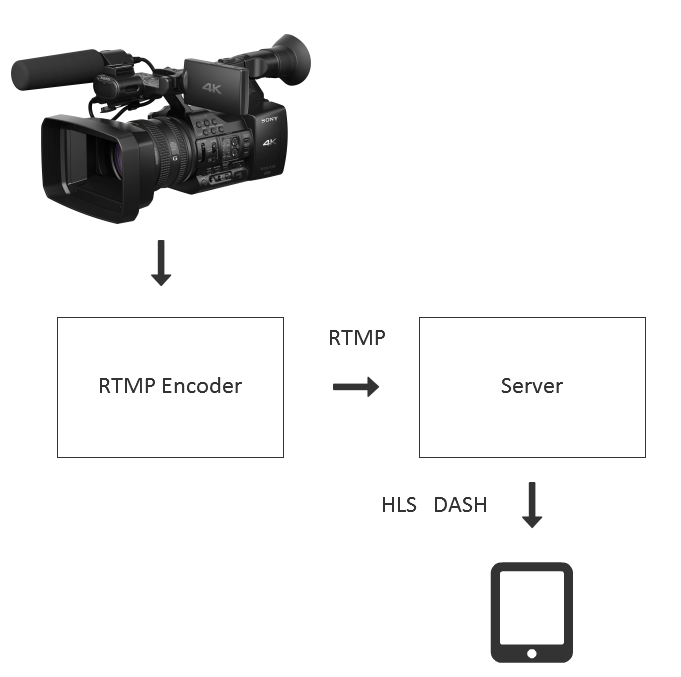
The only disadvantage of this approach is video broadcasting latency which might be as high as 30 seconds. And if we trade HLS and DASH for Adobe Flash Player and RTMP, we come again to the Flash plugin which is, to put it bluntly, is not cutting edge online video technology.
WebRTC
There is a way to play a video stream without installing plugins and with minimum latency as well. This is WebRTC accompanied by RTMP to WebRTC conversion on the server side that solves the task of playing the stream back on multiple devices and browsers.
However, you should take into account that WebRTC is technology designed for real time. Unlike HTTP (РДЫ) where segments of the video is transmitted via HTTP, WebRTC is far more complex. It uses tight data exchange between the sender and the recipient of the traffic using RTCP-feedback, bandwidth control and latency targeting.
That is, before you start your WebRTC project for the only sake of playing a video stream, ask yourself: does the project really need low latency video delivery?. And if you don’t really need low latency, it is worth taking a look at other technologies like HLS and DASH to avoid WebRTC overhead.
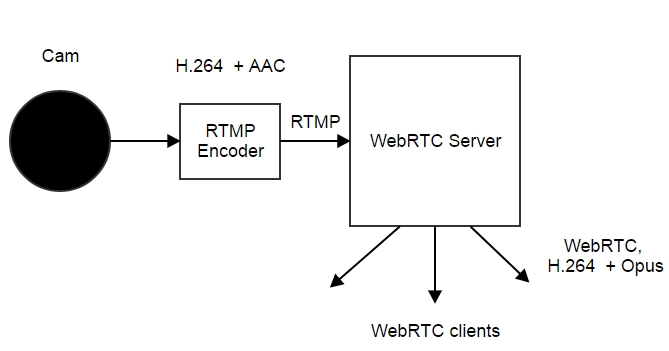
For maximum compatibility with other devices and to retain the ability to broadcast via HLS, you should choose proper codecs. Usually, RTMP encoders support H.264 video codec and AACaudio codec. This combination is rather common and is a standard today.
WebRTC in browsers does not support the AAC codec, so we have to transcode AAC to Opus or AAC to G.711. Opus transcoding results in better quality and allows to raise it up even higher if necessary. So, if you chose to transcode, transcode to Opus.
Since we use H.264 both when receiving a video stream by the server and when playing the stream on a WebRTC device, no transcoding is required here. Instead, we need to depacket the video received via RTMP followed by packeting to SRTP (WebRTC). Repacketing takes less CPU time than transcoding allowing to process more inbound streams.
However some devices do not support H.264. For example, the Chrome browser for Android does not allow using this codec at all times. In this case, full transcoding to WebRTC codec VP8 will be enabled, and the scheme will look as follows:
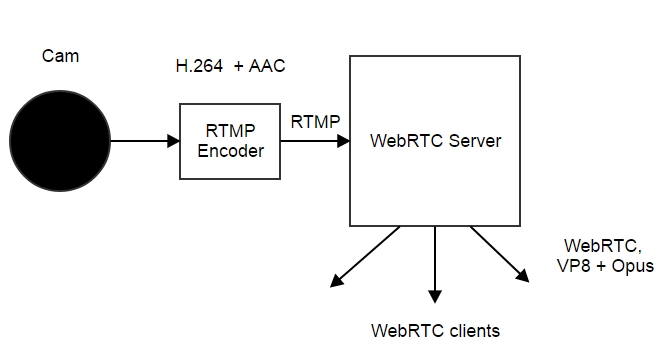
Server-side transcoding requires serious CPU power, so you should be ready to invest into 1 core of the server CPU to transcode a high-resolution video stream, such as 720p.
Coders
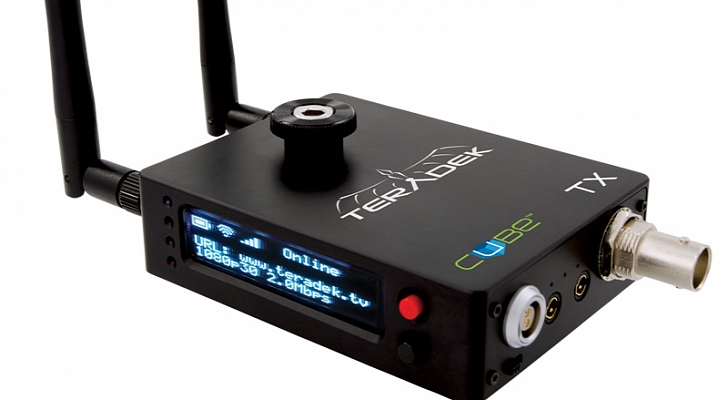
Professional coders like this one are costly and are used for professional 24×7 broadcasting and in serious business applications:
For less pretentious events, software solutions like free Adobe Live Media Encoder can be used.
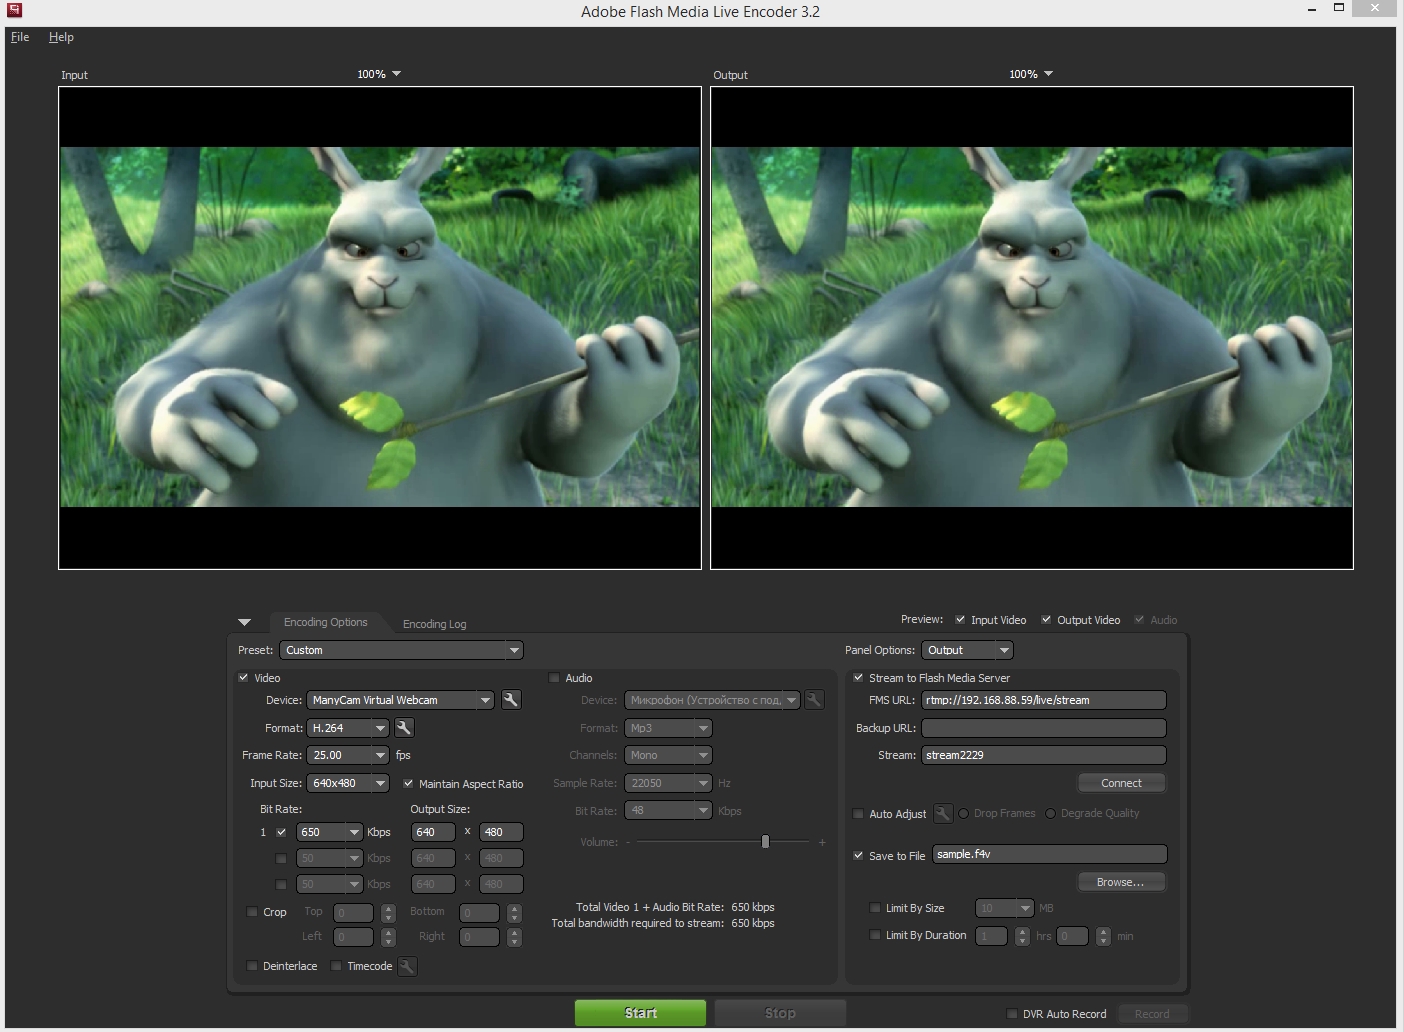
The version of the coder for Mac OS supports H.264 and AAC codecs. Therefore, if you use Live Media Encoder on Mac, it can to some extent replace a hardware coder of proprietary software capable of broadcasting RTMP using these codecs.
Testing
First of all, let’s make sure the stream is available and can be played via RTMP. If it plays via RTMP, we connect to it via WebRTC.
Streaming of a video to the server is called publishing and requires the minimum of:
- Select the camera to use.
- Specify the RTMP address of the stream Example: rtmp://192.168.88.59/live
- Specify the name of the stream Example: stream2229
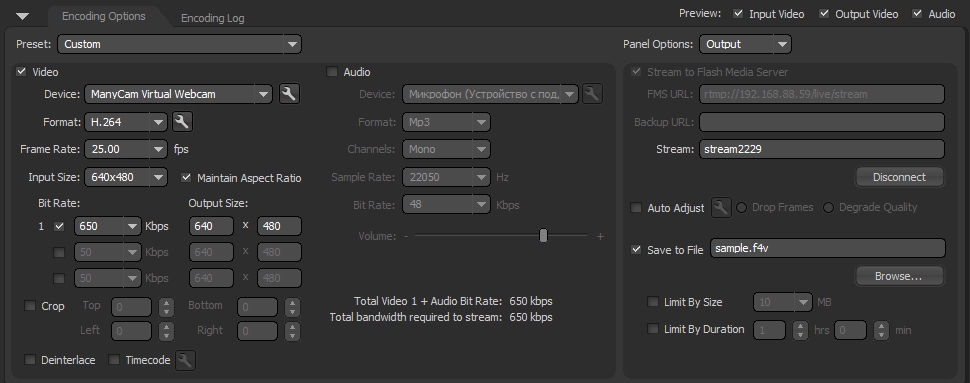
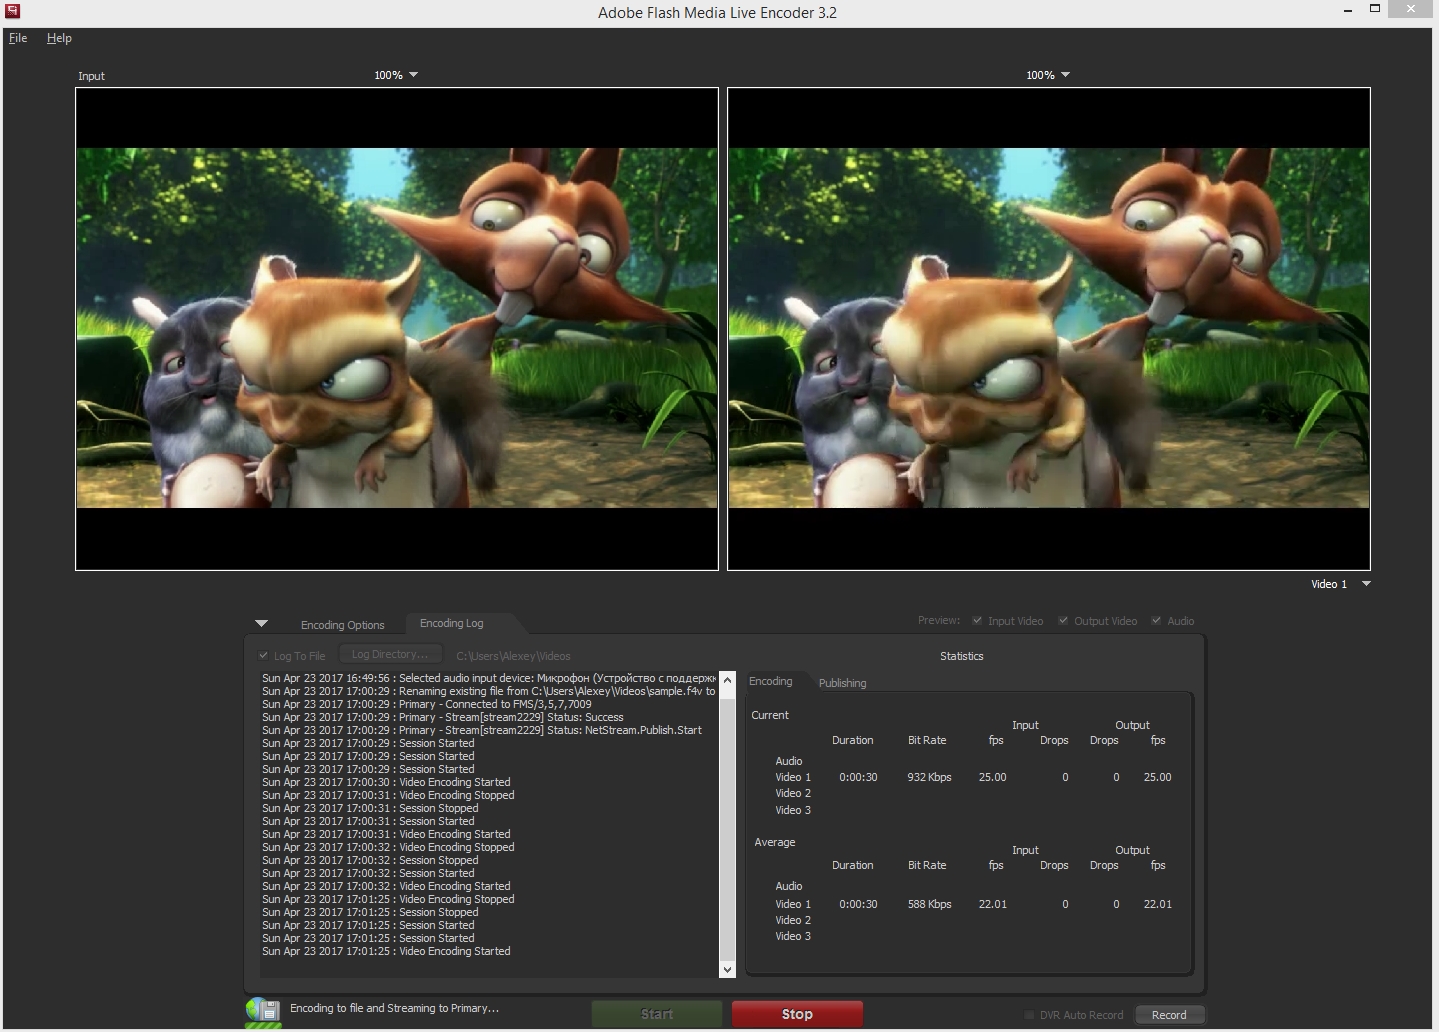
If the server address is correct, and there is access to the camera, clicking on the Start should make the coder to establish a connection to the server via RTMP and start publishing the video stream at the specified address under the specified name stream2229.
Now we should fetch the video stream from the server via RTMP. For that, we will use a simple Flash application Flash Streaming, its demo is available here. This is a simple swf file placed on the page and executed in Adobe Flash Player. So make sure Flash Player is installed and is available for this test.
Here, we need the same data: the RTMP address of the stream and its name. As a result we receive video on the web page played by Flash Player.
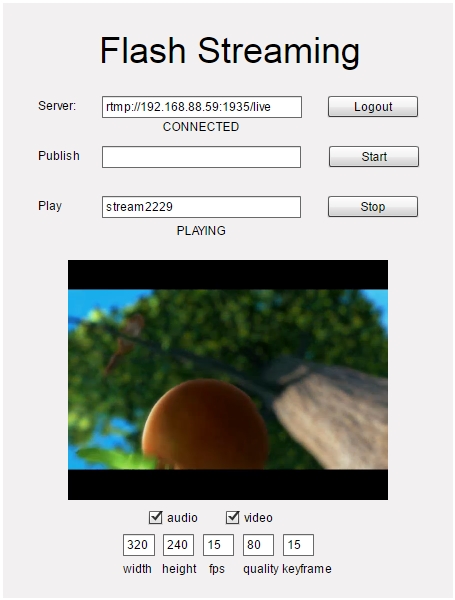
However, let us remind that our goal was to test WebRTC playback, while playing with Flash was simply an intermediate test to confirm the RTMP coder and the broadcasting server function properly.
For the sake of the test we will simply fetch the video stream with a WebRTC player. This player does not require specifying an RTMP address, because it uses the Websockets protocol to connect to the server, and the address in this case is: wss://192.168.88.59:8443
Here:
wss – means Websockets via SSL 192.168.88.59 – the address of the WebRTC server 8443 – the server port for Websockets SSL
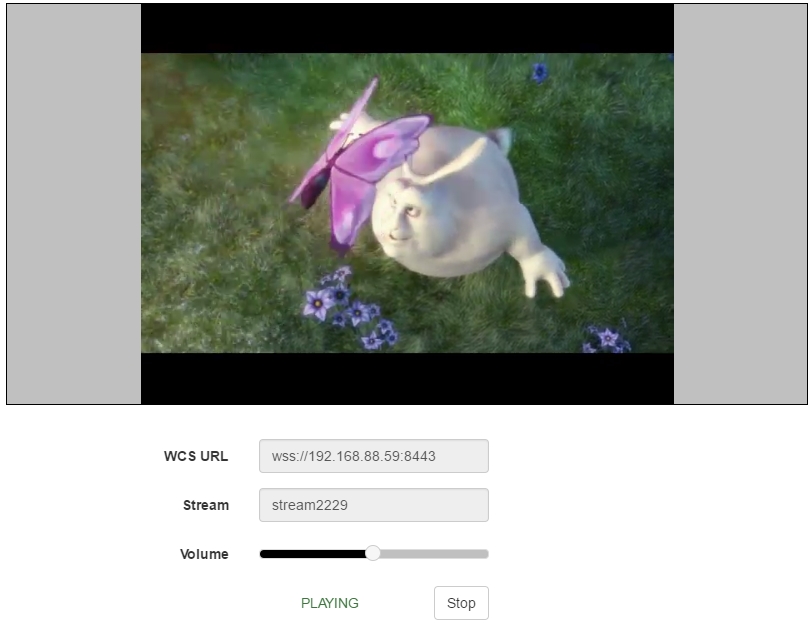
After we have specified the name of the stream as stream2229, we click Play and receive the same picture but now via WebRTC.
It is worth mentioning here that even though connection to the server is established via Websockets and the port is set as 8443, video traffic does NOT go through this connection. The video transfer is performed via special UDP ports opend on the browser side and on the server side. Websockets is used to send playback commands, statuses as well as codec settings and other important WebRTC data.
To monitor WebRTC traffic, we can use the Google Chrome browser. While the video is playing open chrome://webrtc-internals
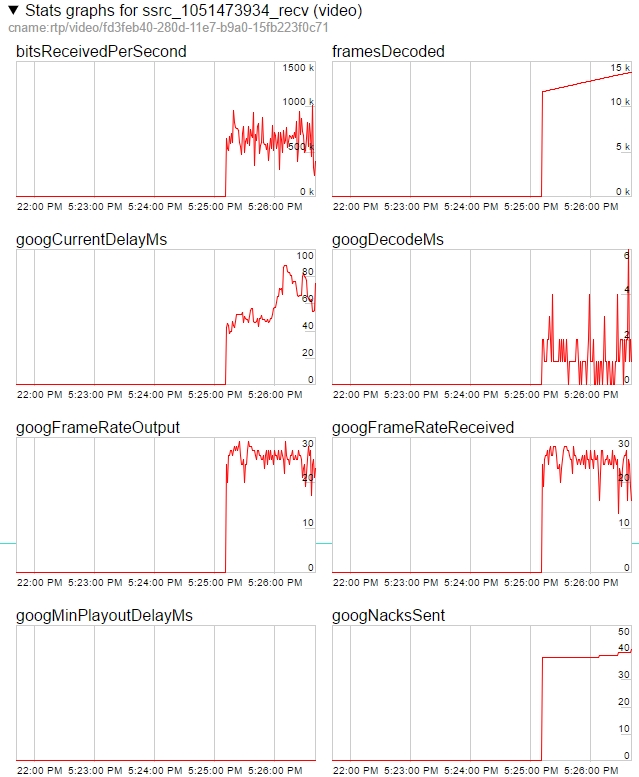
Graphs show that the bitrate of the received video stream is about 600 kbps, and framerate is 28-30 FPS.
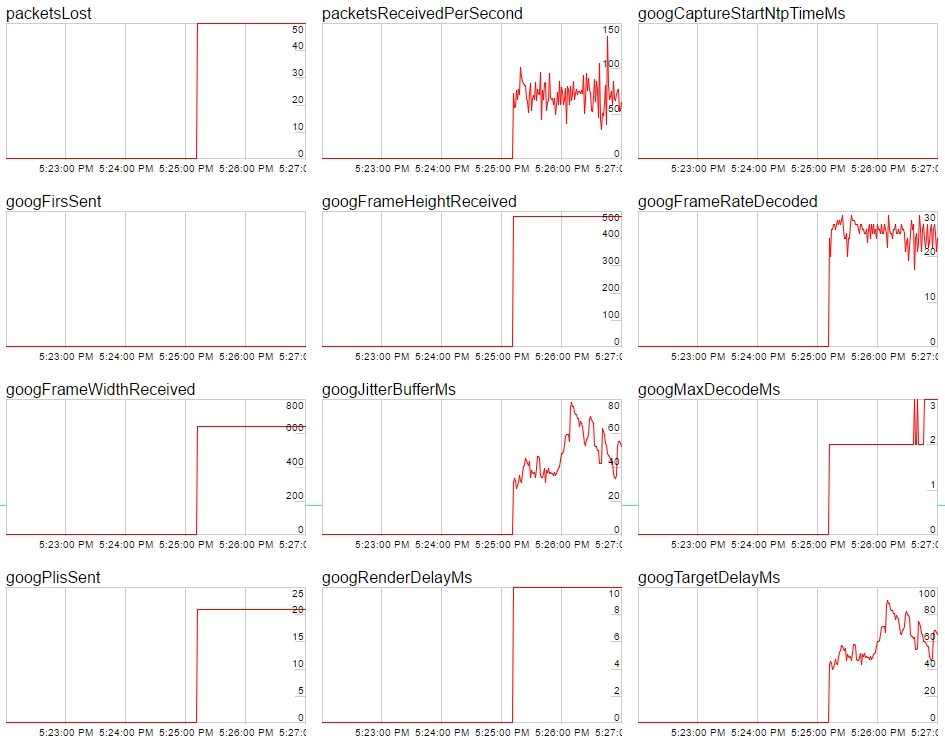
The following graphs provide information on the amount of lost UDP packets (50), packets received per second, video stream resolution (640×480), jitter and decoding time.
In conclusion, we have tested playing an RTMP video stream sent from Adobe Live Media Encoder to the HTML5 page in a WebRTC-compatible browser, and we didn’t use any third-party plugins for that. For the test we used Web Call Server 5 that can take inbound RTMP streams and give them out via RTMP, WebRTC and other protocols.
Source code of the WebRTC player page
The minimum source code of the player to embed to the web page is:
<html>
<head>
    <script language="javascript" src="https://flashphoner.com/downloads/builds/flashphoner_client/wcs_api-2.0/current/flashphoner.js"></script>
    <script language="javascript" src="player.js"></script>
</head>
<body onLoad="init()">
<h1>The player</h1>
<div id="remoteVideo" style="width:320px;height:240px;border: 1px solid"></div>
<input type="button" value="start" onClick="start()"/>
<p id="status"></p>
</body>
</html>
This code is based on the flashphoner.js API file available in the Web SDK build. The player is embedded to the remoteVideo div element.
The player.js script uses three functions: initialization with Flashphoner.init(), establishing connection to the server with Flashphoner.createSession() and playing a WebRTC video stream with session.createStream(…).play().
Server connection statuses are tracked with corresponding events: ESTABLISHED, DISCONNECTED, FAILED.
Video stream statuses are tracked with these events: PLAYING, STOPPED, FAILED.
As a result, we receive full control over connection to the server and video stream status.
var remoteVideo;

function init(){
    Flashphoner.init();
    remoteVideo = document.getElementById("remoteVideo");
}

function start() {
    Flashphoner.createSession({urlServer: "wss://wcs5-eu.flashphoner.com:8443"}).on(Flashphoner.constants.SESSION_STATUS.ESTABLISHED, function (session) {
        //session connected, start streaming
        startPlayback(session);
    }).on(Flashphoner.constants.SESSION_STATUS.DISCONNECTED, function () {
        setStatus("DISCONNECTED");
    }).on(Flashphoner.constants.SESSION_STATUS.FAILED, function () {
        setStatus("FAILED");
    });
}

function startPlayback(session) {
    session.createStream({
        name: "stream2229",
        display: remoteVideo,
        cacheLocalResources: true,
        receiveVideo: true,
        receiveAudio: true
    }).on(Flashphoner.constants.STREAM_STATUS.PLAYING, function (playStream) {
        setStatus(Flashphoner.constants.STREAM_STATUS.PLAYING);
    }).on(Flashphoner.constants.STREAM_STATUS.STOPPED, function () {
        setStatus(Flashphoner.constants.STREAM_STATUS.STOPPED);
    }).on(Flashphoner.constants.STREAM_STATUS.FAILED, function () {
        setStatus(Flashphoner.constants.STREAM_STATUS.FAILED);
    }).play();
}

function setStatus(status) {
    document.getElementById("status").innerHTML = status;
}
The minimum source code of the WebRTC player is available for download at this link, it requires the installed WebRTC server Web Call Server 5. You can download the server and install it to a Linux-host https://flashphoner.com/download or run an Amazon EC2 instance.
Minimum source code of the working WebRTC player
The player demo and screenshots above had some style and scripts to position the picture.
In the minimum code we simplified both the HTML code and the script for the easiest embedding to a web page. The result look like this:
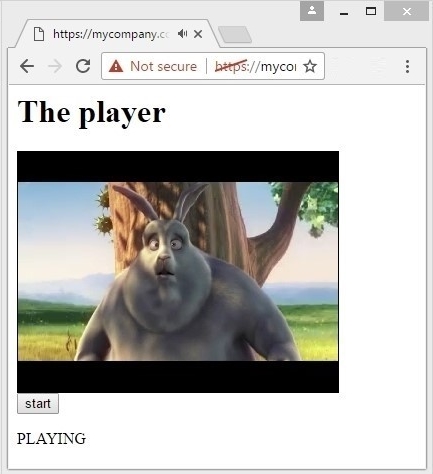
This player can be integrated to any web page or project since it only requires including one API script flashphoner.js and adding one div block to display video on to the page.
The WebRTC server can be physically located on an independent computer physically different from the one where the project is hosted.
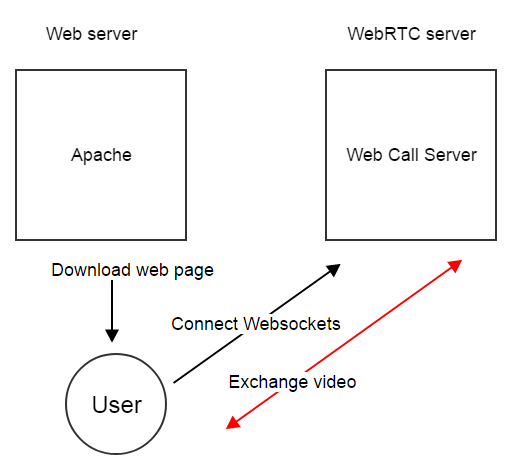
In conclusion, we made a review of a WebRTC player and its source code, and demonstrated how to embed such a player to a web page and deploy it on your own web server. The player plays WebRTC H.264 video streams. The source of the original RTMP stream is Adobe Live Media Encoder.
References
Adobe Flash Media Encoder – a coder from Adobe that allows streaming in RTMP.
Flash Streaming Demo – playing an RTMP stream in Flash Player.
Player – a standard example of a WebRTC player with sources.
Player Minimal – download scripts of the minimum WebRTC player, player.html and player.js
WebRTC Server – the Web Call Server 5 server to rebroadcast an RTMP stream via WebRTC.
Web SDK – this build contains flashphoner.js – an API file required by the player.


