Docker containers are, without a doubt, a quick, easy, and convenient solution for your testing environment. But what about deploying a more loaded system using containers? How well will it run? Can Docker really be used in production?
We already went over a case where it was convenient to use containers: a surveillance system for several buildings, run by one management company. For that, we planned it so a container would be created for each house that was connected to the system, and deleted when it would disconnect — so the container wouldn’t take up server resources.
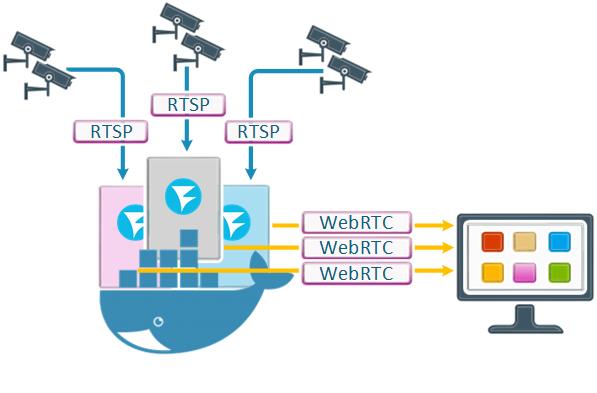
When it comes to recourse usage, Docker is not a collection of virtual machines that are completely isolated from each other and the host, and so there was an assumption that if several containers are launched on the same host, they will be unable to properly divide recourses between each other, which will result in poor performance, timing de-synchronization in RTP streams and various glitches.
There were also doubts about whether containers could function in a global network or via NAT. And, while we looked into the way containers function within a local network in the previous article, in this case, there could be unforeseen difficulties in the form of overlapping port ranges.
We decided to check it for ourselves and find solutions for these issues.
Setting up a Docker network
Before containers can be created, we need to set up a Docker network.
For the purposes of this article, we used public IP addresses. If the containers are operated via NAT, it will complicate the process, for you will also need to configure rules for port forwarding in the border gateway.
With the ipvlan driver each container becomes a full network member, so we can create rules for port forwarding through NAT, just as if WCS were deployed on real hardware. So, keep in mind that, apart from the main NAT, no NATs are created for containers.
We requested a network of 8 public elastic IPs from our ISP.
1st address - network address: 147.75.76.160/29
2nd address - address of the default gateway: 147.75.76.161
3rd address - host address: 147.75.76.162
4th address - range address for Docker 147.75.76.163/30
5th address - address of the first container 147.75.76.164
6th address - address of the second container 147.75.76.165
7th and 8th - backup addresses.
The first step is to create a ipvlan-based Docker network named “new-testnet”
docker network create -d ipvlan -o parent=enp0s3 \
--subnet 147.75.76.160/29 \
--gateway 147.75.76.161 \
--ip-range 147.75.76.163/30 \
new-testnet
where:
- ipvlan — network driver type;
- parent=enp0s3 — physical network interface (enp0s3), through which container traffic will go;
- —subnet — subnet;
- —gateway — default gateway for the subnet;
- —ip-range — address range for the subnet, containing addresses that Docker will assign to containers.
Configuring WCS
Containers will be put under load using a WebRTC load test. Let’s prepare the settings:
On the host, in the directory
/opt/wcs/conf/
create the following files: flashphoner.properties and wcs-core.properties, containing the lines:
for flashphoner.properties:
#server ip
ip =
ip_local =

#webrtc ports range
media_port_from =31001
media_port_to =40000

#codecs
codecs =opus,alaw,ulaw,g729,speex16,g722,mpeg4-generic,telephone-event,h264,vp8,flv,mpv
codecs_exclude_sip =mpeg4-generic,flv,mpv
codecs_exclude_streaming =flv,telephone-event
codecs_exclude_sip_rtmp =opus,g729,g722,mpeg4-generic,vp8,mpv

#websocket ports
ws.port =8080
wss.port =8443

wcs_activity_timer_timeout=86400000

wcs_agent_port_from=44001
wcs_agent_port_to=55000

global_bandwidth_check_enabled=true
zgc_log_parser_enable=true
zgc_log_time_format=yyyy-MM-dd'T'HH:mm:ss.SSSZ
This file will replace the original flashphoner.properties upon container launch. The ip and ip_local variables will be filled with values specified during container creation by the EXTERNAL_IP and LOCAL_IP variables respectively.
Next, we use special settings to broaden the address range:
media_port_from=31001
media_port_to=40000
wcs_agent_port_from=44001
wcs_agent_port_to=55000
lengthen the test duration:
wcs_activity_timer_timeout=86400000
and make it so the data on the speed of the network adapter and ZGC operation data are displayed on the statistics page:
zgc_log_parser_enable=true
zgc_log_time_format=yyyy-MM-dd'T'HH:mm:ss.SSSZ
In the wcs-core.properties file, configure ZGC usage and specify the heap size:
### SERVER OPTIONS ###
# Set this property to false to disable session debug
-DsessionDebugEnabled=false
# Disable SSLv3
-Djdk.tls.client.protocols="TLSv1,TLSv1.1,TLSv1.2"


### JVM OPTIONS ###
-Xmx16g
-Xms16g
#-Xcheck:jni

# Can be a better GC setting to avoid long pauses

# Uncomment to fix multicast crosstalk problem when streams share multicast port
-Djava.net.preferIPv4Stack=true

# Default monitoring port is 50999. Make sure the port is closed on firewall. Use ssh tunel for the monitoring.
-Dcom.sun.management.jmxremote=true
-Dcom.sun.management.jmxremote.local.only=false
-Dcom.sun.management.jmxremote.ssl=false
-Dcom.sun.management.jmxremote.authenticate=false
-Dcom.sun.management.jmxremote.port=50999
-Dcom.sun.management.jmxremote.host=localhost
-Djava.rmi.server.hostname=localhost

#-XX:ErrorFile=/usr/local/FlashphonerWebCallServer/logs/error%p.log
-Xlog:gc*:/usr/local/FlashphonerWebCallServer/logs/gc-core-:time

# ZGC
-XX:+UnlockExperimentalVMOptions -XX:+UseZGC

# Use System.gc() concurrently in CMS
-XX:+ExplicitGCInvokesConcurrent
# Disable System.gc() for RMI, for 10000 hours
-Dsun.rmi.dgc.client.gcInterval=36000000000
-Dsun.rmi.dgc.server.gcInterval=36000000000
This file will also replace the wcs-core.properties file, which is in the container by default.
We generally recommend to set the heap to take up 50% of the available RAM, but, in this case, the launch of two containers would take up the whole server RAM and it could result in unstable operation. This is why we will try a different approach. We shall allocate 25% of the available RAM to each container:
### JVM OPTIONS ###
-Xmx16g
-Xms16g
Now, the set-up is finished, and we’re ready to launch. (You can download the sample wcs-core.properties and flashphoner.properties files in the “Useful files” section at the end of the article).
Launching containers
Now we come back to the primary issue — that of the resource allocation to containers and of timing shifts.
It is true that, when allocating CPU resources between containers via cgroups, the software within the containers may select the quota set by the scheduler, which results in jitters (unwanted deviations of the transmitted signal), which negatively affects RTP stream playback.
Allocation of CPU resources and jitters are an issue not only for Docker, but for both “classic” hypervisor-based virtual machines and real hardware, which is why it is not really Docker-specific. When it comes to WebRTC, jitters are handled by an adaptive jitter buffer, which runs on the client and supports a fairly wide range (up to 1000 ms).
In our case, timings are not really an issue, since the RTP stream is not linked to the server clock. RTP do not necessarily follow the encoder clock exactly, because the network is never flawless. All the discrepancies are handled with buffers in WebRTC. Once again, this is not a Docker-specific matter.
In order to minimize the struggle for resources between containers we shall manually allocate processor cores to them. This way, there will be no conflicts or quotas of processor time. The way to do it is to use the following key when creating a container:
--cpuset-cpus=
You can specify a list of cores (divided with commas) or a range of cores (separated by a hyphen). The first core is named “0”.
Now let’s launch the first container:
docker run --cpuset-cpus=0-15 \
-v /opt/wcs/conf:/conf \
-e PASSWORD=123Qwe \
-e LICENSE=xxxx-xxxx-xxxx-xxxx-xxxx \
-e LOCAL_IP=147.75.76.164 \
-e EXTERNAL_IP=147.75.76.164 \
--net new-testnet \
--ip 147.75.76.164 \
--name wcs-docker-test-1 \
-d flashphoner/webcallserver:latest
the keys are as follows:
- –cpuset-cpus=0-15 – specifies that the container must use host cores 0 through 15 to run;
- -v /opt/wcs/conf:/conf – attaches the directory with config files to the container;
- PASSWORD — password to access the inner workings of the container via SSH. If this variable is not defined, it will not be possible to get into the container via SSH;
- LICENSE — WCS license number. If this variable is not defined, the license can be activated through the web interface;
- LOCAL_IP — IP address of the container in the Docker network, which will be logged into the ip_local parameter in the flashphoner.properties config file;
- EXTERNAL_IP — IP address of the external network interface. It is entered into the IP parameter in the flashphoner.properties config file;
- –net specifies the network within which the container will operate. Our container is launched in the testnet network;
- –ip 147.75.76.164 – address of the container in the Docker network;
- –name wcs-docker-test-1 – container name;
- -d flashphoner/webcallserver:latest – image for the container deployment
For the second container, we use a very similar command:
docker run --cpuset-cpus=15-31 \
-v /opt/wcs/conf:/conf \
-e PASSWORD=123Qwe \
-e LICENSE=xxxx-xxxx-xxxx-xxxx-xxxx \
-e LOCAL_IP=147.75.76.165 \
-e EXTERNAL_IP=147.75.76.165 \
--net new-testnet \
--ip 147.75.76.165 \
--name wcs-docker-test-2 \
-d flashphoner/webcallserver:latest
Here, we specify a different core range and a different IP address for the container. You can also set a different password for the SSH, but it is not required.
Initializing the test and evaluating the results
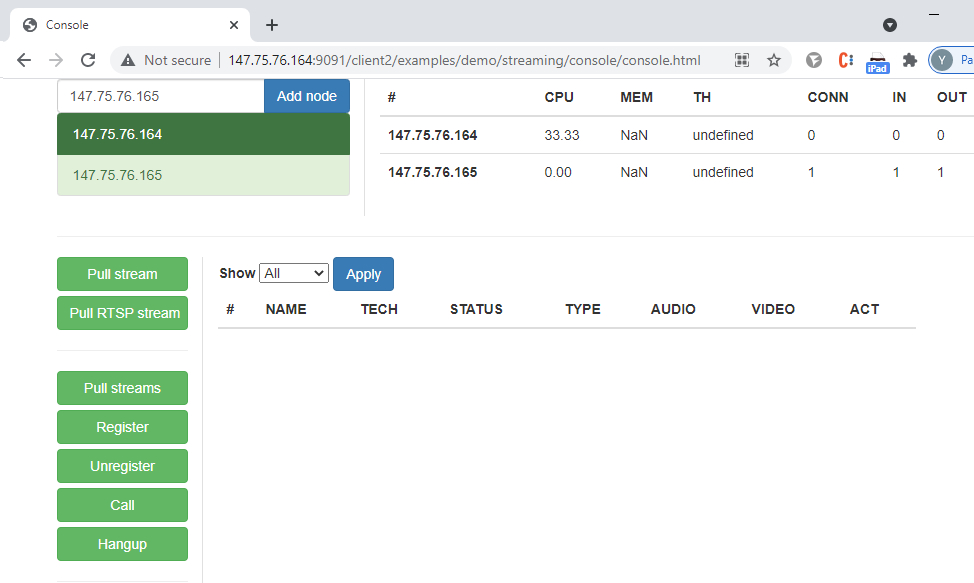
In the web interface of the first container we launch a console for WebRTC testing with stream capture http://147.75.76.164:9091/client2/examples/demo/streaming/console/console.html:
In the web interface of the second container we select “Two-way Streaming”:
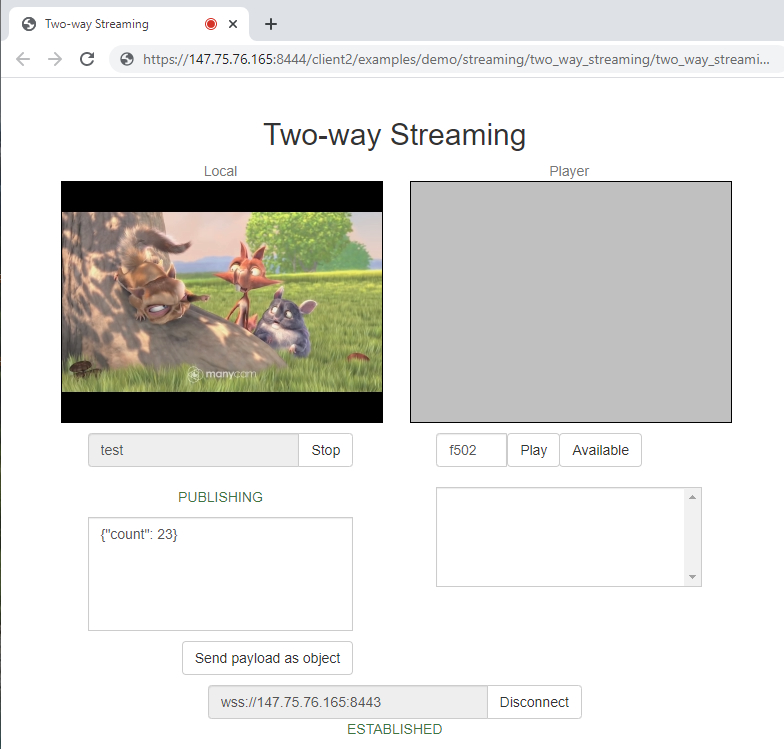
and then start the load test:
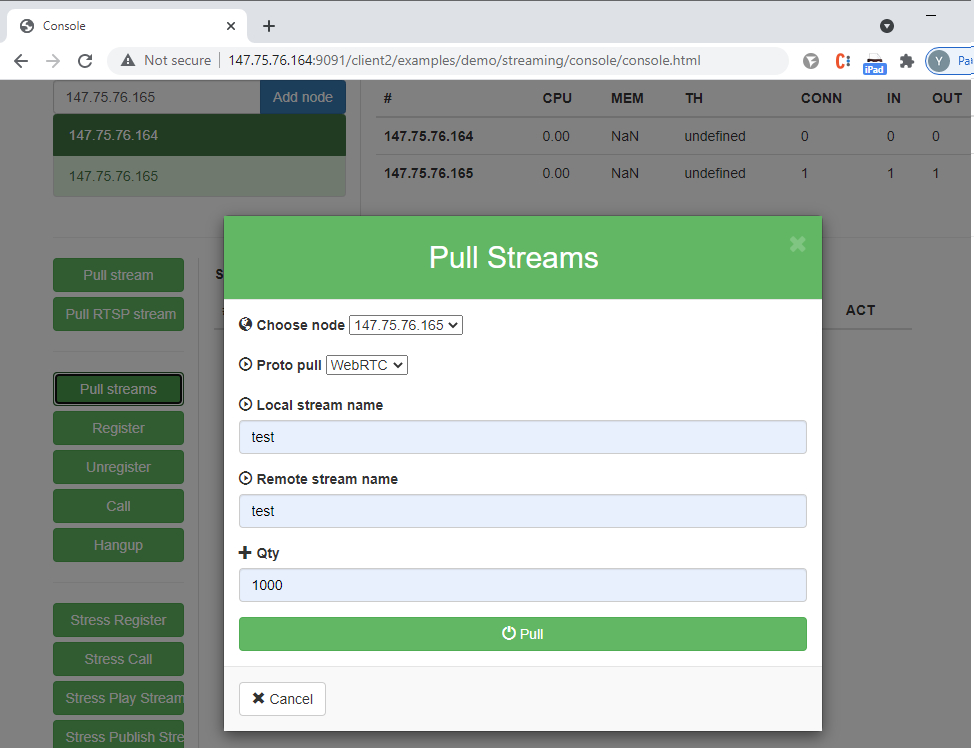
Container performance is evaluated using graphs produced by the Prometheus + Grafana monitoring systems. To receive data on the CPU load we have installed Prometheus Node Exporter on the host. Information on the container load and streams status is collected from the WCS server statistics page in the containers:
http://147.75.76.164:8081/?action=stat
http://147.75.76.165:8081/?action=stat
You can find the panel for Grafana in the “Useful files” section.
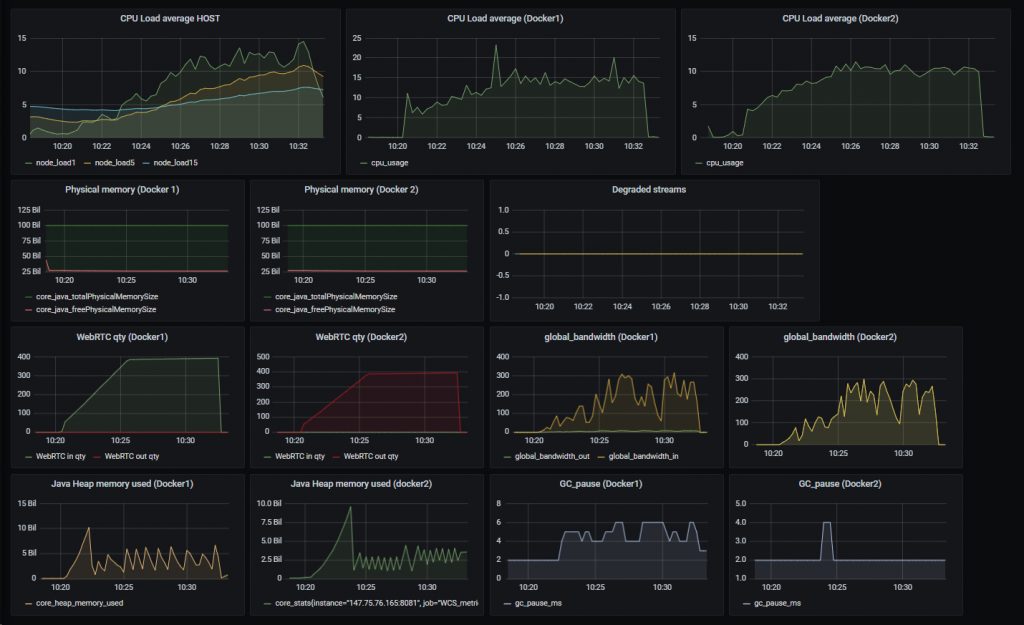
The results of the test with container separation by core:
As we can see, the load on the test container that was receiving streams was slightly higher (singular peaks up to 20-25 units), compared to the container that was sending the streams. At the same time, no stream degradation was detected and the control stream’s quality (see the screenshot below) was acceptable: there were no artifacts and sound stutters. All in all, it is fair to say that the containers handled the load well.
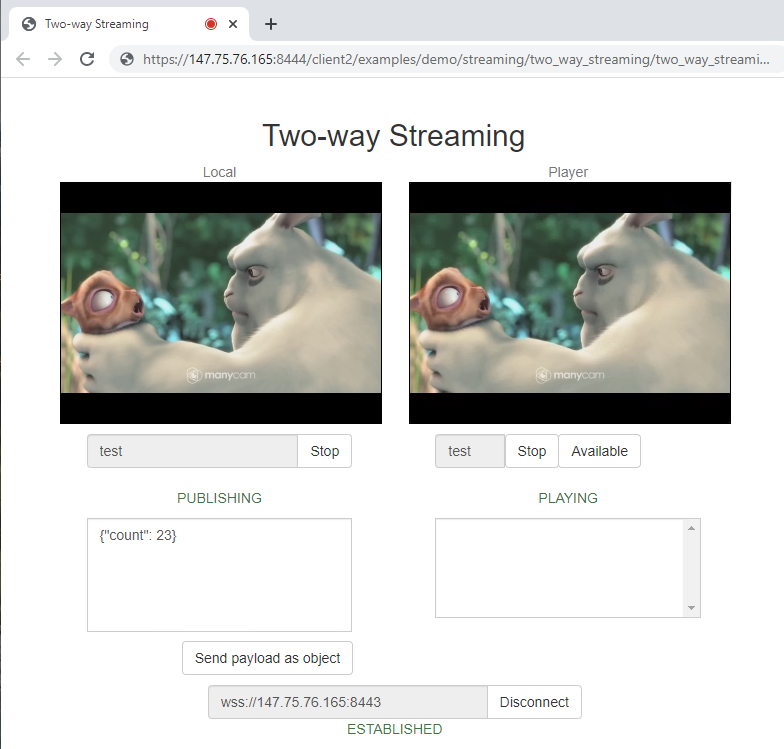
The output from the htop application, produced during the test, shows that the 32 cores used by the containers were active, while the rest of the cores were not:

Now, let’s relaunch the containers with no settings for container separation by core.
The first container:
docker run \
-v /opt/wcs/conf:/conf \
-e PASSWORD=123Qwe \
-e LICENSE=xxxx-xxxx-xxxx-xxxx-xxxx \
-e LOCAL_IP=147.75.76.164 \
-e EXTERNAL_IP=147.75.76.164 \
--net new-testnet \
--ip 147.75.76.164 \
--name wcs-docker-test-1 \
-d flashphoner/webcallserver:latest
The second container:
docker run \
-v /opt/wcs/conf:/conf \
-e PASSWORD=123Qwe \
-e LICENSE=xxxx-xxxx-xxxx-xxxx-xxxx \
-e LOCAL_IP=147.75.76.165 \
-e EXTERNAL_IP=147.75.76.165 \
--net new-testnet \
--ip 147.75.76.165 \
--name wcs-docker-test-2 \
-d flashphoner/webcallserver:latest
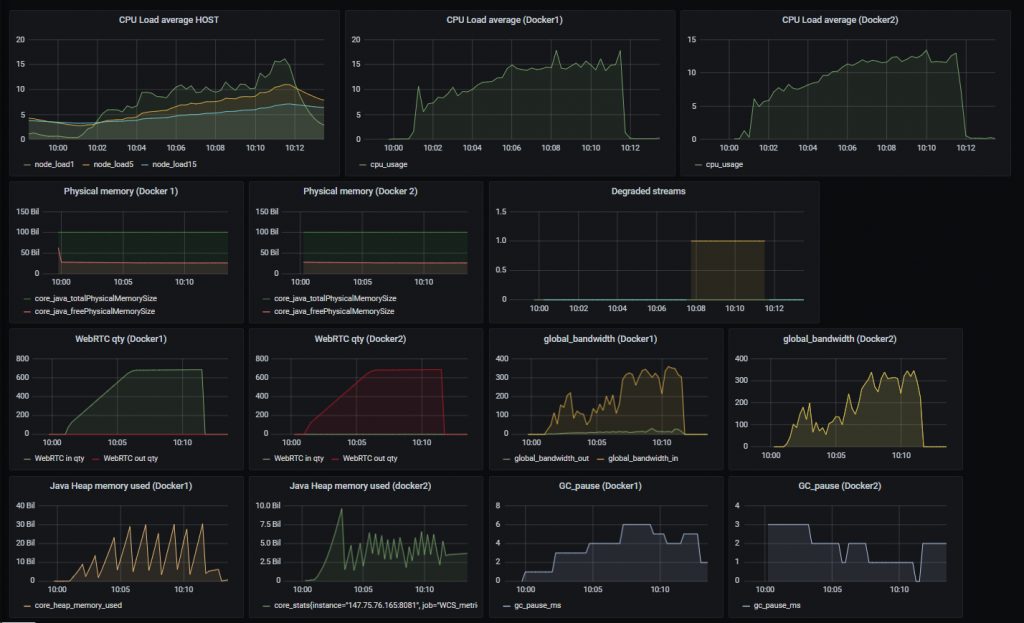
Let’s start the load test again, using the same conditions, and look at the graphs:
This time, the containers appeared to be “more powerful” – the cores were not manually limited, and each container had access to all the 40 cores of the host. That’s why they managed to capture more streams, but closer to the end of the test 1% of them became degraded. This means that with container separation by core containers run more smoothly.
And thus, the testing has shown that containers can be configured to be full members of either the local or the global network. We also managed to configure resource allocation between containers in a way that makes it so they do not interfere with each other. Keep in mind that the quantitative results of your testing may be different, because they depend on the specific task you aim to perform, the technical specifications of the system used, and its environment.
Good streaming to you!


