
Embedding a video stream recording capability to an HTML page
What scripts are needed to embed recording and what dependencies should be taken into account
Preparing to embedding the stream recording
from a browser’s web camera
To perform the stream recording from Google Chrome or IE you need to prepare Web Call Server and all necessary scripts and files.
- Install Web Call Server to your hosting and import SSL-certificates to work with the WebRTC technology.
If you experience difficulties while installing the server, you can run the already configured turnkey virtual Web Call Server in the Amazon cloud and import an SSL certificate.
Besides you can connect to our demo servers
wss://wcs5-eu.flashphoner.com:8443
wss://wcs5-us.flashphoner.com:8443 -
Download the latest build with HTML and JavaScript code
-
Unpack the build on your web server and open the following files
examples/min/streaming/Streaming-min.html see on Github
examples/min/streaming/Streaming-min.js see on Github
These files do not require any changes and are simple the required code minimum that allows recording of video from a web camera using WebRTC and Flash technologies. Let’s take a look at these files.
examples/min/streaming/Streaming-min.html
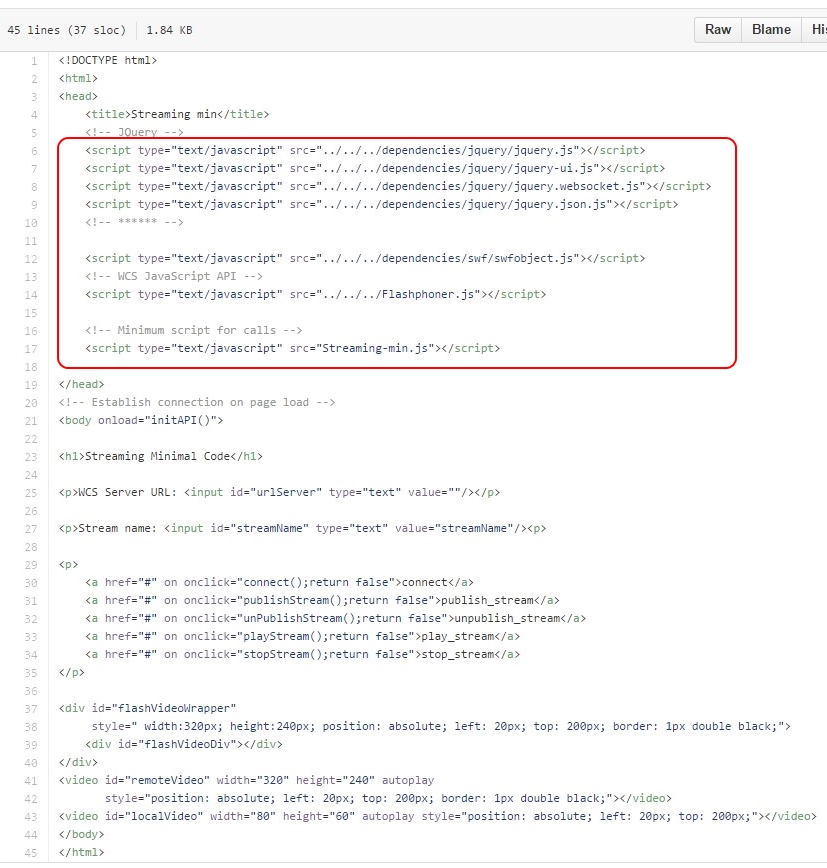
Here you should pay attention to included dependencies in the head tag script loading.
examples/min/streaming/Streaming-min.js
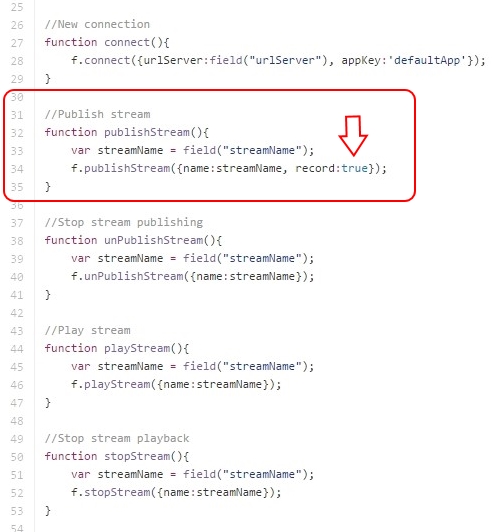
Note that we pass the record:true parameter to enable recording when publishing a video stream.
f.publishStream({name:streamName, record:true});
After the Publish Stream button is pressed, the callback function streamStatusListener receives an event that contains the filename of the record assigned for this stream by the server:
//Connection Status
function streamStatusListener(event) {
trace(event.recordName);
}
For example: recordName”:”stream-90593107-8209-4b26-84onaadtumi9pn713vf8iblbe6.webm”
Now, as we know the filename, we can construct a download link, because we know the local folder on the web server where the recorded files are stored. By default it is WCS_HOME/client/records.
On the server side, after the recording of a file is done, the file is passed to the bash script on_record_hook.sh that places the recorded file to the web folder for download. If Web Call Server is installed, you can process the recorded file arbitrarily: copy, move, recompress, transfer to another server and so on.
Demo scripts
You can see how the link is constructed in the example scripts of the demo:
examples/demo/streaming/stream-recording.html
examples/demo/streaming/streaming.js
These scripts are a bit more complex, because they also provide various interface functions (displaying statuses, changing buttons, adding links and so on).
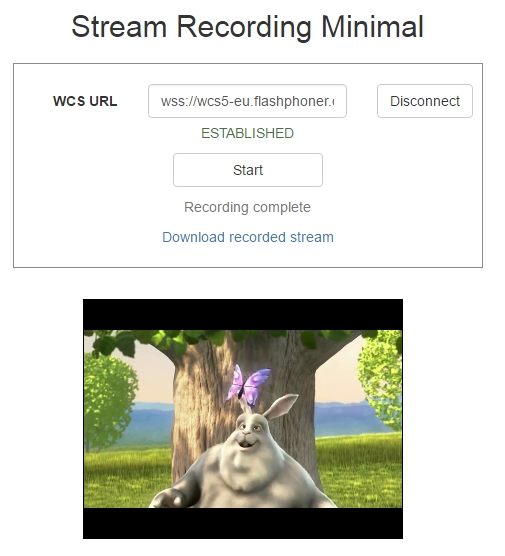
We have already seen the result of these scripts operation on the Testing page.
This page is out of date
Please visit the actual page of embedding the stream recording technology into your HTML-code
Download Web Call Server 5
System requirements: Linux x86_64, 1 core CPU, 2 Gb RAM, Java
Installation:
- wget https://flashphoner.com/download-wcs5.2-server.tar.gz
- Unpack and install using 'install.sh'
- Launch server using command 'service webcallserver start'
- Open the web interface https://host:8444 and activate your license
If you are using Amazon EC2, you don't need to download anything.