The minimal examples on our website are written so that any client, even those far from web programming, can take pieces of code and make their own product. But thoughtlessly copying code can lead to financial losses. A striking example is the minimal code for embedding a Click to Call button.
Click to Call is a button on the site that allows users to make a call to a predefined number directly from the browser. A very handy marketing tool that increases conversions and profits.
If you implement the Click to Call button according to the method described here, an intruder can spoof the called subscriber number or use your SIP server credentials to call penguins in Antarctica and retell them Tolstoy’s works. And then the profits from implementing the Click to call button can turn into huge losses.
It is unsafe to transfer connection parameters to the SIP server in JS code, therefore, for Production implementation, we recommend storing connection parameters on the server and substituting them when initiating a call. To do this, you can use the so-called REST Hook scripts.
Getting hooked
REST Hook are simple scripts that work with JSON in the body of an HTTP request and return JSON in the body of HTTP responses. REST Hook scripts replace standard WCS API applications and allow to process data about connections, calls and video streams on the backend server.
REST Hook can be used for the following purposes:
- authentication of connections to the server by token or password;
- getting information about connections, disconnections, start and end of streams, calls, etc. in real time;
- overriding data transferred from the client. For example, you can override and hide the real name of the stream or the direction of the call;
- implementation of custom signaling with data transmission via WebSockets; for example, sending a text message in the chat to all connected clients.
In this article, we will look at how you can securely pass the SIP server credentials and callee number for the “Click to Call” button using REST Hook technology.
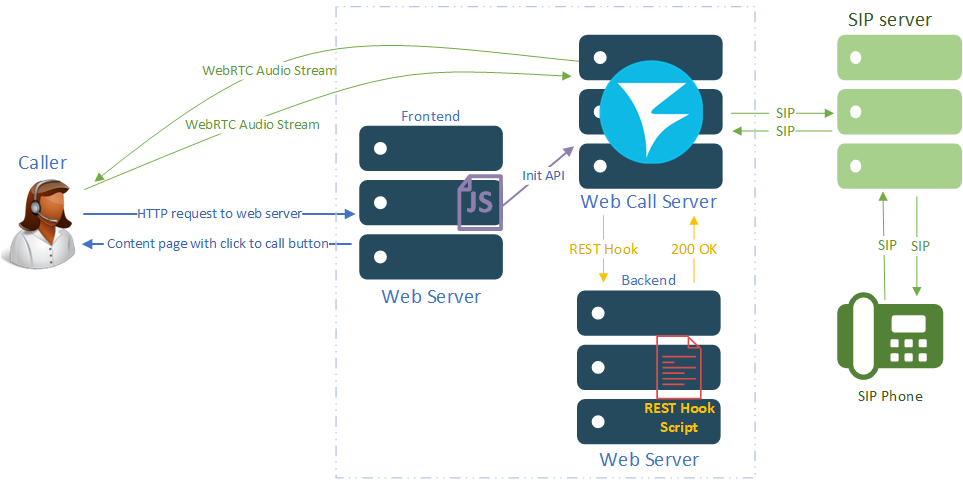
Solution architecture
- Front-end Web server organizes the user interface and displays a web page with a “Click to Call” button.
- WCS is an intermediary between the user and the SIP server. It converts WebRTC stream from browser to SIP format.
- Backend Server is a Web server that makes the REST Hook work.
- SIP server and SIP phone.
Logically, we separate the front-end, back-end and WCS servers, but physically they can be placed on the same machine. In this article, we use three separate virtual machines to simplify the example parsing.
Implementation
Let’s start with the backend server.
We install and configure Nginx and PHP, for example Nginx on CentOS 7.
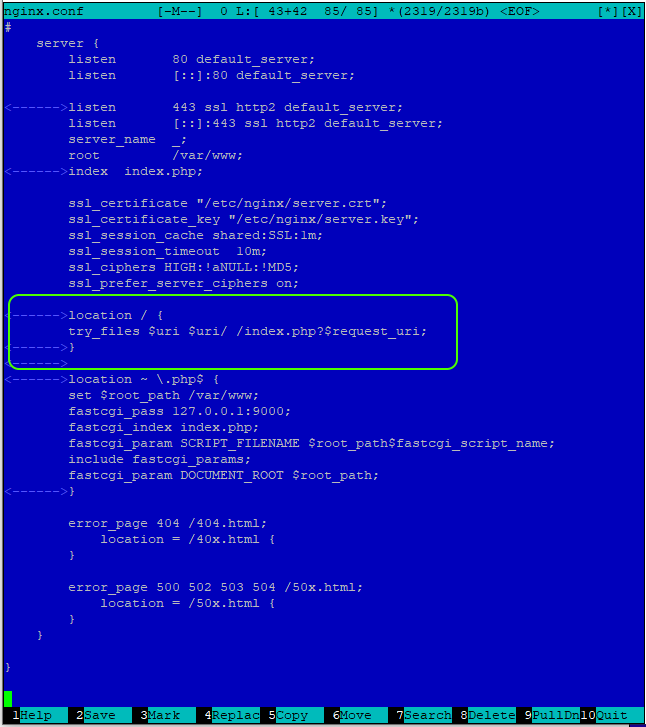
After that, in the file /etc/nginx/nginx.conf in the “server” section, add the following lines. This setting will make our REST Hook script available for the “/connect” and “/call” events:
location / {
try_files $uri $uri/ /index.php?$request_uri;
}
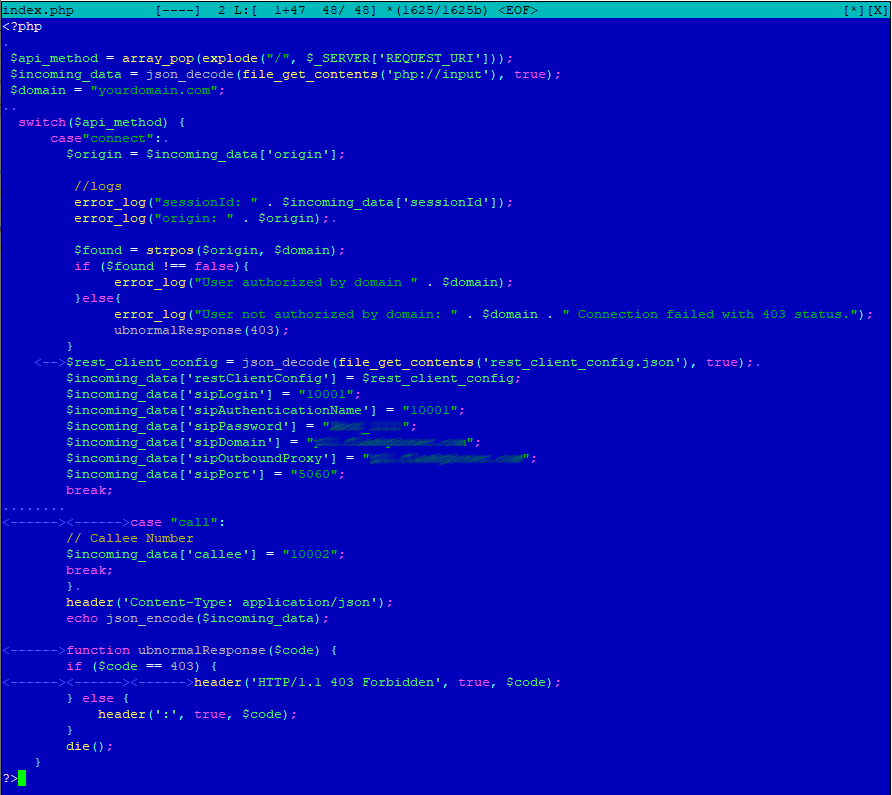
In the directory for the web server files (we have /var/www ), we create a file “index.php”, in which we place the main code of the REST Hook being created. This script will implement a domain access check and transfer the connection parameters to the SIP server and the subscriber’s number:
<?php

$api_method = array_pop(explode("/", $_SERVER['REQUEST_URI']));
$incoming_data = json_decode(file_get_contents('php://input'), true);
$domain = "yourdomain.com";

switch($api_method) {
case"connect":
$origin = $incoming_data['origin'];

//logs
error_log("sessionId: " . $incoming_data['sessionId']);
error_log("origin: " . $origin);

$found = strpos($origin, $domain);

if ($found !== false){
error_log("User authorized by domain " . $domain);
}else{
error_log("User not authorized by domain: " . $domain . " Connection failed with 403 status.");
ubnormalResponse(403);
}

$rest_client_config = json_decode(file_get_contents('rest_client_config.json'), true);
$incoming_data['restClientConfig'] = $rest_client_config;

$incoming_data['sipLogin'] = "10001";
$incoming_data['sipAuthenticationName'] = "10001";
$incoming_data['sipPassword'] = "Password_123";
$incoming_data['sipDomain'] = "172.16.30.156";
$incoming_data['sipOutboundProxy'] = "172.16.30.156";
$incoming_data['sipPort'] = "5060";
break;
case "call":
// Callee Number
$incoming_data['callee'] = "10002";
break;
}
header('Content-Type: application/json');
echo json_encode($incoming_data);

function ubnormalResponse($code) {
if ($code == 403) {
header('HTTP/1.1 403 Forbidden', true, $code);
} else {
header(':', true, $code);
}
die();
}
?>
In the same directory /var/www, we create a file “rest_client_config.json”. The source code can be found at the end of this page.
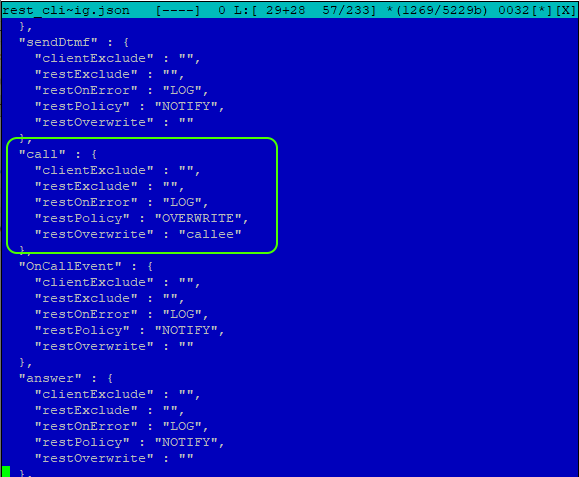
In the file “rest_client_config.json” edit the “call” section. Here we specify the policy of the REST method; overwrite data and the value that will be overwritten using the script:
"call" : {
"clientExclude" : "",
"restExclude" : "",
"restOnError" : "LOG",
"restPolicy" : "OVERWRITE",
"restOverwrite" : "callee"
},
Then we go to the WCS server. We will assume that you already have a WCS installed and configured. If not, install it according to this instruction. WCS can be run as a virtual instance on Amazon, Google Cloud and DigitalOcean, or as a container in Docker.
In the console of your server with WCS, check the availability of the REST Hook script for the /connect and /call events using the “Curl” utility:
curl http://172.16.30.123/connect
curl http://172.16.30.123/call
replace 172.16.30.123 with an IP address or the domain name of your backend web server.

If the output of the Curl utility contains the necessary information, such as the parameters for the SIP connection and the number of the subscriber, then we have configured the REST Hook correctly.
Go to server’s CLI WCS:
ssh -p 2001 admin@localhost
you don’t need to change anything in this command, the default password is: admin
and change the default application for handling “/connect” and “/call” events to our new REST Hook script using the command:
update app -l http://172.16.30.123/ defaultApp
replace 172.16.30.123 with the IP address or domain name of your backend web server.

After all these settings, go to the front-end web server.
We create two empty files Click-to-Call-min.html and Click-to-Call-min.js on the frontend. These files will contain the minimal code to implement the “Click to call” button.
HTML code:
<!DOCTYPE html>
<html lang="en">
<head>
    <meta charset="utf-8">
    <script type="text/javascript" src="https://flashphoner.com/downloads/builds/flashphoner_client/wcs_api-2.0/current/flashphoner.js"></script>
    <script type="text/javascript" src="Click-to-Call-min.js"></script>
</head>
<body onload="init_page()">
<input type="button" id="callBtn" type="button" Value="Call"/>
    <div id="remoteAudio"></div>
    <div id="localAudio"></div>
</body>
</html>
We remove the data for connecting to the SIP server and the number of the subscriber from JS minimal example code.
JS code:
var SESSION_STATUS = Flashphoner.constants.SESSION_STATUS;
var CALL_STATUS = Flashphoner.constants.CALL_STATUS;
var localAudio;
var remoteAudio;


function init_page(){
Flashphoner.init({});
localAudio = document.getElementById("localAudio");
remoteAudio = document.getElementById("remoteAudio");
connect();
}

function connect() {
var url = "wss://172.16.30.124:8443"
var sipOptions = {
registerRequired: true
};
var connectionOptions = {
urlServer: url,
sipOptions: sipOptions
};
console.log("Create new session with url " + url);
Flashphoner.createSession(connectionOptions).on(SESSION_STATUS.ESTABLISHED, function (session) {
console.log(SESSION_STATUS.ESTABLISHED);
}).on(SESSION_STATUS.REGISTERED, function (session) {
console.log(SESSION_STATUS.REGISTERED);
});
callBtn.onclick = call
}


function call(session) {
var constraints = {
audio: true,
video: false
};
var session = Flashphoner.getSessions()[0];
var outCall = session.createCall({
remoteVideoDisplay: remoteAudio,
localVideoDisplay: localAudio,
constraints: constraints,
stripCodecs: "SILK"
});
outCall.call();
callBtn.value = "Hangup";
callBtn.onclick = function () {
callBtn.value = "Call";
outCall.hangup();
connect();
}
}
Testing
You will need the following for testing:
- the test stand that we made above (frontend, WCS, backend);
- SIP server;
- two SIP accounts;
- browser;
- a software based SIP phone.
We transfer the data for connecting the SIP account 10001 in the JS code of the page with the “Click to Call” button using the REST Hook. The “Click to Call” button is programmed to make a call to 10002. We will enter the credentials for account 10002 into the soft SIP phone.
Open the HTML page created on the front-end web server and click the “Call” button:

We accept an incoming call on the SIP soft phone and make sure that there is an exchange of audio streams between subscribers:
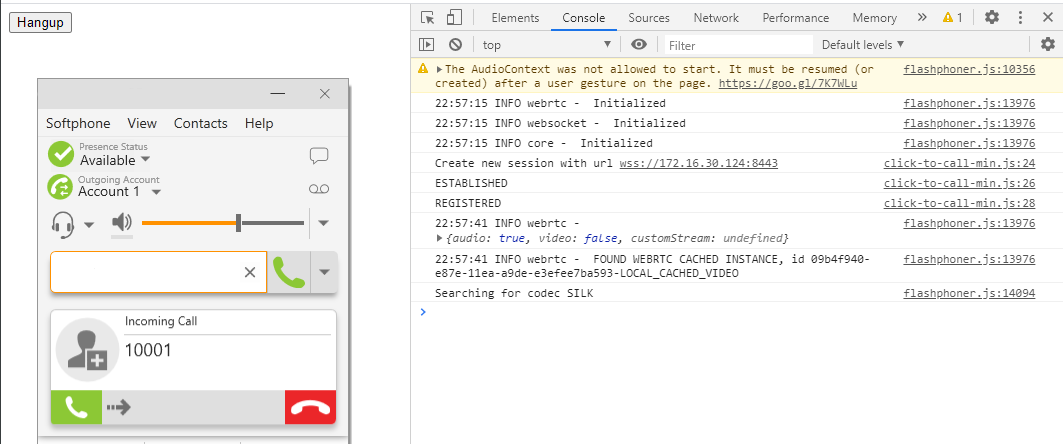
It took some effort, but the result is worth it. Now the credentials of the SIP server and the number of the subscriber are protected against intruders, and you don’t have to worry that someone is using your telephony to their advantage.


