We have been staying at home for quite a long time now. In this situation, communication between people is coming to the fore. We need to call each other and communicate somehow. For some people, it is entertainment as they are missing their loved ones, while for others it is associated with business.
On one of those languid evenings, I had a phone call from a friend who opened a school for teaching programming to children and teenagers long before all the quarantine-related events. Of course, the circumstances made him move his classes to online.
Embedding Multipoint Conference Unit (MCU)
To embed Multipoint Conference Unit (MCU), you need to embed HTML code and dependent API scripts in your website
Use these instructions for quick installation and configuration of the server. In addition to that, you can connect to our demo server demo.flashphoner.com to perform the tests.
Step-by-step instructions for embedding Multipoint Conference Unit (MCU)
To embed Multipoint Conference Unit (MCU), we will create two empty files mcu-client-min.html and mcu-client-min.js. These files will contain the minimum code.
Let’s analyze the contents of the files
HTML
Place the necessary elements in mcu-client-min.html:
View of the resulting web page in the screenshot below
JavaScript
1. We create constants and variables for the server operation status, WebSocket session and stream. To work with the iOS Safari browser, we need a preloader, which can be downloaded from GitHub:
var SESSION_STATUS = Flashphoner.constants.SESSION_STATUS;
var STREAM_STATUS = Flashphoner.constants.STREAM_STATUS;
var session;
var PRELOADER_URL = "https://github.com/flashphoner/flashphoner_client/raw/wcs_api-2.0/examples/demo/dependencies/media/preloader.mp4";
var conferenceStream;
var publishStream;
2. We initialize the API when loading the HTML page and connect to the WCS server via WebSocket. In this example, we are using our demo server. To test your own server, replace “wss://demo.flashphoner.com” with your WCS address:
function init_api() {
    Flashphoner.init({});
    //Connect to WCS server over websockets
    session = Flashphoner.createSession({
        urlServer: "wss://demo.flashphoner.com" //specify the address of your WCS
    }).on(SESSION_STATUS.ESTABLISHED, function(session) {
        console.log("ESTABLISHED");
    });

    joinBtn.onclick = joinBtnClick;
    var remoteVideo = document.getElementById("remoteVideo");
    var localDisplay = document.getElementById("localDisplay");
}
3. We detect the browser, and if the browser is Safari, we launch the preloader. Playback should start strictly upon a user’s gesture (i.e. button click). This is limitation of mobile Safari browsers. More:
var Browser = {
    isSafari: function() {
        return /^((?!chrome|android).)*safari/i.test(navigator.userAgent);
    },
}

function joinBtnClick() {
    if (Browser.isSafari()) {
        Flashphoner.playFirstVideo(document.getElementById("play"), true, PRELOADER_URL).then(function() {
            startStreaming(session);
        });
    } else {
        startStreaming(session);
    }
}
4. The function “startStreaming()” starts publishing the local video stream to WCS. When creating a stream, the following parameters are passed:
streamName – the name of the stream published by the conference participant (in this case, login + “#” + room1, where login is the name of the participant);
localDisplay – the div element required to display the preview of the local video stream;
constraints – parameters for the presence of audio and video.
function startStreaming(session) {
    var login = document.getElementById("login").value;
    var streamName = login + "#" + "room1";
    var constraints = {
        audio: true,
        video: true
    };
    publishStream = session.createStream({
        name: streamName,
        display: localDisplay,
        receiveVideo: false,
        receiveAudio: false,
        constraints : constraints,
    }).on(STREAM_STATUS.PUBLISHING, function (publishStream) {
        playStream(session);
    })
    publishStream.publish();
}
5. The “playStream()” function starts playback of the MCU stream. The following data is transmitted as parameters for playing a stream:
streamName – name of the mixer that will be played for the participant (in this case room1 + “-” + login + room1, where login is the name of the participant);
remoteVideo – the div element in which the video will be displayed;
constraints – parameters for the presence of audio and video in the playback.
function playStream(session) {
    var login = document.getElementById("login").value;
    var streamName = "room1" + "-" + login +"room1";
    var constraints = {
        audio: true,
        video: true
    };
    conferenceStream = session.createStream({
        name: streamName,
        display: remoteVideo,
        constraints: constraints,

    }).on(STREAM_STATUS.PLAYING, function (stream) {})
    conferenceStream.play();
}
The full JavaScript code looks as follows (file «mcu-client-min.js»):
//Status constants
var SESSION_STATUS = Flashphoner.constants.SESSION_STATUS;
var STREAM_STATUS = Flashphoner.constants.STREAM_STATUS;
var session;
var PRELOADER_URL = "https://github.com/flashphoner/flashphoner_client/raw/wcs_api-2.0/examples/demo/dependencies/media/preloader.mp4";
var conferenceStream;
var publishStream;

//Init Flashphoner API on page load
function init_api() {
    Flashphoner.init({});
    //Connect to WCS server over websockets
    session = Flashphoner.createSession({
        urlServer: "wss://demo.flashphoner.com" //specify the address of your WCS
    }).on(SESSION_STATUS.ESTABLISHED, function(session) {
        console.log("ESTABLISHED");
    });

    joinBtn.onclick = joinBtnClick;
    var remoteVideo = document.getElementById("remoteVideo");
    var localDisplay = document.getElementById("localDisplay");
}

//Detect browser
var Browser = {
    isSafari: function() {
        return /^((?!chrome|android).)*safari/i.test(navigator.userAgent);
    },
}

function joinBtnClick() {
    if (Browser.isSafari()) {
        Flashphoner.playFirstVideo(document.getElementById("play"), true, PRELOADER_URL).then(function() {
            startStreaming(session);
        });
    } else {
        startStreaming(session);
    }
}

function startStreaming(session) {
    var login = document.getElementById("login").value;
    var streamName = login + "#" + "room1";
    var constraints = {
        audio: true,
        video: true
    };
    publishStream = session.createStream({
        name: streamName,
        display: localDisplay,
        receiveVideo: false,
        receiveAudio: false,
        constraints : constraints,
    }).on(STREAM_STATUS.PUBLISHING, function (publishStream) {
        playStream(session);
    })
    publishStream.publish();
}

function playStream(session) {
    var login = document.getElementById("login").value;
    var streamName = "room1" + "-" + login +"room1";
    var constraints = {
        audio: true,
        video: true
    };
    conferenceStream = session.createStream({
        name: streamName,
        display: remoteVideo,
        constraints: constraints,

    }).on(STREAM_STATUS.PLAYING, function (stream) {})
    conferenceStream.play();
}
View of the web pages during a Multipoint Conference Unit (MCU) for three users
Thus, you can embed a Multipoint Conference Unit (MCU) into your web project using a minimum code.
Use these instructions for quick installation and configuration of the server. In addition to that, you can connect to our demo server demo.flashphoner.com to perform the tests.
In this example, we use a virtual camera that plays a video clip. For the example to work, the following settings are required in the WCS server configuration file flashphoner.properties
2. Select “MCU Client” from the menu on the left side of the page
3. Enter the username “user1” and the name of the room “room1” and click the “Join” button
4. The mixer displays the stream from your camera
5. In a new browser tab, open another “MCU Client”. Enter the username “user2” and the name of the room “room1”. Click “Join”
6. The stream of the first and second user will be displayed in the mixer window
7. After connecting the second user, the first user also changed the picture. Now the first user also displays both streams
Adding a screensharing stream to the MCU
1. In a new browser tab, open the web interface of the server demo.flashphoner.com and select “Screen Sharing” from the menu on the left side of the page
2. The line for entering the URL address of the stream by default shows the WSS address of your WCS server and a random stream name. Replace the random stream name with “user1-desktop” and click on the “Start” button
3. After clicking on the “Start” button, the browser asks what exactly needs to be shared – the entire screen, application or a specific browser tab. For this testing, we selected the “Application Window” and the application “VLC media player”. Make a selection and click the “Share” button
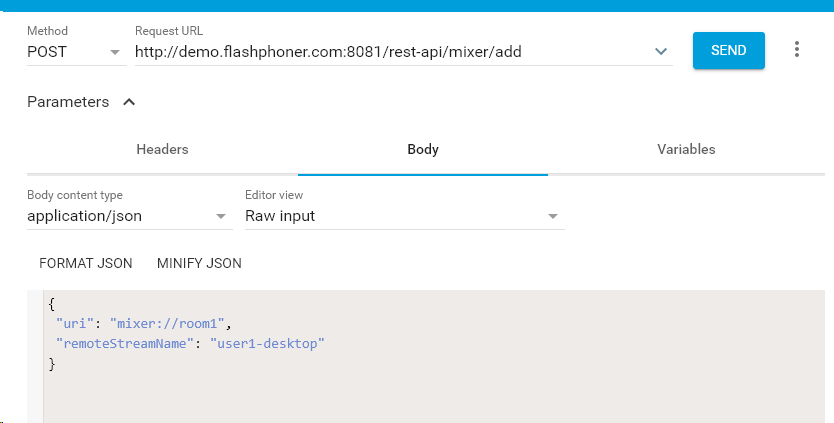
4. Open the REST client. Send the request /mixer/add, specifying mixer://room1 as the URI parameter of the mixer and the name of the screen stream “user1-desktop”
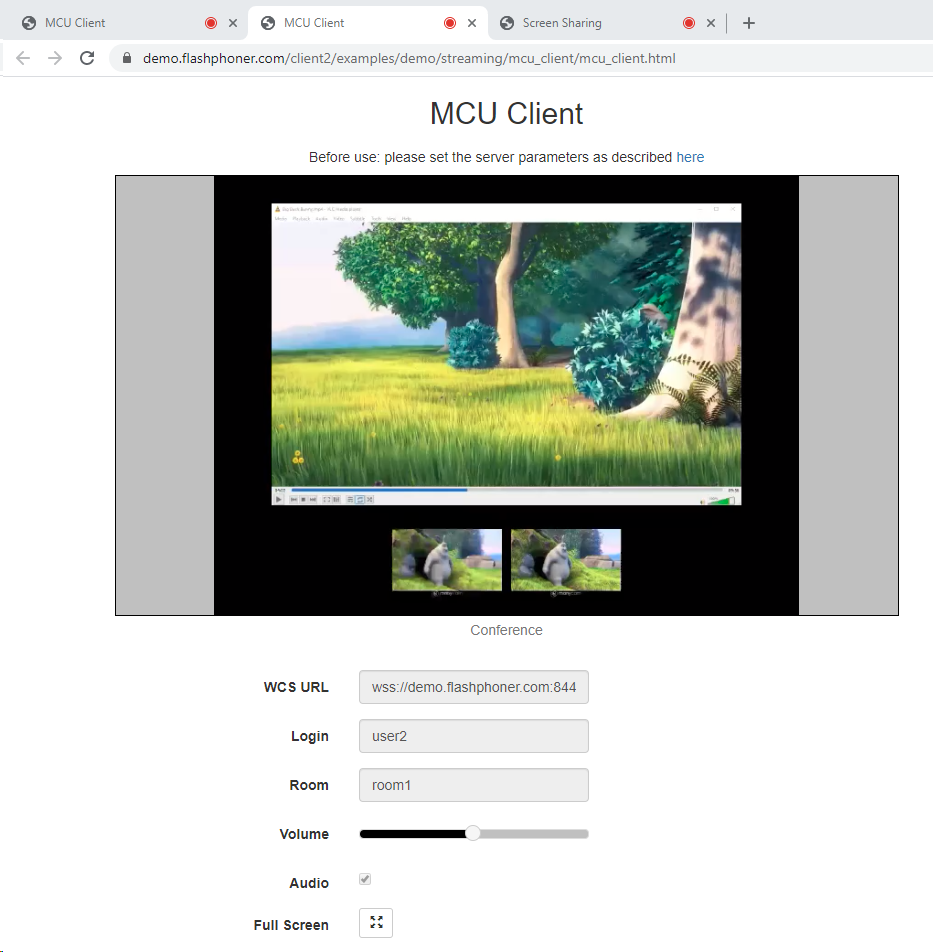
5. Now return to the MCU client. In the mixer playback window, the streams of conference participants are displayed small and the broadcast of the participant “user1” screen is large
For more information on embedding a Multipoint Conference Unit (MCU) in your web project, see page Embedding
Download Web Call Server 5
System requirements: Linux x86_64, 1 core CPU, 2 Gb RAM, Java
Each participant of Multipoint Conference Unit (MCU) can publish a WebRTC stream and play a mixer stream with audio and video from the other participants and own video (without own audio)
To organize Multipoint Conference Unit (MCU), real-time stream mixer function is added to WCS. Lack of own audio playback for the conference user eliminates the echo effect.
The key difference between the MCU and the classic conference is the number of video streams received by each participant.
In the case of a regular conference, each participant receives N different video streams and plays them in N <video> elements on the page. As a result, if the user receives 3 streams of 1 Mbps each, then the total bitrate is 3 Mbps.
In the case of the MCU, each participant receives only 1 mosaic stream, assembled from the flows of other participants, with a fixed bitrate, which depends on the output resolution of the mixer (720p 2Mbps). And plays in one <video> element. Mixing is done on the server side and consumes server CPU and RAM resources.
That is, in the first case of regular conferences, we save CPU and RAM of the server, but we spend a lot of network and browser resources on rendering N <video> frames. In the second case (MCU), we save the network and browser resources, but heavily load the CPU and RAM of the server, because mixing 1 room MCU may require 2 physical cores.
Specifications
Stream sources
Protocols
Playback platforms
Chrome
Firefox
Opera
Safari, Mac OS
Safari, iOS
Edge
iOS SDK
Android SDK
WebRTC
Chrome
Firefox
Opera
Safari, Mac OS
Safari, iOS
Edge
iOS SDK
Android SDK
Stream sources
Chrome
Firefox
Opera
Safari, Mac OS
Safari, iOS
Edge
iOS SDK
Android SDK
Protocols
WebRTC
Playback platforms
Chrome
Firefox
Opera
Safari, Mac OS
Safari, iOS
Edge
iOS SDK
Android SDK
Scheme of the MCU
Each MCU participant sends video + audio streams to the WCS. WCS gives MCU participants a mixed stream that contains video of all participants and audio of all but their own.
Step-by-step diagram of the MCU
Browser 1 publishes audio + video stream on WCS
Browser 2 publishes audio + video stream on WCS
WCS mixes the published streams into one
WCS returns mixed stream without its own audio to browser 1
WCS returns mixed stream without its own audio to browser 2
For information on testing Multipoint Conference Unit (MCU), see Testing
Download Web Call Server 5
System requirements: Linux x86_64, 1 core CPU, 2 Gb RAM, Java
WCS allows mixing streams of active broadcasts. The output stream of the mixer can be recorded, played or republished using any of the technologies supported by WCS. The mixer allows custom placing of video streams in the output frame.
Mixing is controlled using settings and REST API.
Specifications
Stream sources
Protocols
Playback platforms
IP cameras
Web cameras
Media servers
Surveillance systems
Conference servers
WebRTC
RTMP
RTSP
Chrome
Firefox
Opera
Safari, Mac OS
Safari, iOS
Edge
iOS SDK
Android SDK
Stream sources
IP cameras
Web cameras
Media servers
Surveillance systems
Conference servers
Protocols
WebRTC
RTMP
RTSP
Playback platforms
Chrome
Firefox
Opera
Safari, Mac OS
Safari, iOS
Edge
iOS SDK
Android SDK
Scheme of the stream mixer
The WCS server receives video streams from their sources and, by the REST API command, combines them into one stream, which can later be played in the player.
Step-by-step diagram of the stream mixer
Video stream sources publish streams to WCS
REST client sends a stream mixing command using REST call /mixer/startup
The browser requests playback of the mixed stream
Web Call Server sends the mixed stream to the browser for playback
You can find information about testing the mixer on the Testing page.
Download Web Call Server 5
System requirements: Linux x86_64, 1 core CPU, 2 Gb RAM, Java
On April 16, 2025, we began the transition from Skype to Teams.
On the same day, we sent out a message via our Skype account (flashphoner.com / Flashphoner Sales) informing users about the move.
Unfortunately, this message appears to have triggered a block on our Microsoft account (Skype + Teams), most likely due to being flagged as spam. As of now, appeals have not been successful, and the account remains blocked.
Our current contact details:
Microsoft Teams: sales@flashphoner.com — for sales, pre-sales, and licensing inquiries