
Embedding of browser-based online calls to mobile phones and SIP on to a web page
To embed the Click to Call button you should embed the HTML code and all dependence scripts of the API to your website. If done properly, the button or a link placed on any page of your website will initiate a call to the given phone number.
Preparing to embedding the Click to Call button
on to the page
To embed the Click to Call online call button you should prepare Web Call Server and all necessary files and scripts.
- Install Web Call Server to your hosting and import SSL-certificates required to work with the WebRTC technology.
- If you have troubles installing the server, you can run our preconfigured virtual Web Call Server in Amazon Cloud and import the SSL certificate.
- Besides, you can connect to our demo servers at: wss://wcs5-eu.flashphoner.com:8443, wss://wcs5-us.flashphoner.com:8443
- Download the latest build with the required HTML and JavaScript code
- Unpack the build on your web server and open the following files:
- examples/min/click-to-call/Click-to-Call-min.html see on Github
- examples/min/click-to-call/Click-to-Call-min.js see on Github
These files are the minimum code required to put a link or a button for browser-based calls from your website. Let’s take a closer look.
HTML and JavaScript code to embed the online call button to the web page
Here are the description of the main elements of Click-to-Call-min.hml and Click-to-Call-min.js scripts.
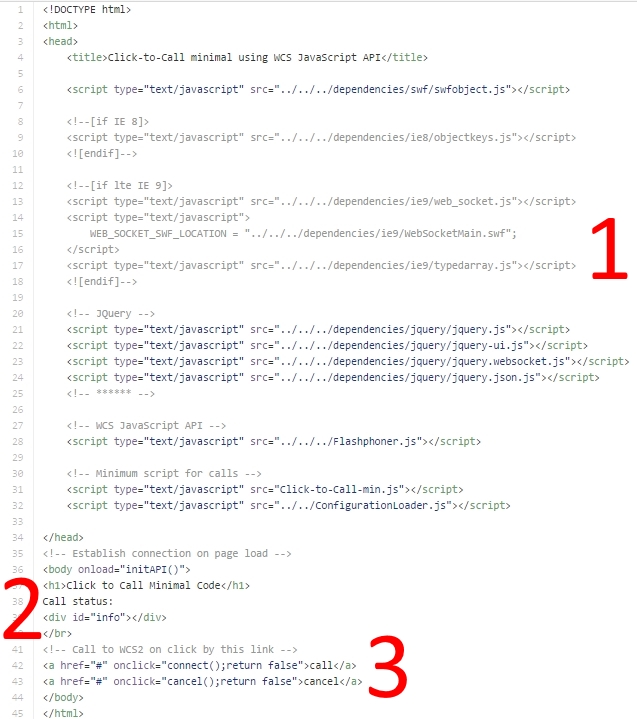
Click-to-Call-min.html
The HTML file is short and basically consists of three blocks:
- Dependencies
- Call status output
- The ‘Call’ link
All dependencies are listed in the head HTML element. These are a set of scripts required to capture audio from the microphone, connect to the server and play the voice of the subscriber.
The block with the ‘info’ id outputs the current status of the call, and a click to the ‘Call’ link initiates calling. Corresponding blocks are marked with numbers on the screenshot.
Click-to-Call-min.js
The important functions of this script are marked with numbers
- Obtaining the link to the Flashphoner API
- Initializing the API
- Establishing connection to the server
- Calling
- Successful connection event (line 51). We can male a call after that.
Therefore, when the ‘Call’ link is clicked two things happen: connection to the server is established and, as soon as the server confirm the successful connect, the call itself.
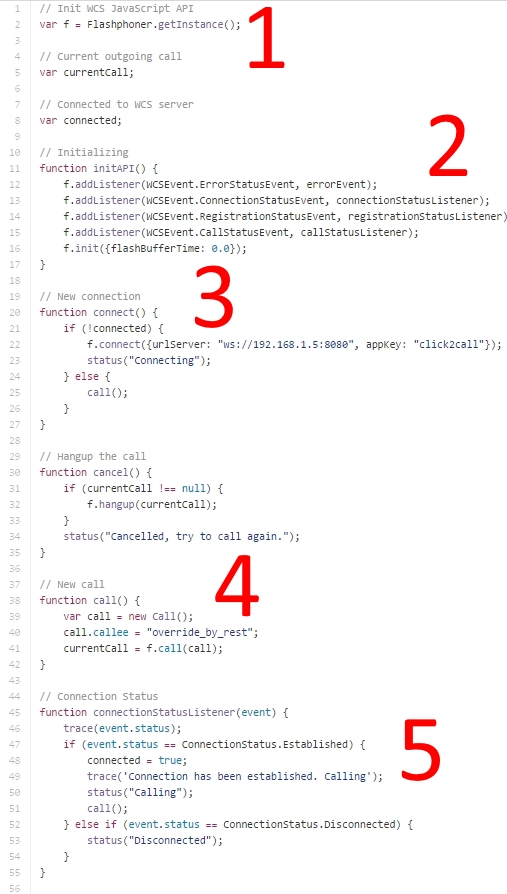
The following lines perform establishing the connection and making a call:
22
f.connect({urlServer: “ws://192.168.1.5:8080”, appKey: “click2call”});
40
call.callee = “override_by_rest”;
To conduct your own tests you will need to specify your own values here.
For example,
22
// Data to connect to the SIP-gateway
f.connect({urlServer: ‘wss://wcs5-us.flashphoner.com:8443’, appKey: ‘defaultApp’,sipLogin:’TEST009′,sipPassword:’12345678′,sipDomain:’sipnet.ru’,sipPort:5060});
40
// The phone number of the callee
call.callee = ‘+79230000000’;
If the parameters are specified properly, the call to the mobile phone is made. For debug, use Chrome / Developer Tools. To test your SIP gateway, use the free Xlite or Linphone SIP softphones.
In this example we simply insert the SIP parameters directly into the code and a user can see them. This is ok if you can permit calling to specific numbers only in your SIP provider account or on the digital switch under your control. Otherwise, it is not advisable to reveal and store SIP data in the code of the web client.
Web Call Server features wide integration and customization capabilities. It can be configured to not store any data on the web client. In this case, on every call attempt Web Call Server requests SIP data required for the call via the protected connection to your web server or script. Hence, the secret data are not passed to the client and are not available to the user, therefore providing the maximum security.
The full documentation of integration capabilities of the server can be found in the Administrator Guide and in the Call flow
In the Testing section you can find thorough description of Click to Call tests.
This page is out of date
Please visit the actual page describing integration of click-to-call into your HTML-code
Download Web Call Server 5
System requirements: Linux x86_64, 1 core CPU, 2 Gb RAM, Java
Installation:
- wget https://flashphoner.com/download-wcs5.2-server.tar.gz
- Unpack and install using 'install.sh'
- Launch server using command 'service webcallserver start'
- Open the web interface https://host:8444 and activate your license
If you are using Amazon EC2, you don't need to download anything.