Evil empires are often a target of grudge and hate from end users. This is understandable and sometimes even justified, but nevertheless Uber still partially pays for our trips (even though it’s temporarily) and Google accelerated the WebRTC technology, which otherwise would stay a proprietary and expensive software tool for quite a narrow b2b purposes if not for the Evil Empire of Google.
Since WebRTC has been made public, video chats became much easier to develop. A number of API and services, servers and framework has emerged for that. In this article we thoroughly describe one more way to develop a video chat between a web browser and a native Android application.
Video chat in a browser
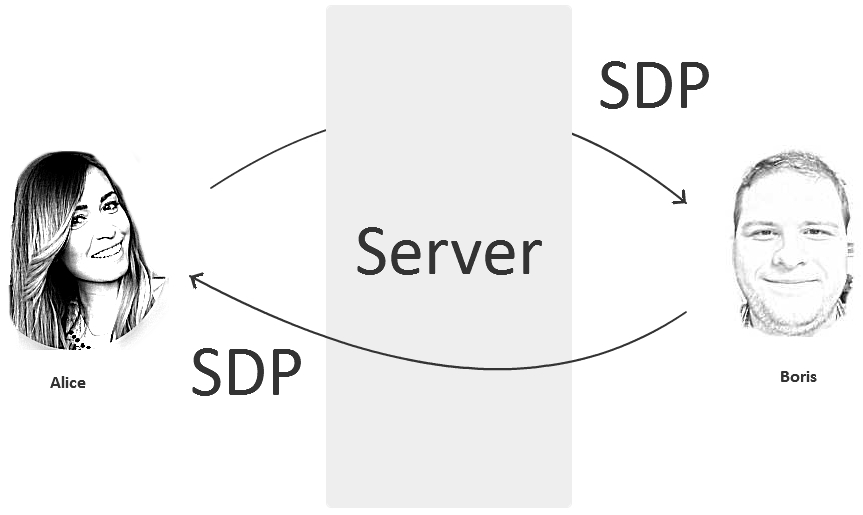
A classic WebRTC video chat between browsers starts from SDP (session description protocol) exchange. Alice sends her SDP to Boris, and Boris responds with his one. SDP is a config like below:
o=- 1468792194439919690 2 IN IP4 127.0.0.1
s=-
t=0 0
a=group:BUNDLE audio video
a=msid-semantic: WMS 9nKsWmxMvOQBYaz9xhRffWeWSUbCbnox6aQ4
m=audio 9 UDP/TLS/RTP/SAVPF 111 103 104 9 0 8 106 105 13 110 112 113 126
c=IN IP4 0.0.0.0
a=rtcp:9 IN IP4 0.0.0.0
a=ice-ufrag:kSrQ
a=ice-pwd:4uIyZd/mbVSVe2iMFgC1i3qn
a=fingerprint:sha-256 6B:29:2F:47:EB:38:64:F3:25:CE:BD:E6:B0:3F:A6:FA:55:57:A9:EA:44:0B:7C:45:D2:0D:F4:96:8D:B2:9F:BA
a=setup:actpass
a=mid:audio
a=extmap:1 urn:ietf:params:rtp-hdrext:ssrc-audio-level
a=sendonly
a=rtcp-mux
a=rtpmap:111 opus/48000/2
a=rtcp-fb:111 transport-cc
a=fmtp:111 minptime=10;useinbandfec=1
a=rtpmap:103 ISAC/16000
a=rtpmap:104 ISAC/32000
a=rtpmap:9 G722/8000
a=rtpmap:0 PCMU/8000
a=rtpmap:8 PCMA/8000
a=rtpmap:106 CN/32000
a=rtpmap:105 CN/16000
a=rtpmap:13 CN/8000
a=rtpmap:110 telephone-event/48000
a=rtpmap:112 telephone-event/32000
a=rtpmap:113 telephone-event/16000
a=rtpmap:126 telephone-event/8000
a=ssrc:3525514540 cname:drYey7idt605CcEG
a=ssrc:3525514540 msid:9nKsWmxMvOQBYaz9xhRffWeWSUbCbnox6aQ4 09bdb6e7-b4b3-437b-945e-771f535052e3
a=ssrc:3525514540 mslabel:9nKsWmxMvOQBYaz9xhRffWeWSUbCbnox6aQ4
a=ssrc:3525514540 label:09bdb6e7-b4b3-437b-945e-771f535052e3
m=video 9 UDP/TLS/RTP/SAVPF 96 98 100 102 127 97 99 101 125
c=IN IP4 0.0.0.0
a=rtcp:9 IN IP4 0.0.0.0
a=ice-ufrag:kSrQ
a=ice-pwd:4uIyZd/mbVSVe2iMFgC1i3qn
a=fingerprint:sha-256 6B:29:2F:47:EB:38:64:F3:25:CE:BD:E6:B0:3F:A6:FA:55:57:A9:EA:44:0B:7C:45:D2:0D:F4:96:8D:B2:9F:BA
a=setup:actpass
a=mid:video
a=extmap:2 urn:ietf:params:rtp-hdrext:toffset
a=extmap:3 http://www.webrtc.org/experiments/rtp-hdrext/abs-send-time
a=extmap:4 urn:3gpp:video-orientation
a=extmap:5 http://www.ietf.org/id/draft-holmer-rmcat-transport-wide-cc-extensions-01
a=extmap:6 http://www.webrtc.org/experiments/rtp-hdrext/playout-delay
a=sendonly
a=rtcp-mux
a=rtcp-rsize
a=rtpmap:96 VP8/90000
a=rtcp-fb:96 ccm fir
a=rtcp-fb:96 nack
a=rtcp-fb:96 nack pli
a=rtcp-fb:96 goog-remb
a=rtcp-fb:96 transport-cc
a=rtpmap:98 VP9/90000
a=rtcp-fb:98 ccm fir
a=rtcp-fb:98 nack
a=rtcp-fb:98 nack pli
a=rtcp-fb:98 goog-remb
a=rtcp-fb:98 transport-cc
a=rtpmap:100 H264/90000
a=rtcp-fb:100 ccm fir
a=rtcp-fb:100 nack
a=rtcp-fb:100 nack pli
a=rtcp-fb:100 goog-remb
a=rtcp-fb:100 transport-cc
a=fmtp:100 level-asymmetry-allowed=1;packetization-mode=1;profile-level-id=42e01f
a=rtpmap:102 red/90000
a=rtpmap:127 ulpfec/90000
a=rtpmap:97 rtx/90000
a=fmtp:97 apt=96
a=rtpmap:99 rtx/90000
a=fmtp:99 apt=98
a=rtpmap:101 rtx/90000
a=fmtp:101 apt=100
a=rtpmap:125 rtx/90000
a=fmtp:125 apt=102
a=ssrc-group:FID 2470936840 2969787502
a=ssrc:2470936840 cname:drYey7idt605CcEG
a=ssrc:2470936840 msid:9nKsWmxMvOQBYaz9xhRffWeWSUbCbnox6aQ4 ce9235c5-f300-466a-aadd-b969dc2f3664
a=ssrc:2470936840 mslabel:9nKsWmxMvOQBYaz9xhRffWeWSUbCbnox6aQ4
a=ssrc:2470936840 label:ce9235c5-f300-466a-aadd-b969dc2f3664
a=ssrc:2969787502 cname:drYey7idt605CcEG
a=ssrc:2969787502 msid:9nKsWmxMvOQBYaz9xhRffWeWSUbCbnox6aQ4 ce9235c5-f300-466a-aadd-b969dc2f3664
a=ssrc:2969787502 mslabel:9nKsWmxMvOQBYaz9xhRffWeWSUbCbnox6aQ4
a=ssrc:2969787502 label:ce9235c5-f300-466a-aadd-b969dc2f3664
From this SDP config we can say, for example, that it suggests using H.264 and VP8 codecs for video and Opus for audio. Besides, it provides a lot of other information useful for communication: codecs priority, usage of fir, nack, pli feedbacks, the profile level for the H.264 codec is 42e01f – Baseline 3.1, and so on.
When you implement a video chat based on native WebRTC API you should understand what are SDP, candidates, codecs, ICE, STUN, TURN and many other scary words.
WebRTC, Websockets � SIP
Terms WebRTC and Websockets are often confused. Sometimes SIP takes part in this mess too.

Well, we can definitely state that WebRTC is not directly related to neither Websockets nor SIP.
Websockets is simply a convenient way to transmit SDP from Boris to Alice. We could use plain HTTP for that or send SDP by e-mail. SDP messages exchange is signalling information and we can use any protocol to send it. For browsers, the default protocols to send data are Websockets and HTTP. Hence, Websockets is mostly used because it is closer to real time compared to HTTP. You can’t transfer video or audio via Websockets, only signalling information: text and commands.

SIP is a text protocol to exchange messages. WebRTC is often wrongly called SIP in a browser, most likely because SIP messages also use SDP to configure codecs and establish connections.
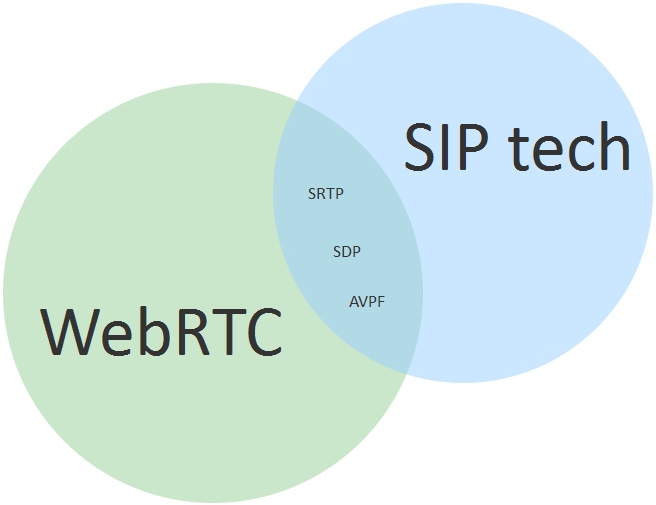
On the other side, when we say something like SIP telephone we mean a device that along with the SIP (RFC3261) protocol also supports a dozen of other network specifications and protocols: RTP, SDP, AVPF, etc.
Indeed, in its core, WebRTC uses construction bricks similar to those used by a SIP telephone (SRTP, STUN, and so on). So one could say that both WebRTC and SIP devices and software use the same technology basis. But calling WebRTC SIP in a browser is incorrect not least because browsers do not have SIP out-of-the-box.
WebRTC is a technology that has three main audio/video transmission functions:
- Capturing, encoding and sending
- Receiving, decoding and playback
- Overcoming NAT and Firewall
Plus a lot of auxiliary functions such as jitter compensation, adaptive bitrate, network overload control and so on.
As described above, in order to successfully transmit media via WebRTC, Alice and Boris should exchange SDP containing detailed information on video stream formats, packeting and other parameters that specify how the SDP sender will receive video.
In addition to exchanging SDP, a TURN-server may be required. This server will pass the video traffic through if the peer-to-peer connection will not be established, for example if Alice or Boris have some unfriendly (for instance, symmetric) NAT.
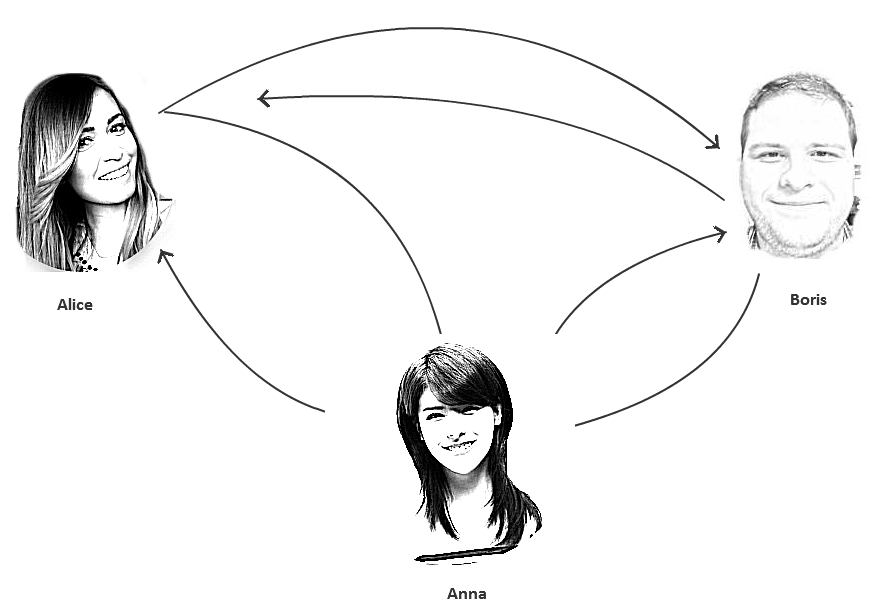
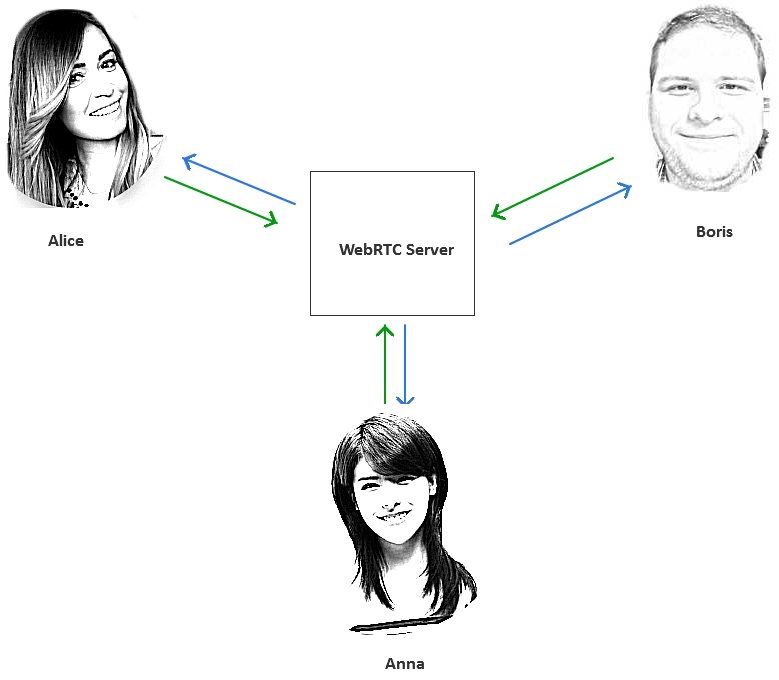
Now, suppose we want to add a third active participant to the chat, or simply another viewer. Here is a good example: debates. Two participants talk while all others just watch. Another example is a chat for three or more participants.
When the third participant arrives, things get more complex. Now every participant needs to capture and compress two video streams instead of just one, and establish mutual connections to overcome NAT. In this case time needed to establish a connection increases while the stability of this connection decreases. Two or more video streams compressed and sent simultaneously creates a serious load to CPU and network and affects the quality especially on mobile devices:
Tasks like these:
- connection of three or more participants
- connection of additional subscribers of the video chat
- recording of the video chat
are beyond the scope of peer-to-peer and require a centralized WebRTC server that will manage all the connections.
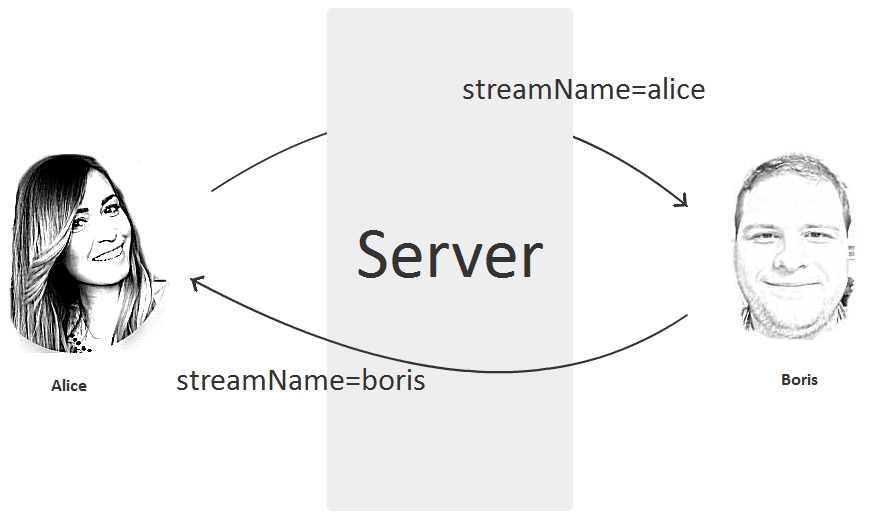
As we said above, there are services and servers as well as more or less convenient API on top of WebRTC API that can speed up development of video chats and allow to work with handier abstractions i.e. Stream, Room, Publisher, Subscriber and so on.
For example, to create the simplest video chat, exchanging names of the streams would be enough. Boris knows Alice’s stream. Alice know Boris’ stream. The video chat is ready:
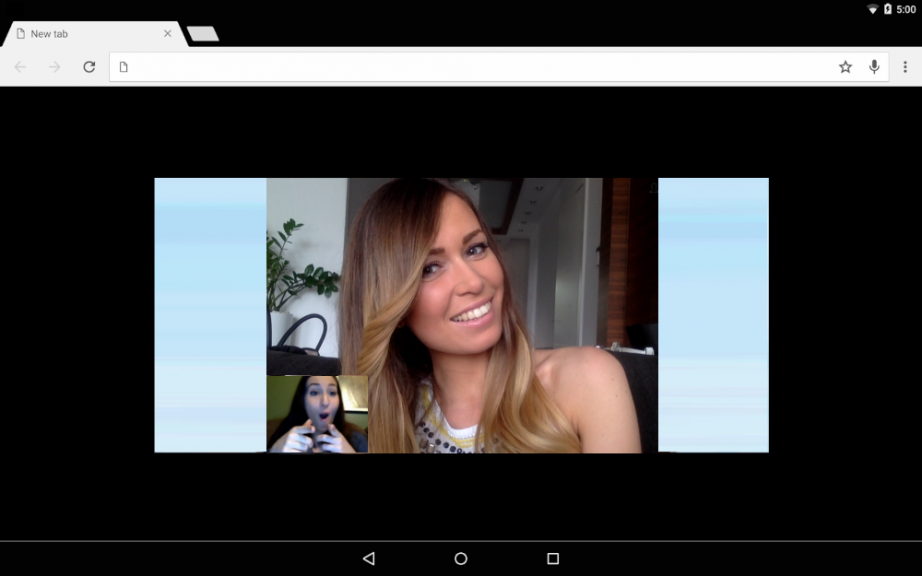
Example of a video chat in a browser
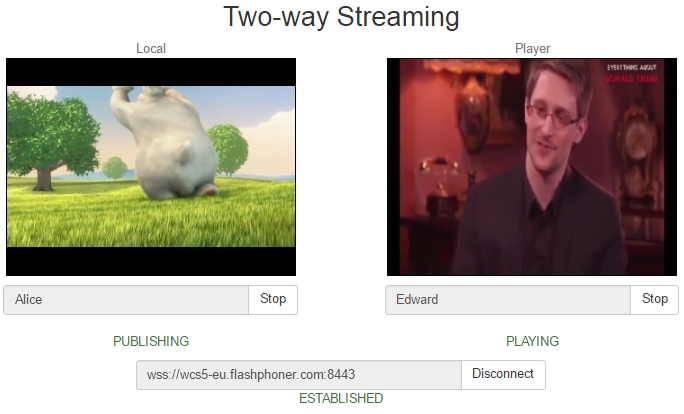
In this article we will demonstrate how Streaming API works with Web Call Server 5 – a WebRTC server for video chats and online broadcasts.
The video chat in action is illustrated on the following two screenshots. The first subscriber Alice sees the video chat like this:
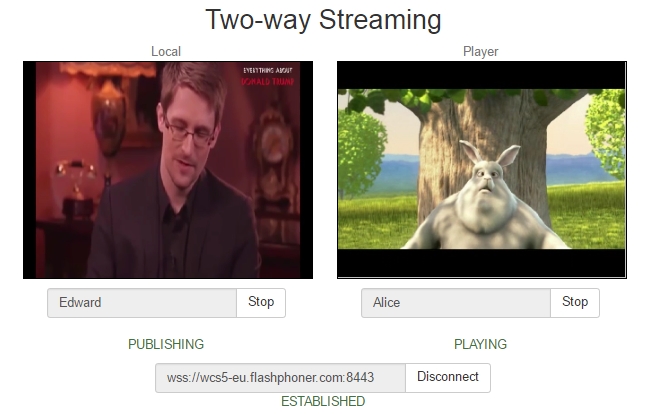
The second subscriber Edward sees the video chat like this:
In this example a few things happen:
- Alice sends the video stream named Alice from the browser to the server.
- Edward sends the video stream named Edward from the browser to the server.
- Alice fetched and played the video stream named Edward.
- Edward fetched and played the video stream named Alice.
As seen from the example, we built a video chat based on the assumption that both Alice and Edward know each other’s stream names. We didn’t directly used SDP, PeerConnection, NAT, TURN, etc.
Therefore, a video chat can be implemented by simply passing names of the streams to those who should play them.
This simple concept allows using any front-end and back-end technologies such as Jquery, Bootstrap, React, Angular, PHP, Java, .Net, and further on. The good news is embedding support for video streams and video chat does not have effect on the existing we application. You control your video chat simply allowing (or denying) given subscribers to play specific video streams.
Source code of the video chat in a browser
Now let’s see how the corresponding code looks. An HTML page with the video chat has two main div elements:
- localVideo – the video captured from the web camera
- remoteVideo – the video that is played form the server
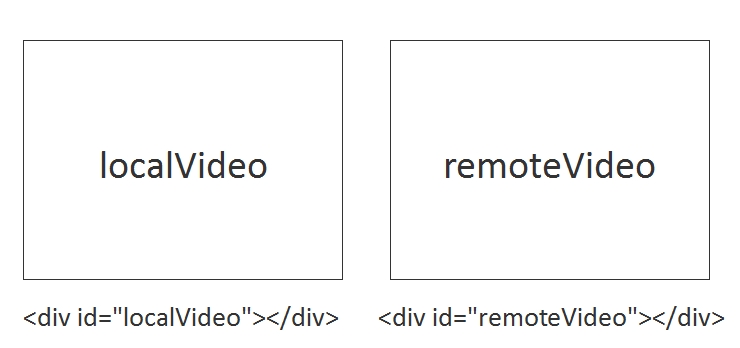
You can assign arbitrary identifiers to this divs, for instance id=”captureVideo” or id=”playbackVideo”, but both div elements must present on the page.
The HTML page with localVideo and remoteVideo blocks looks as follows:
<html>
<head>
    <script language="javascript" src="https://flashphoner.com/downloads/builds/flashphoner_client/wcs_api-2.0/current/flashphoner.js"></script>
    <script language="javascript" src="video-chat.js"></script>
</head>
<body onLoad="init()">
<h1>Video Chat</h1>
<div id="localVideo" style="width:320px;height:240px;border: 1px solid"></div>
<div id="remoteVideo" style="width:320px;height:240px;border: 1px solid"></div>
<input type="button" value="connect" onClick="connect()"/>
<input type="button" value="publish" onClick="publish('Alice')"/>
<input type="button" value="play" onClick="play('Edward')"/>
<p id="status"></p>
</body>
</html>
Now, here is the code that is responsible for sending and playing the video.
Sending the stream from a webcam
To send, we use the session.createStream().publish() API method. For this stream we specify the HTML div element that should display the video captured from the webcam, localVideo, as well as the name of the video stream, Alice, so that any connected client that knows this name will be able to play the stream.
session.createStream({
        name: "Alice",
        display: localVideo,
        cacheLocalResources: true,
        receiveVideo: false,
        receiveAudio: false
    }).on(Flashphoner.constants.STREAM_STATUS.PUBLISHING, function (publishStream) {
        setStatus(Flashphoner.constants.STREAM_STATUS.PUBLISHING);
    }).on(Flashphoner.constants.STREAM_STATUS.UNPUBLISHED, function () {
        setStatus(Flashphoner.constants.STREAM_STATUS.UNPUBLISHED);
    }).on(Flashphoner.constants.STREAM_STATUS.FAILED, function () {
        setStatus(Flashphoner.constants.STREAM_STATUS.FAILED);
    }).publish();
Playing the stream from the server
To play, we specify the name of the stream that we want to play, and the HTML div element, remoteVideo, that should display the stream received from the server. We use the session.createStream().play() API method.
session.createStream({
    name: "Edward",
    display: remoteVideo,
    cacheLocalResources: true,
    receiveVideo: true,
    receiveAudio: true
}).on(Flashphoner.constants.STREAM_STATUS.PLAYING, function (playStream) {
    setStatus(Flashphoner.constants.STREAM_STATUS.PLAYING);
}).on(Flashphoner.constants.STREAM_STATUS.STOPPED, function () {
    setStatus(Flashphoner.constants.STREAM_STATUS.STOPPED);
}).on(Flashphoner.constants.STREAM_STATUS.FAILED, function () {
    setStatus(Flashphoner.constants.STREAM_STATUS.FAILED);
}).play();
While working with the server, the HTML page will receive various statuses from it, i.e. PLAYING, STOPPED for playback and PUBLISHING, UNPUBLISHED for publishing. Therefore, the basic thing we need to do for a video chat to work is to place two div blocks on the web page and include the corresponding scripts that will execute stream.play() and stream.publish() for the given stream name. The full source code of the Two Way Streaming example can be downloaded here.
Example of a WebRTC video chat in an Android application
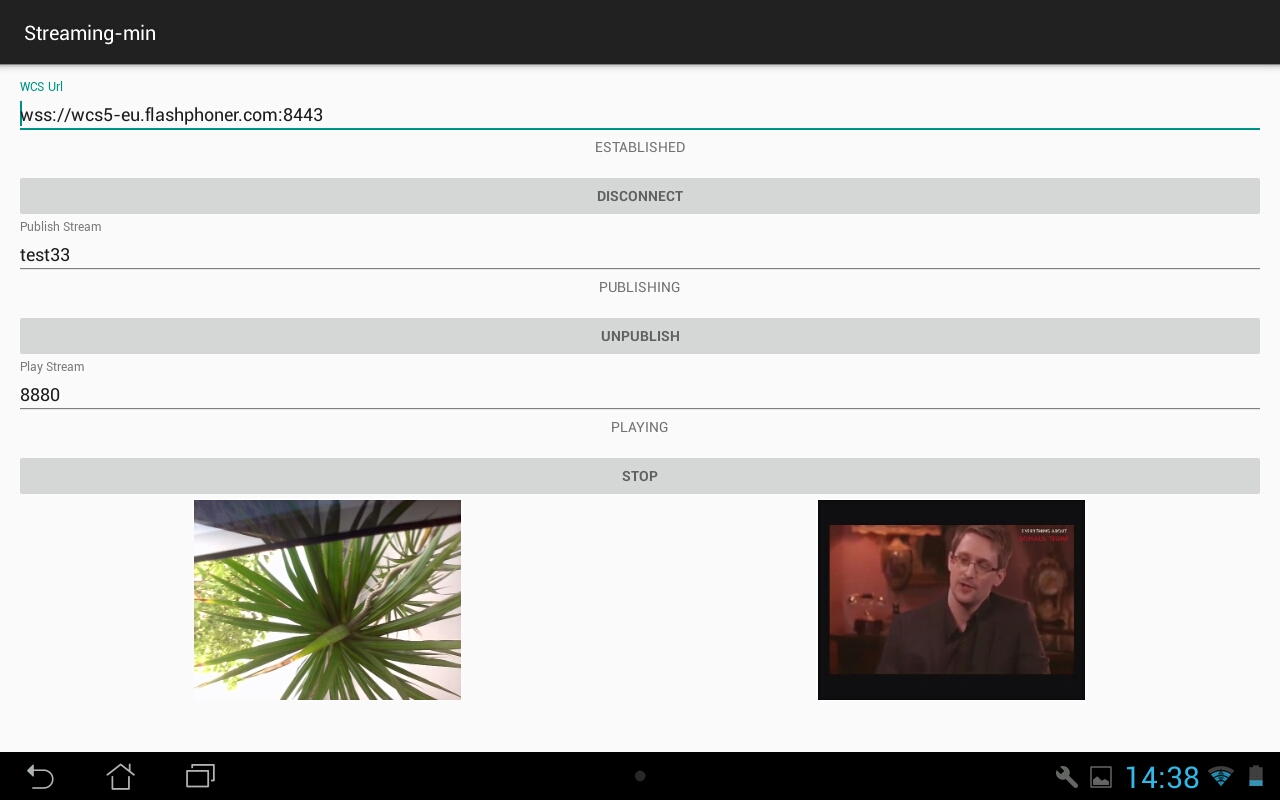
The video chat for Android works exactly the same way as a video chat in a browser. The app establishes connection to the server and sends a video stream from the camera of the Android device, as well as receive and play the other video stream from the server. Below is the Android app Streaming Min (a mobile version of the Two Way Streaming example for a video chat in a browser), that allows to exchange video streams.

As you can see from the screenshot, nothing has changed. We have two video windows. The left one displays the video captured from the webcam, and the right one displays the video received from the server. Exchanging of video stream is too based on stream names. We publish one stream and play the other one.
Source code of the video chat for an Android application
While to create a video chat in a browser we used Web SDK that includes the flashphoner.js API script, for a full-featured Android application we need to import the aar-file of the Android SDK to the project. To understand how this works, we recommend to build and execute the Streaming Min example based on the Android SDK. All examples are available in the github repository.
1. Download all examples
git clone https://github.com/flashphoner/wcs-android-sdk-samples.git
2. Download SDK
wget https://flashphoner.com/downloads/builds/flashphoner_client/wcs-android-sdk/aar/wcs-android-sdk-1.0.1.25.aar
3. Link SDK as the aar-file to examples.
cd export
./export.sh /tmp/wcs-android-sdk-1.0.1.25.aar
Note, we tell the export.sh script the path to the downloaded file: wcs-android-sdk-1.0.1.25.aar – Android SDK
As a result, in the export/output folder you will find a completely configured project that you can open in Android Studio
Now you only need to build the examples using gradle.
1 – Create a new run configuration
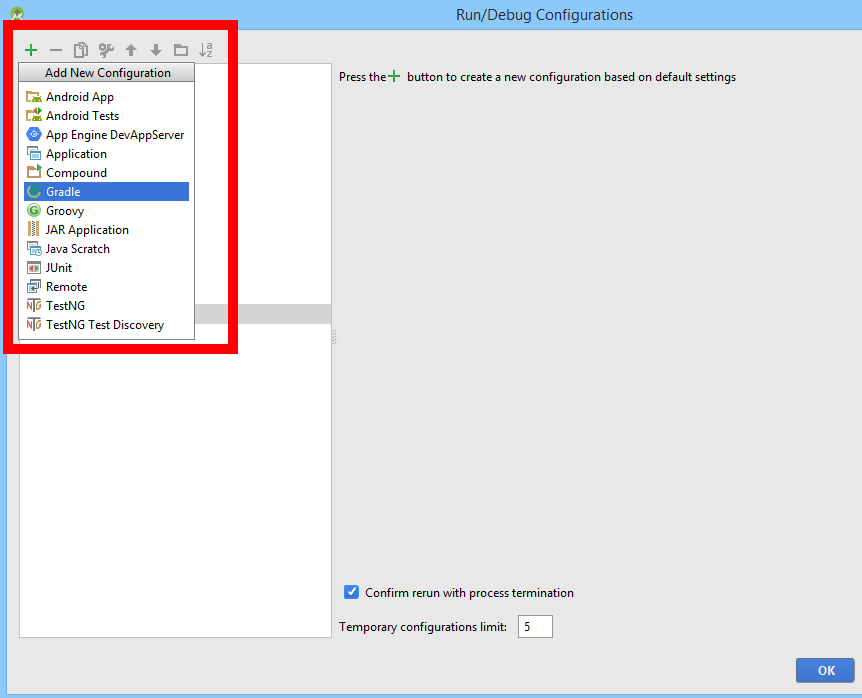
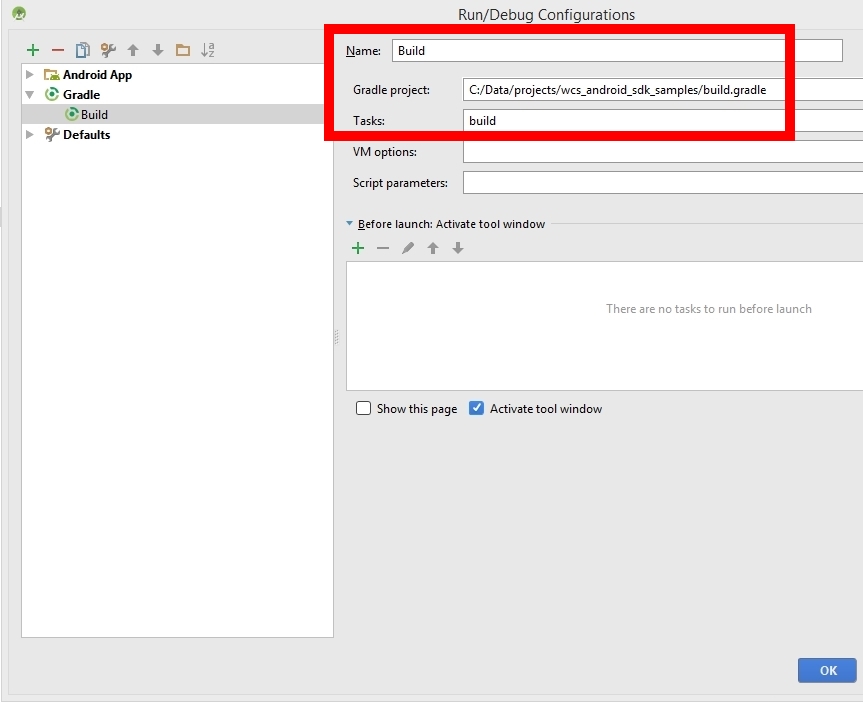
2 – Select the Gradle script
3 – Build
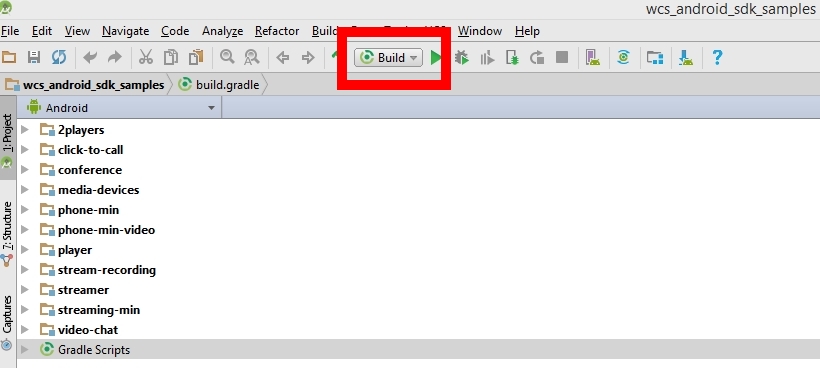
As a result, we should receive apk-files, that can be installed to an Android device. In this example we exchanged video streams with a browser. The video stream test33 was sent from the Android device to the server and played in a browser. The video stream 8880 was sent by the browser and played on the Android device. Therefore we ended up with a two-way audio and video communication between the browser and the Android app.
In the Web version of the video chat we used HTML div elements for video. On Android, we use renderers.
private SurfaceViewRenderer localRender;
private SurfaceViewRenderer remoteRender;
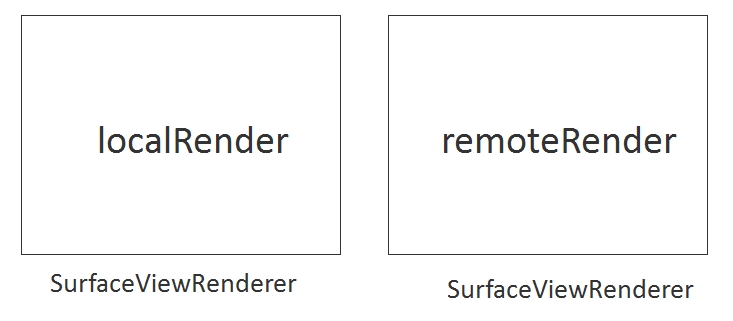
The localRenderer displays the video captured from the camera of the Android device. The remoteRenderer shows the video received from the server.
1. Establish a connection to the server and set renderers.
sessionOptions = new SessionOptions(mWcsUrlView.getText().toString());
sessionOptions.setLocalRenderer(localRender);
sessionOptions.setRemoteRenderer(remoteRender);
...
session = Flashphoner.createSession(sessionOptions);
…
session.connect(new Connection());
2. Create a stream with an arbitrary name and publish the stream to the server.
StreamOptions streamOptions = new StreamOptions(mPublishStreamView.getText().toString());
publishStream = session.createStream(streamOptions);
...
publishStream.publish();
3. Specify the name of the stream to play and fetch the stream from the server.
StreamOptions streamOptions = new StreamOptions(mPlayStreamView.getText().toString());
playStream = session.createStream(streamOptions);
...
playStream.play();
The full source code of the StreamingMinActivity.java class is available here. And the entire Streaming Min example for Android is available in the repository here.
Web Call Server
In conclusion, we demonstrated how to creare a simple exchange of video streams between an HTML page in a browser and an Android application. Video streams go through Web Call Server that is both the signalling server and an audio and video proxy.
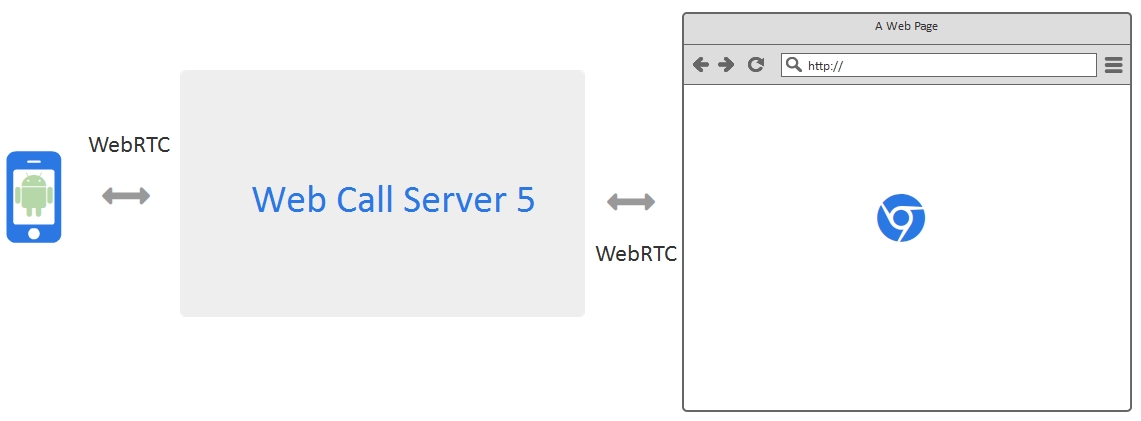
Web Call Server – is a server software that can be installed on Linux, either on a virtual server or a dedicated server. WCS is a streaming video WebRTC server, and it can manage video streams from browsers, iOS and Android devices.
References
Technologies and protocols
WebRTC – WebRTC technology
SDP – Session description protocol, RFC
Websocket – Websocket protocol, RFC
Server and API for video chat development
Web Call Server – WebRTC streaming video server for video chats
Download Web Call Server – install the server
Web Call Server on EC2 – run a server image on Amazon EC2
Web SDK – Web SDK to develop video chats with WebRTC support
Android SDK – Android SDK to develop video chats with WebRTC support
Working examples
Web Two Way Streaming – an example video stream exchange for Web
Android Two Way Streaming – an example video stream exchange Android application
Source codes of examples
Web Two Way Streaming – source code of an example video stream exchange for Web
Android Two Way Streaming – source code of an example video stream exchange for Android