Broadcasting of a SIP Call to RTMP CDN
The Web Call Server 5 feature allows connection to SIP devices and services and delivery of the SIP video call to an external RTMP server or a CDN for further mass delivery of the received content
There is a segment of CDN specializing on delivery of live video content. It is possible to publish RTMP video streams to such CDNs and broadcast the streams to a large and geographically distributed audience. Besides there are few widely used RTMP mediaservers such as Wowza Streaming Engine, Adobe AMS, rtmpd, etc., which are also able to receive media streams and handle some local tasks for delivering streaming video over RTMP protocol.
The given solution based on Web Call Server 5 is designed to connect to VoIP conference services (online meetings) or devices using the SIP protocol and to broadcast the established connection over the RTMP protocol.
The main purpose of the solution is to connect to an existing online conference through a simple SIP-call and broadcast of the running conference to a third party RTMP server or a CDN network for mass delivery or a private show.
Specificaions
Codecs:
- H.264
- G.711
- Speex
Protocols:
- SIP
- RTMP
- REST/HTTP
System requirements:
- Linux x86_64 server
- 1-core CPU at 2 GHz or higher
- 1 GB RAM or more
- 1 GB of disk space
Target systems:
- RTMP CDN
- RTMP Servers
- WCS itself
Interaction diagram
The diagram below shows interaction between the SIP device (or software with SIP support), Web Call Server and CDN software via the RTMP protocol.
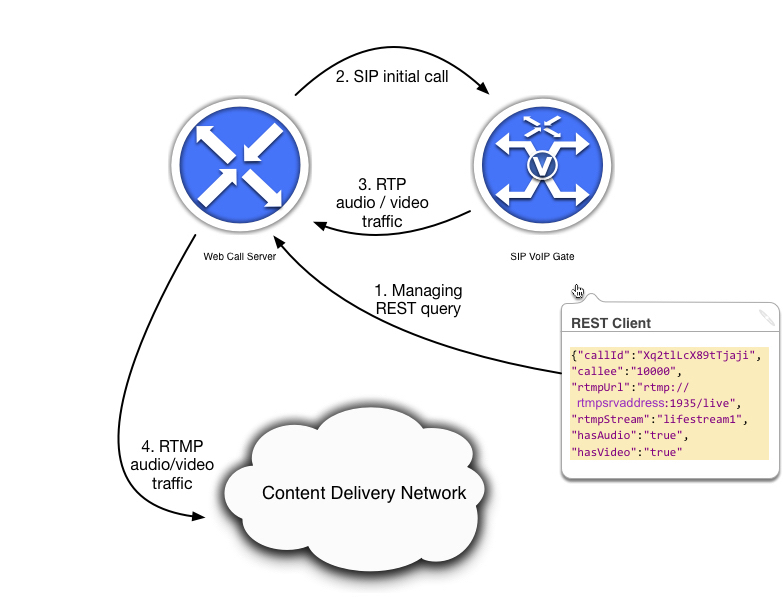
From the diagram above, you can see that the Web Call Server is managed through the REST requests, which can come either from the software that uses REST API, or from a REST console (i.e. extension of Google Chrome).
The first step, shown on the diagram, is a REST request, that contains the data necessary for Web Call Server data – the RTMP server address, the stream name, audio / video traffic presence attributes, the callee “number” and other information.
Upon received the query, Web Call Server makes a call to the SIP device (or software) via the SIP protocol. As a result of the established SIP call, the device will send RTP audio / video traffic to the Web Call Server.
After receiving traffic from the SIP device, Web Call Server sends traffic to the RTMP streaming server or CDN Network.
Below is the sequence diagram that shows the step-by-step sequence of the software interaction:
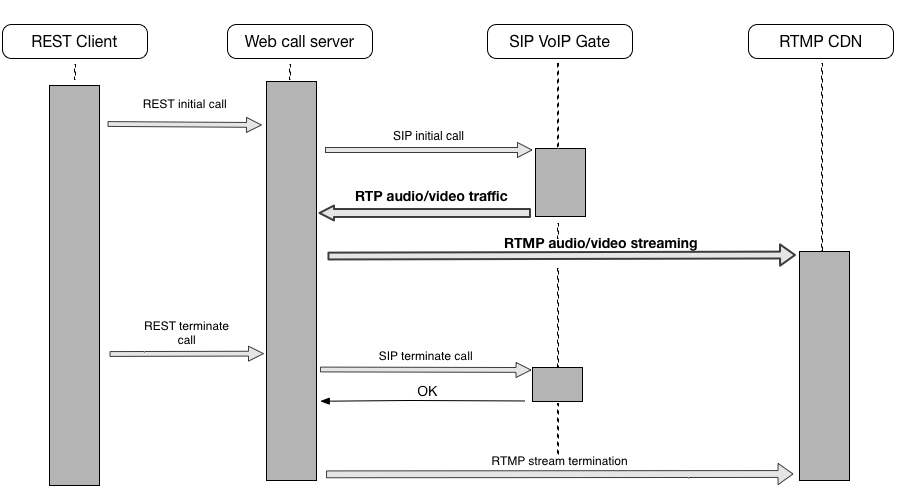
The diagram shows the sequence in which four components interact with each other:
1. REST client – can be a code in a third-party application or extension for Google Chrome.
The REST client sends a query to the Web Call Server. This query orders to initialize interaction between Web Call Server, SIP source and RTMP receiver (roughly speaking this request is about to start the broadcasting). Also the REST client may send a query for the termination of broadcasting.
2. Web Call Server is software that performs conversion of traffic from a SIP source and its subsequent transmission via RTMP to a CDN network or a video streaming server.
3. SIP VoIP Gate – in this case, is an example of a possible source of the traffic that support SIP and RTP protocols. Generally, it can be any other software or device that supports those protocols. The diagram shows that the SIP VoIP Gate receives an initial call from Web Call Server, then respond to such a call by transferring audio / video traffic or by terminating such transfer.
4. RTMP CDN – streaming software that takes traffic from Web Call Server – via RTMP and then shares that traffic among recipients.
SIP Compatibility
The ‘SIP as RTMP’ – option is available with type of services listed below:
-
IP PBX
-
Online meeting services
-
IP PBX online services
Tested With
The ‘SIP as RTMP” option has been tested with the following varieties of software and services:
Streaming software
-
Adobe Media Server
-
Wowza Streaming Engine
IP PBX
-
OpenSIPS
Online meeting services
- Vidyo
- Zoom
- Lifesize
- Blue jeans
- Twilio
All tests were conducted using with the Bria 4 softphone.
Broadcasting Demo
In the administor web-interface of the Web Call Server / Demo there is a ‘SIP as RTMP’ demo client, that is an HTML-page with the implemented JavaScript REST query form and the embedded demo RTMP-player.
The following screenshot shows beginning of testing, that is the first page of the demo interface:
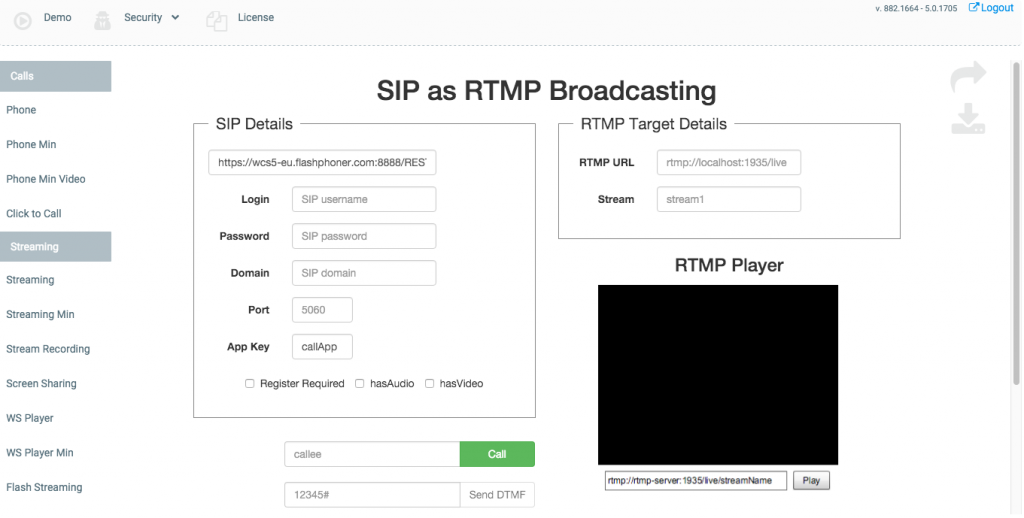
If you choose the ‘open in the new window’ option (the up and right arrow in the top left corner of the screenshot) – a new window is opened. This new window allows for easier use of all capabilities of the demo interface.
The demo interface page is split onto four different functional areas:
SIP Details – this section for entering all available SIP account details (provided by IP PBX service), i.e.: login, password, address of the IP PBX server (domain), port for SIP calls. If IP PBX provider requires registration, check the “register required” option. If the SIP call will use audio – check “hasAudio”. Similarly, check “hasVideo” for a video call.
RTMP Target Details – enter the data about available the RTMP server here. Specifically, enter the streaming server URL and the stream name (for example ‘stream 1’).
RTMP Player – this area shows a player window where all traffic streamed from the RTMP server can be seen. To play the stream, click the “Play” button, to stop that playback, click “Stop”. The broadcast address for the RTMP stream is provided the demo interface automatically
At the bottom of the screen is the SIP Details area. It contains fields for callee “number” and, if necessary, DTMF data. To make a test call or send DTMF data, click the corresponding button next to the above mentioned fields.
At the bottom, the page displays current service information, including the call status and the status of the stream used for broadcasting.
The following screenshot illustrate a successfully established call.
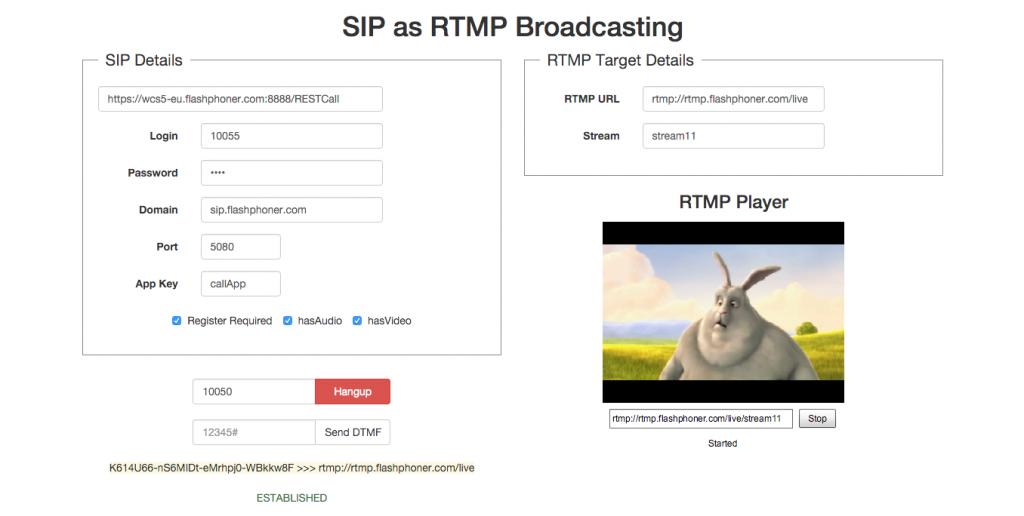
The screenshot above, aside of the data necessary for successful test, also displays – the status of the call (Established) and the status of the RTMP stream broadcast (Started).
In addition, the page also displays the ID of the call and the RTMP server’s URL.
The “Hangup” button terminates the call and the “Stop” button] stops the playback of audio/video traffic in the player window.
Finished call statuses are shown at the screenshot below:
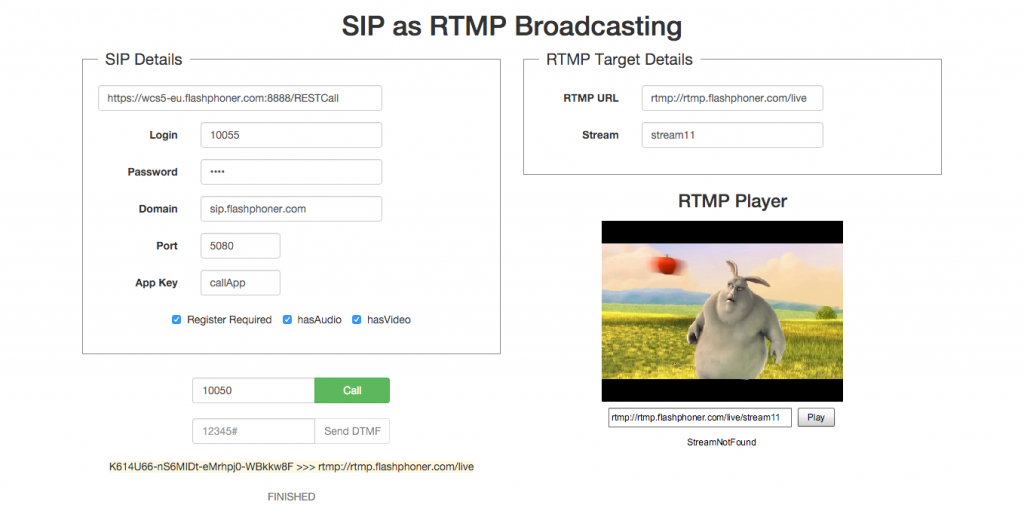
The ‘Established’ status has switched to ‘Finished’ (call is finished) and ‘Started’ has changed to the ‘StreamNotFound’ status (absence of the stream)
The whole testing process using the demo interface is shown in the following video:
Download Web Call Server 5
System requirements: Linux x86_64, 1 core CPU, 2 Gb RAM, Java
Installation:
- wget https://flashphoner.com/download-wcs5.2-server.tar.gz
- Unpack and install using 'install.sh'
- Launch server using command 'service webcallserver start'
- Open the web interface https://host:8444 and activate your license
If you are using Amazon EC2, you don't need to download anything.

